Notes Feature

When we have meetings in a real room together, we often pull out a piece of paper or start noting down lists on a whiteboard. Using Circles you can easily do so, too. On top of being able to quickly jot down thoughts, ideas, intentions, plans or to dos, the Notes feature helps you to keep track of them. Here’s how you can use the feature:

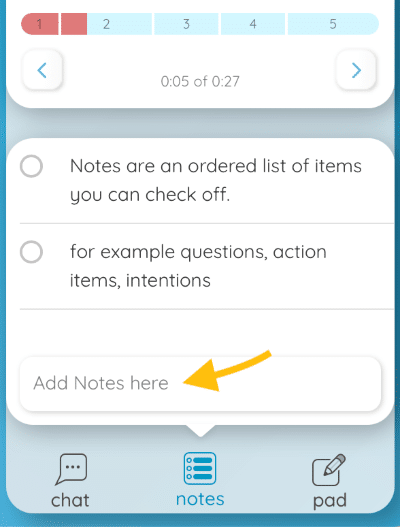
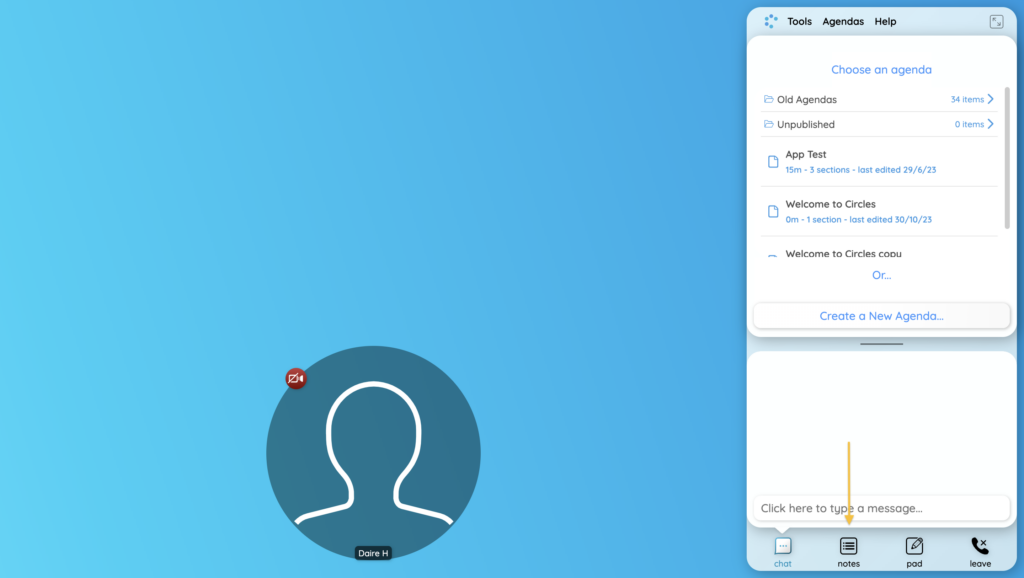
The Notes feature lives in the text box in the bottom right of your CircleSpace™️. Each circle participant can open it at any time by clicking on the ‘Notes‘ icon.
Note Groups

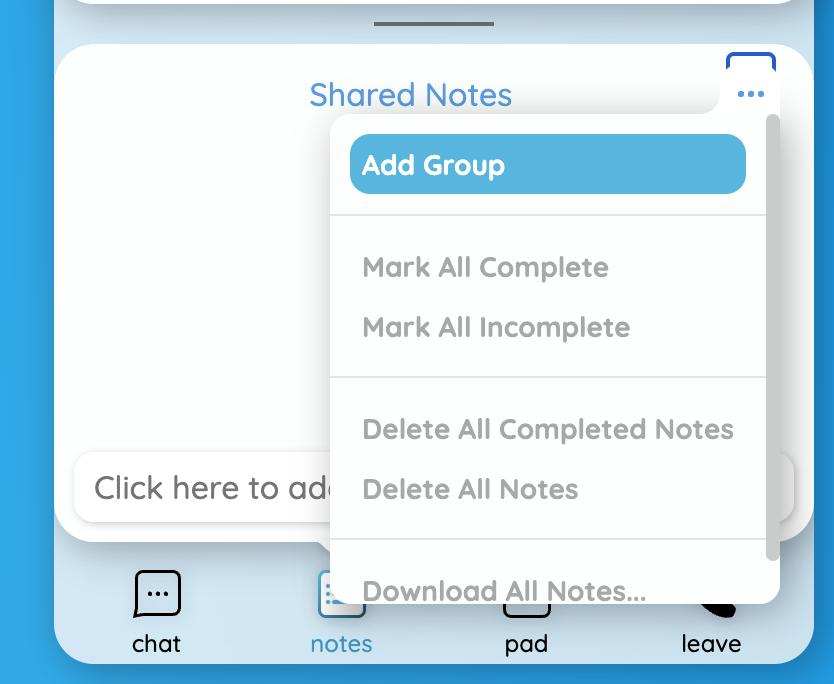
  1. To keep track of your notes, we recommend using Groups. Click the three blue dots at the top of the notes section and selecting ‘Add Group’.
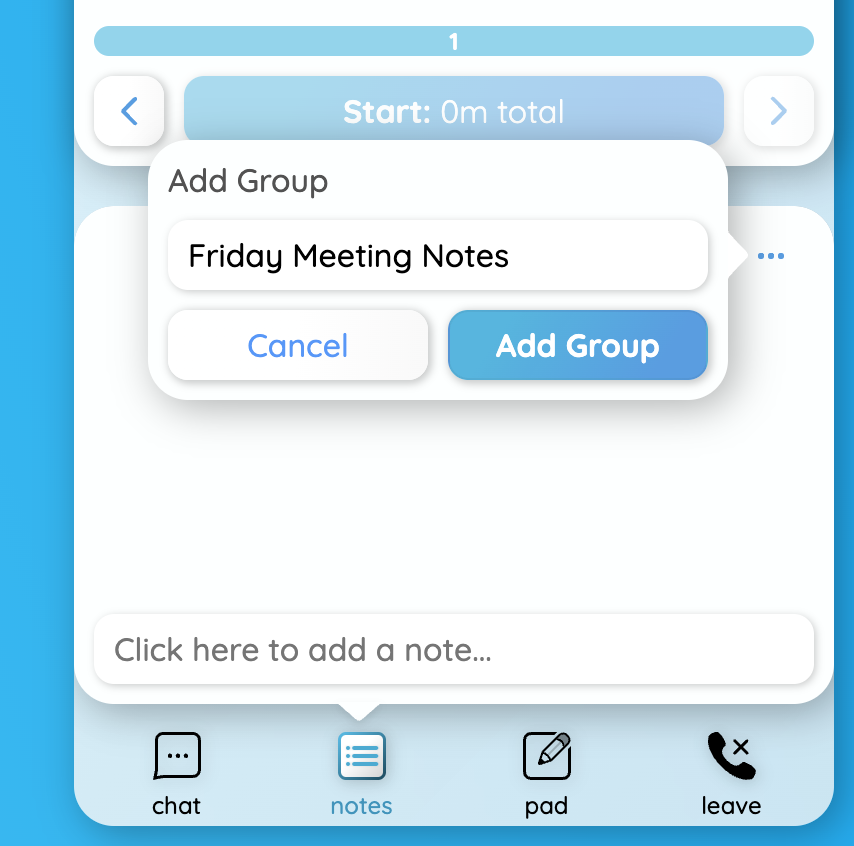
  1. Give your group a name by typing into the box that appears and click ‘Add Group’ to confirm. You could create Groups, for example, for particular meetings, or particular purposes, like (“To be discussed later”, “Urgent topics”, “Backlog” etc.).
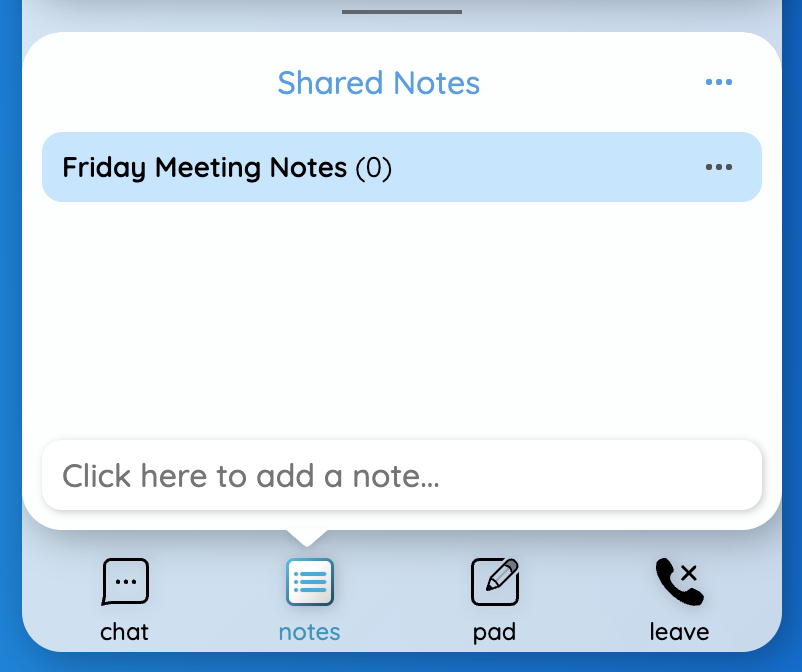
  1. You’ll now see your new group in the list along with the number of notes contained within the group.
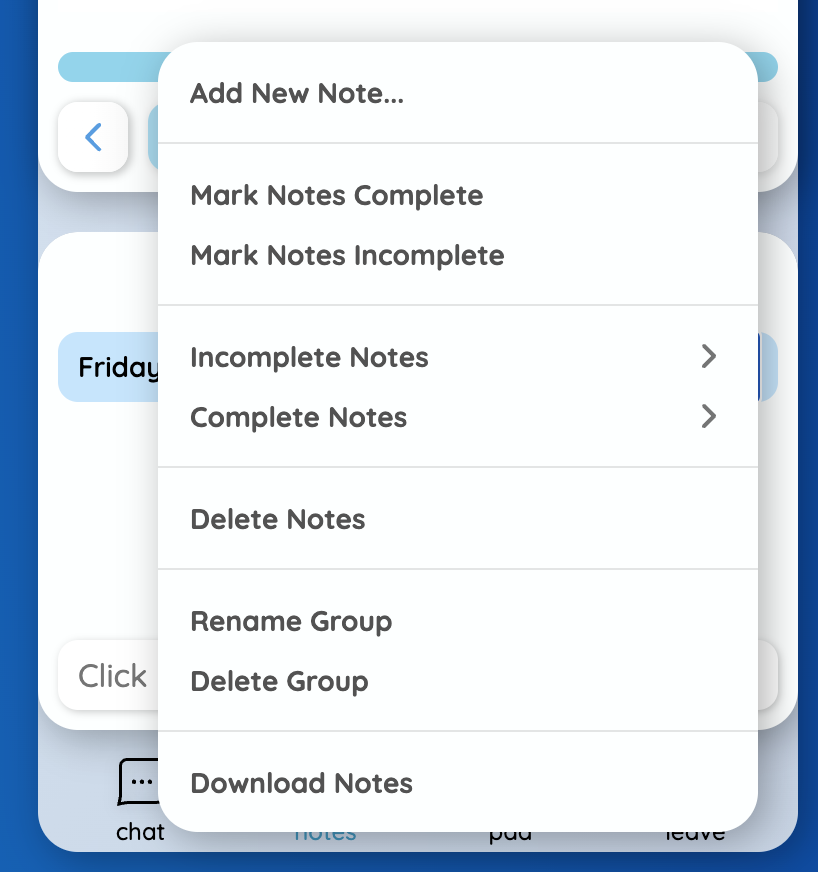
  1. Click the three black dots next to the group name to bring up the notes menu. From here you can:
    • Add notes
    • Mark notes complete or incomplete
    • Delete notes
    • Rename or delete the group
    • Download notes
  1. Within the ‘Incomplete Notes’ and ‘Complete Notes’ sections you have the option to:
    • Mark a complete or incomplete
    • Change the owner of the note
    • Change the group of the note
    • Delete

Adding and Completing Notes

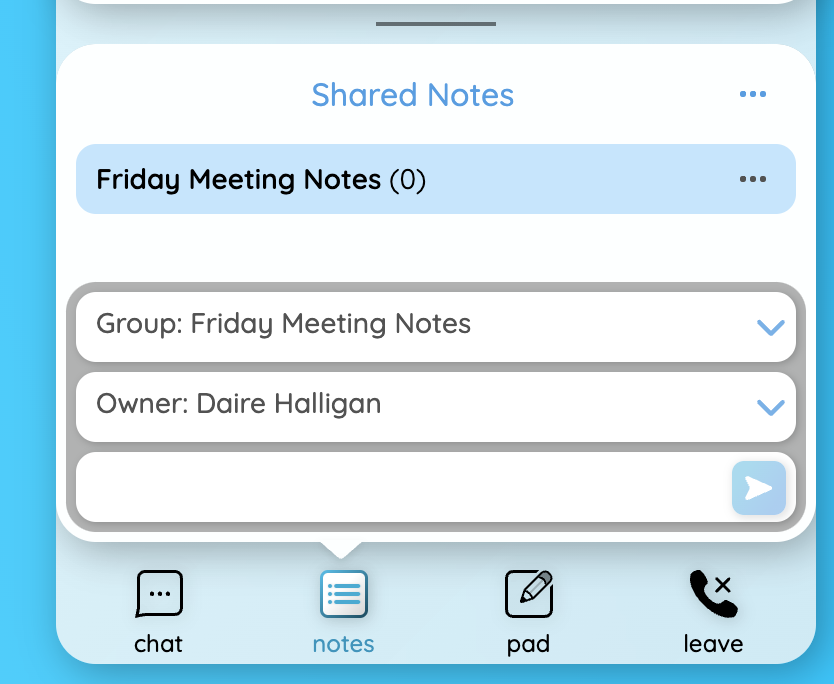
Click in the box at the bottom to add a new note. By default, the note will go to your last edited notes group and assign you as the owner. You can use the drop-down menus to reassign the group or the owner of the note.
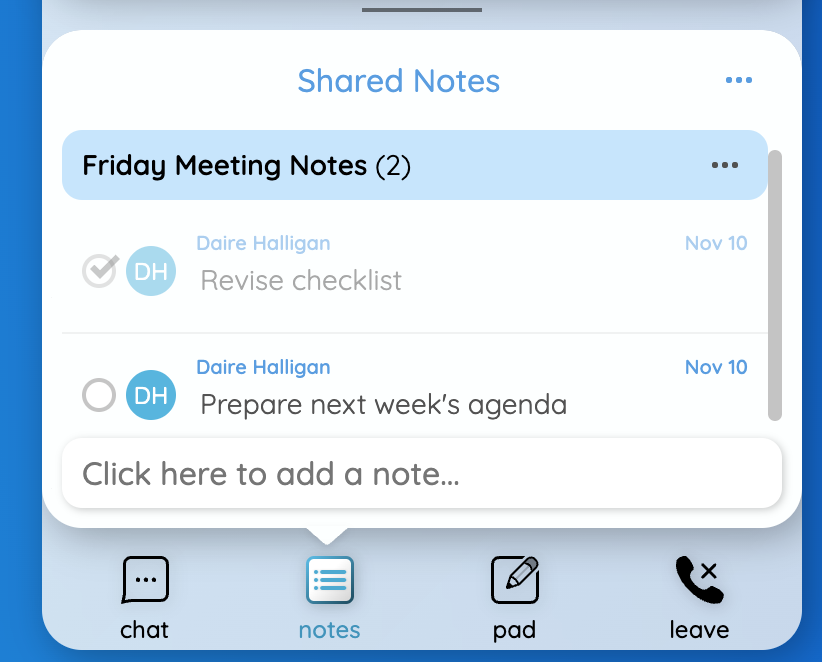
To mark a note as complete, click in the circle to the left of the note’s title, and you will see a tick appear to mark it as complete. This note will disappear before your next session.
Note Taking Mode

Note Taking Mode is a feature designed to make it easy to take notes during live conversation. By reducing note taking to a 0-click process, conversations can now have a seemless flow, but still gather relevant information.

When turned on, this mode lets you start entering notes by tapping the Spacebar, and automatically assigns it to the user with the current random order, the current spotlit user, or the user with the “hand up” icon in that order.

Just tap Space, type the note, hit Enter and you’re done, ready for a new note!

Let’s have a close look at it!

  • Activating Note Taking Mode

Note Taking Mode can be turned on or off using this option in the main Notes menu.

  • Default Appearance

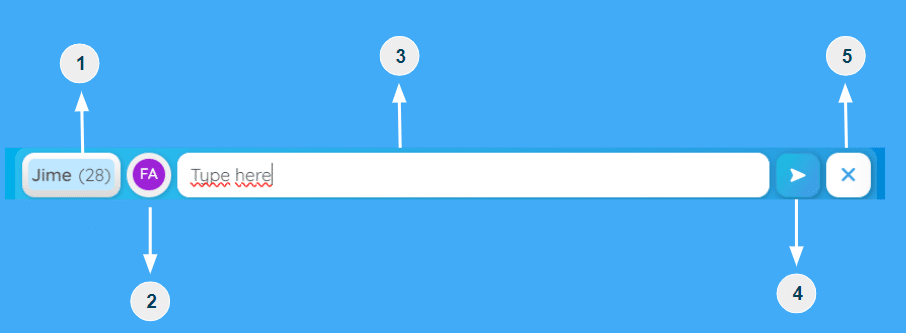
Note Taking Mode adds the “Note Taker” widget to the bottom of your screen. It remains visible until you turn Note Taking Mode off, which you can do in the Notes menu or by clicking the X button.

  • Controls
  1. Group Select: click this for a list of Note Groups. This will remain selected until you change it, so you can set it at the start of a Round and all Notes will go to the same place.
  2. User Select: the Note Taker sets the current user automatically when you start a new note (see later) but if you click this you can then click on a user’s video circle to assign your new note to them instead before you submit it.
  3. Note Entry: this is where you type your note.
  4. Submit: click this or press Enter to submit the new note.
  5. Close: turns off Note Taking Mode. You do not need to do this between taking notes, only do it when you don’t need the Note Taker any more.
  • How to use it

Here is a step by step process for how to use the Note Taker:

  1. Start by turning on the Note Taking Mode
  2. Tap the Spacebar, the Note Taker becomes active:
    • Optional: pick a group for the note
  3. Type your note and tap Enter
  4. The Note is added to the appropriate group!

And that’s all you need to do! After step 4, the Note Taker returns to its empty state and you can repeat the process by tapping Space again.

  • How it picks users

When you hit Space to start a new note, the Note Taker looks for a likely owner in this order:

  1. Does someone have the green light in Random Order? Pick them
  2. Is someone in the Spotlight? Pick them
  3. Does someone have the green hand raise? Pick them
  4. Pick me

So during a Random Order round, most of the time whenever you hit space, the current active talker is going to be the owner it picks. It doesn’t change owners automatically while you’re typing a note, so it doesn’t matter if the order shifts before you’ve finished.

In most cases, you won’t even need to think about the owner.

Remember: You can always click the owner initials to manually select an owner instead.

  • Send to Pad

The Note Takes also lets you send Notes directly to your Pad instead of adding them as Notes. In that case, you should click the Group selector in the Note Taker and choose Save to Pad.

You’ll realize the Note Taker updates to show that the Pad will receive your notes. No Owner is assigned when you save notes to the Pad this way, but you can just hit Space, type a note, hit Enter, and a new line will be added to your pad.

  • Secret shortcut

For the adventurous, there’s an even faster way to add a note for a user: just right-Click on the user’s video circle and you’ll see a new pop-up menu. In this menu you can see their full name, and selecting “Add Note” turns Note Taking Mode on and activates the Note Taker with the user you chose as the note owner!

Viewing Notes During the Session

During your session you might want to display the notes in a larger window for everyone to view. You can do this in a couple of ways:

During your session you might want to display the notes in a larger window for everyone to view. You can do this in a couple of ways:

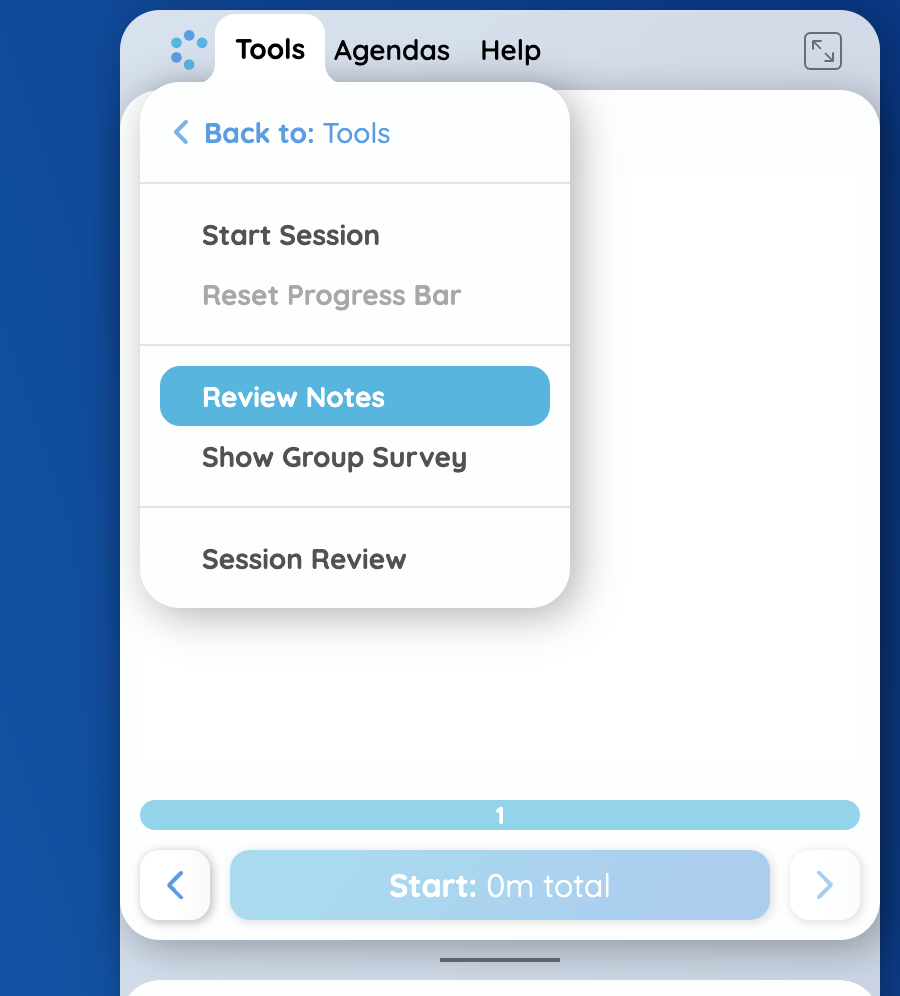
  1. Using ‘Review Notes’:
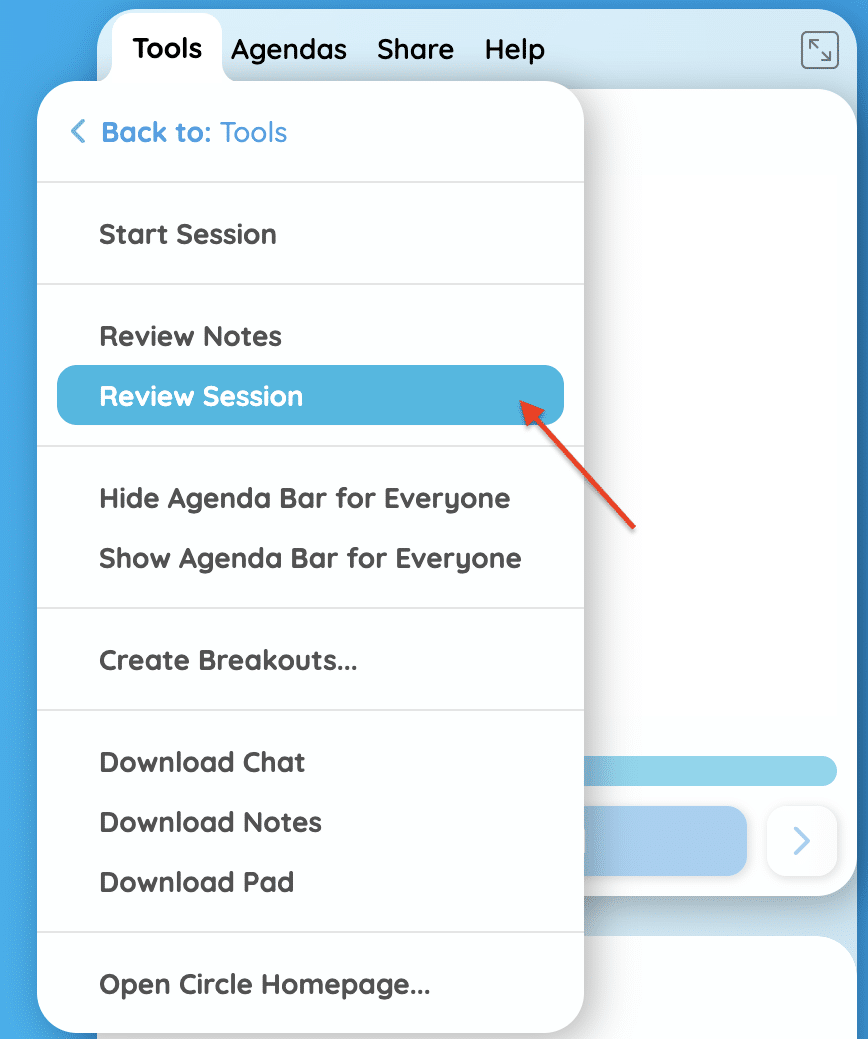
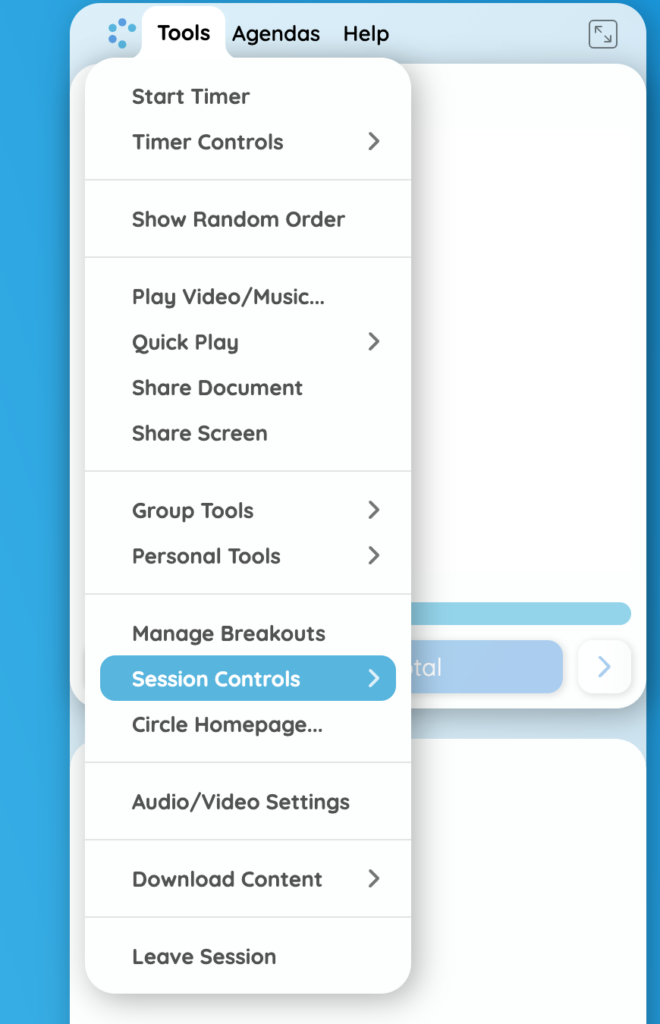
    • Open the Tools menu in the top right of the CircleSpace™️ and select ‘Session Controls’.
    • In the menu that opens choose the ‘Review Notes’ option.
  1. Adding a button to your agenda:
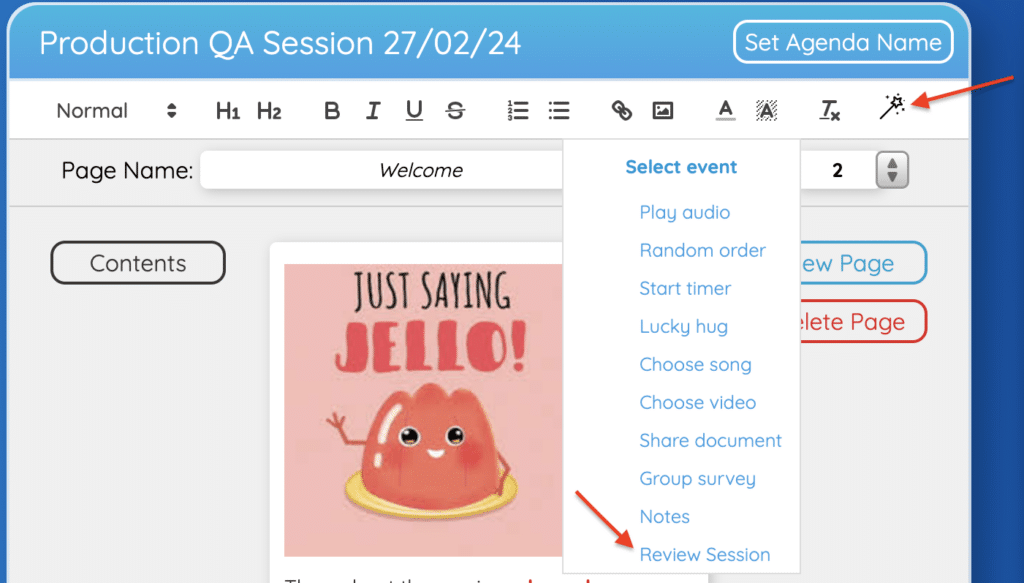
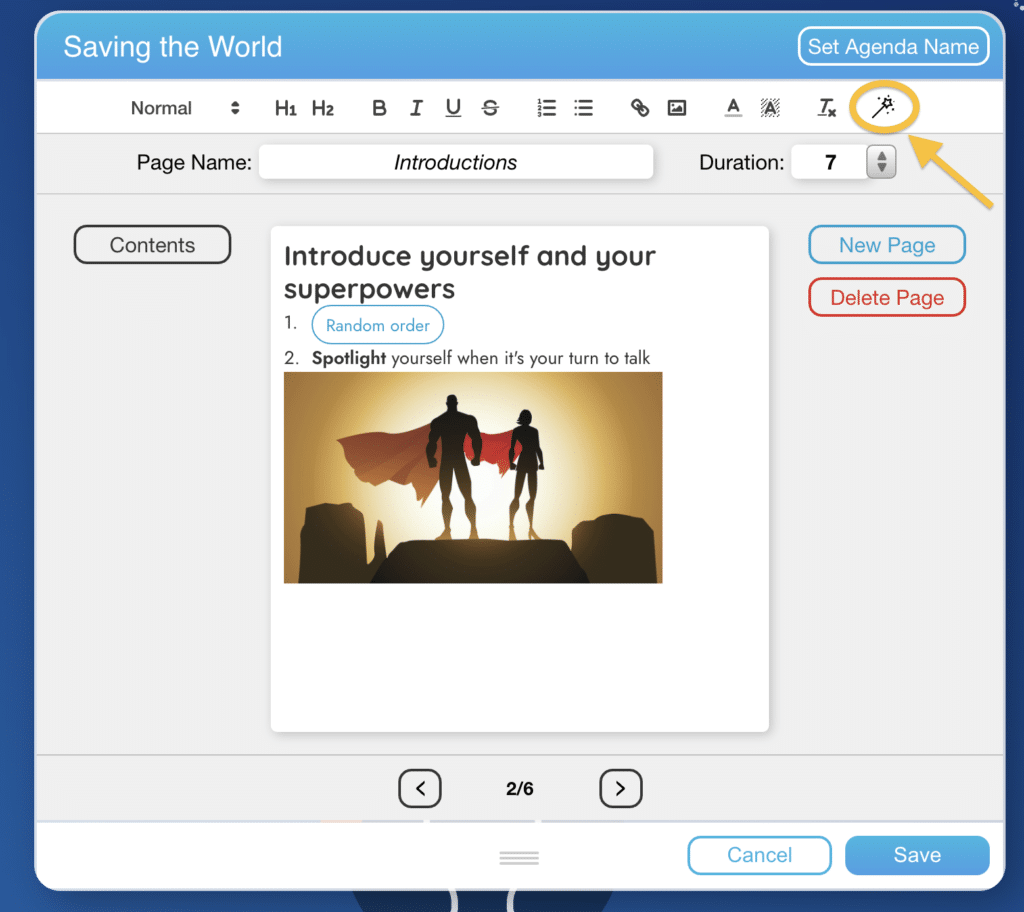
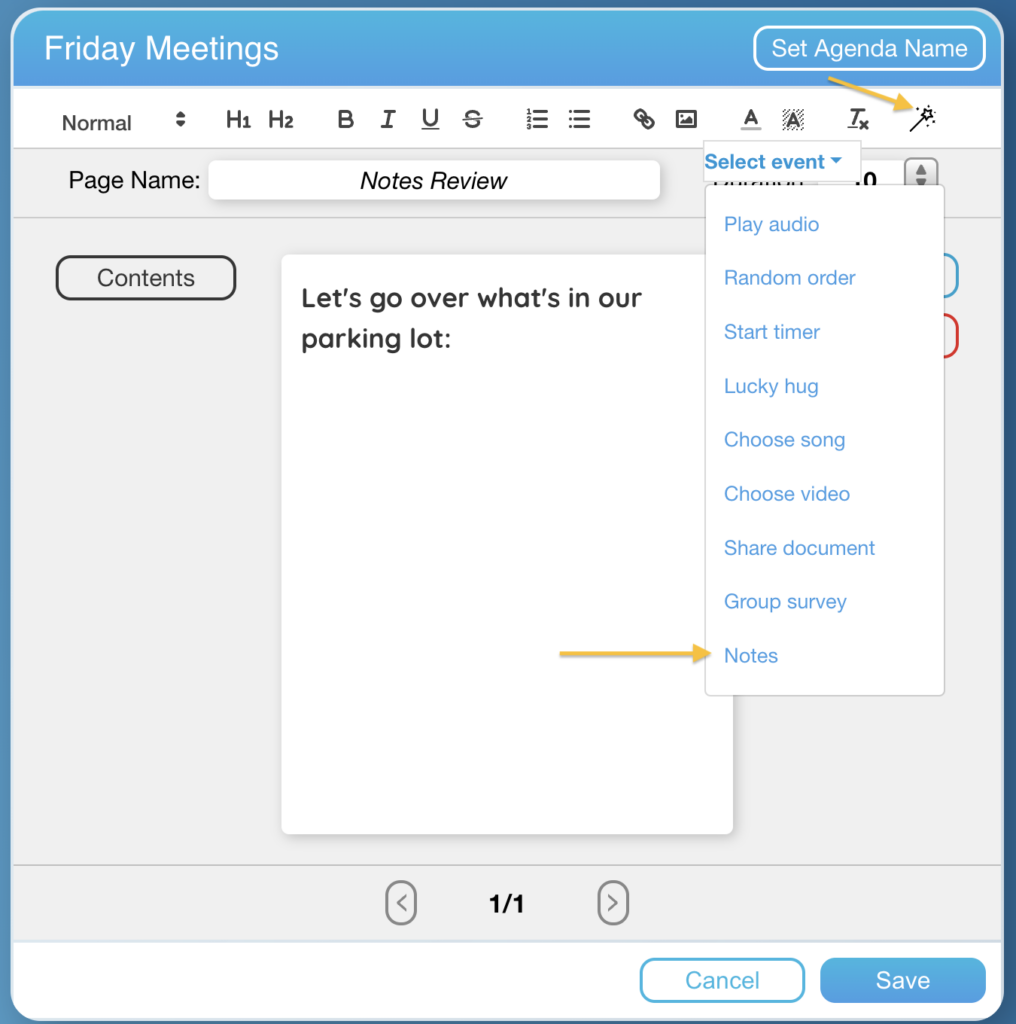
    • In the agenda editor, click the magic wand icon to open the list of agenda buttons.
    • Select ‘Notes’ at the bottom of the list.
Notes will also appear when you open the End of Session Review panel. To learn more about this, check out this article.
Quickstart Circles Session Facilitator

Are you the facilitator for your Circles session and not sure where to begin? Don’t worry, the CirclesSpace™️ will help you! Read on for some handy guidelines on how to get started!

In this article you will learn how to use the CircleSpace™️ to run your sessions:

STEP 1: Start your session

STEP 2: Use the agenda

STEP 3: Use the video stream features

STEP 4: Use the text box

STEP 1: Start your session

We recommend that you come to the CircleSpace™️ in advance of your session to familiarize yourself with the features of the CircleSpace™️ and to get ready to start:

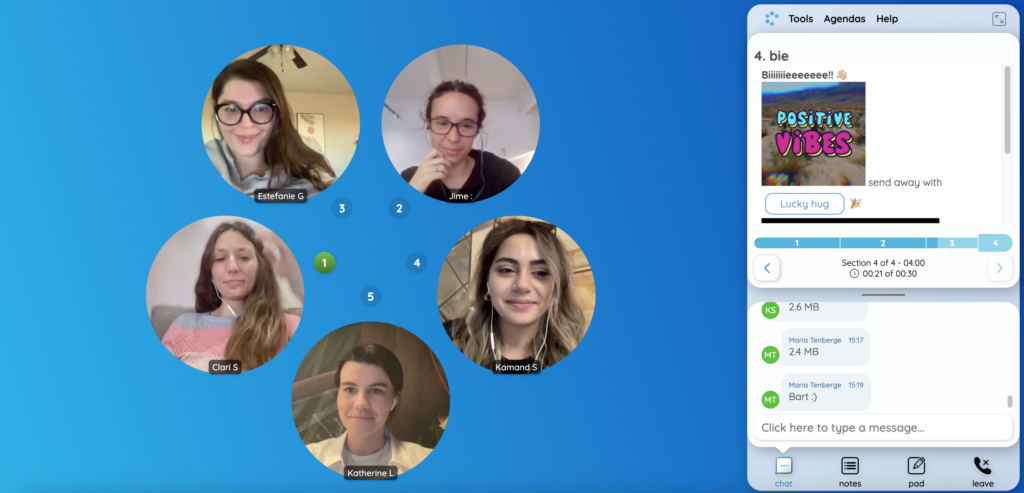
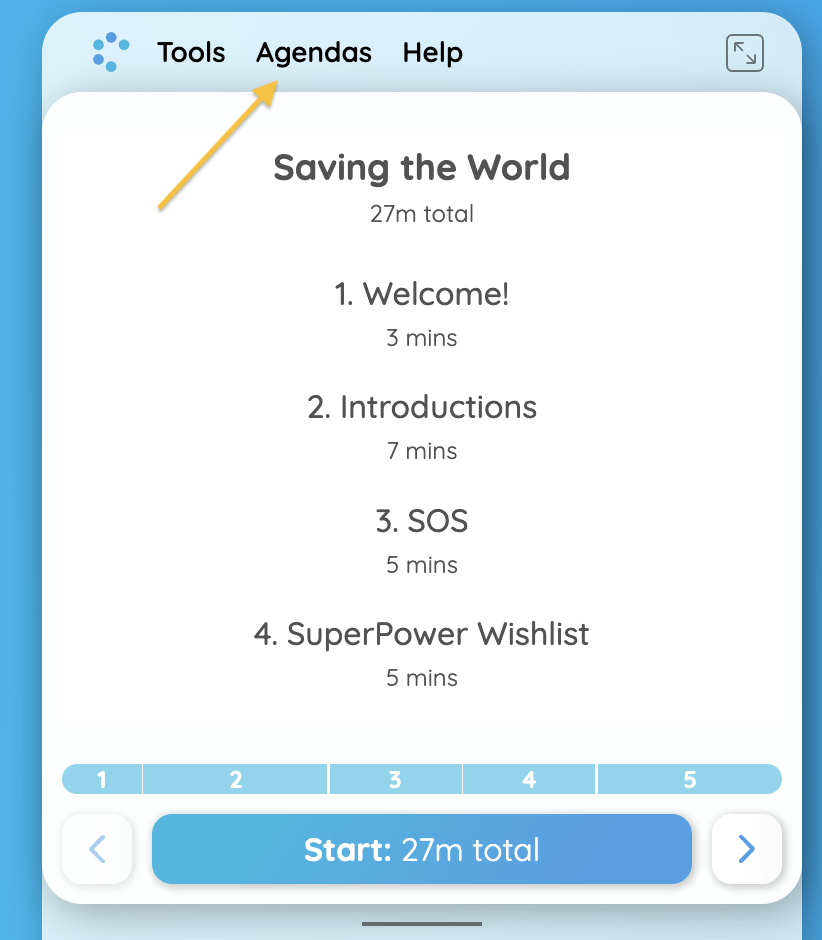
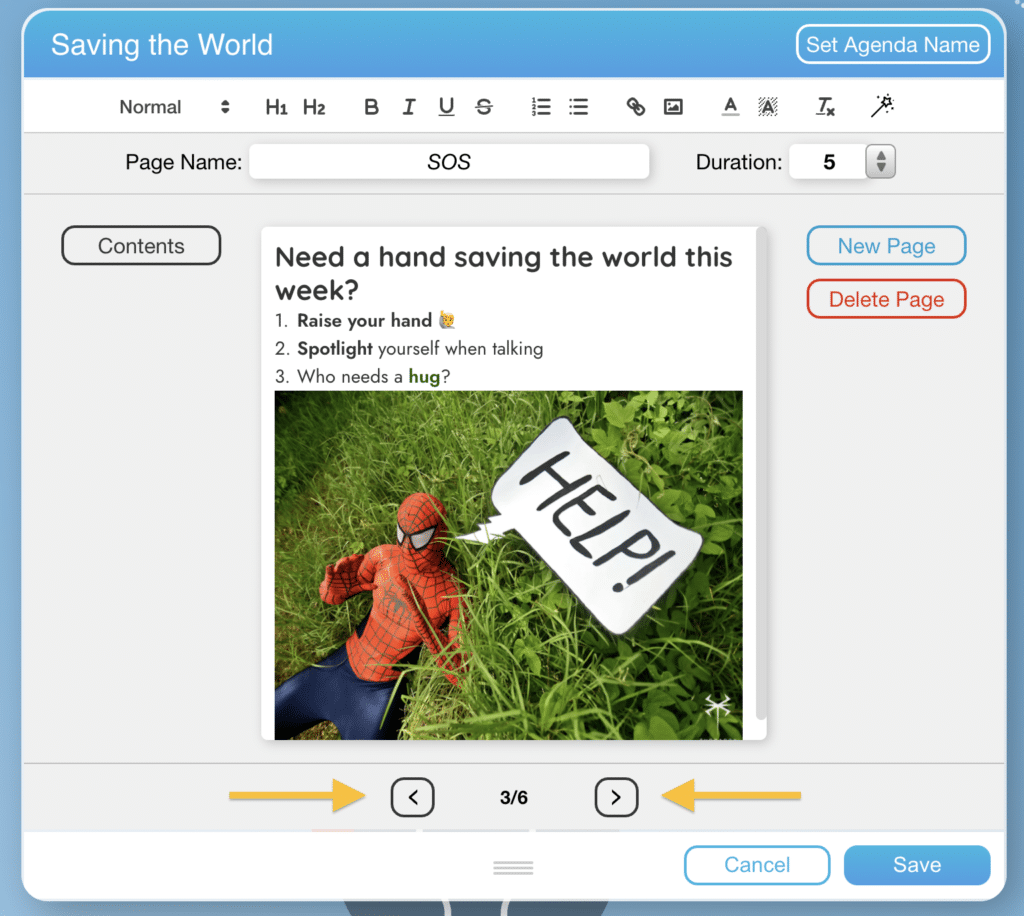
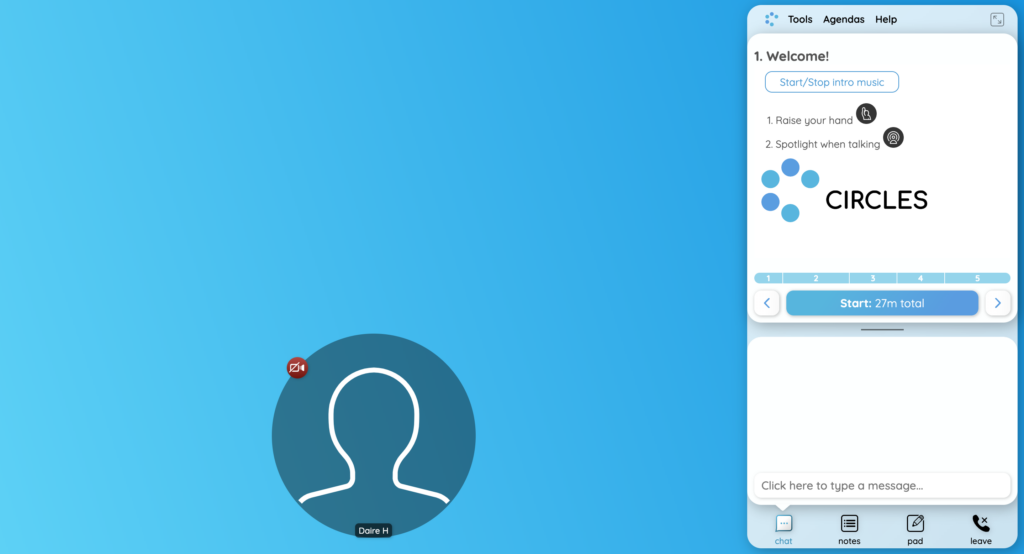
  1. After entering the meeting, you will see a blue background and your agenda and text box on the right side of your browser window. In the picture below, you see the agenda “Saving the World” loaded.
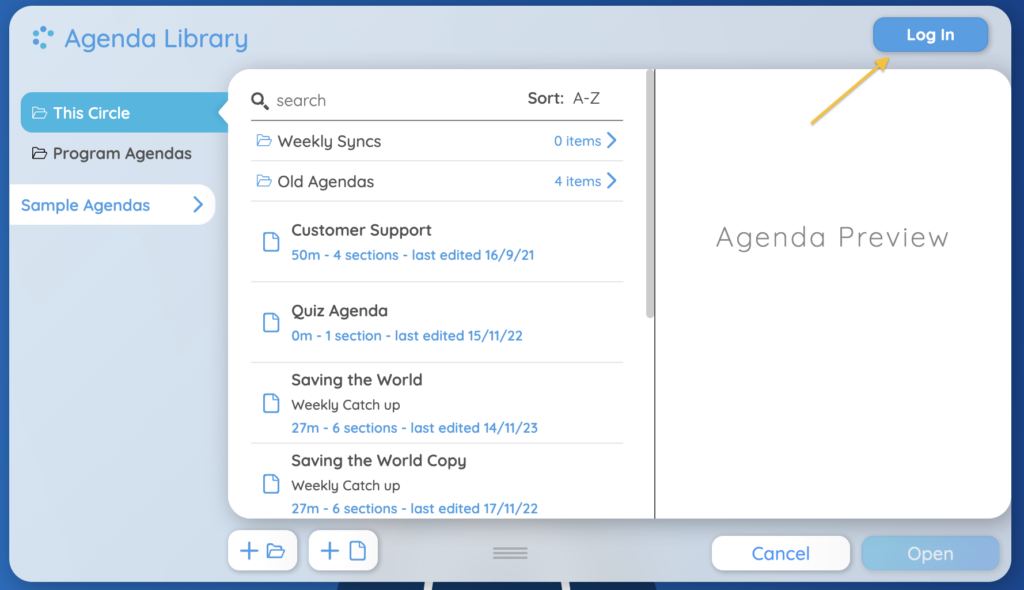
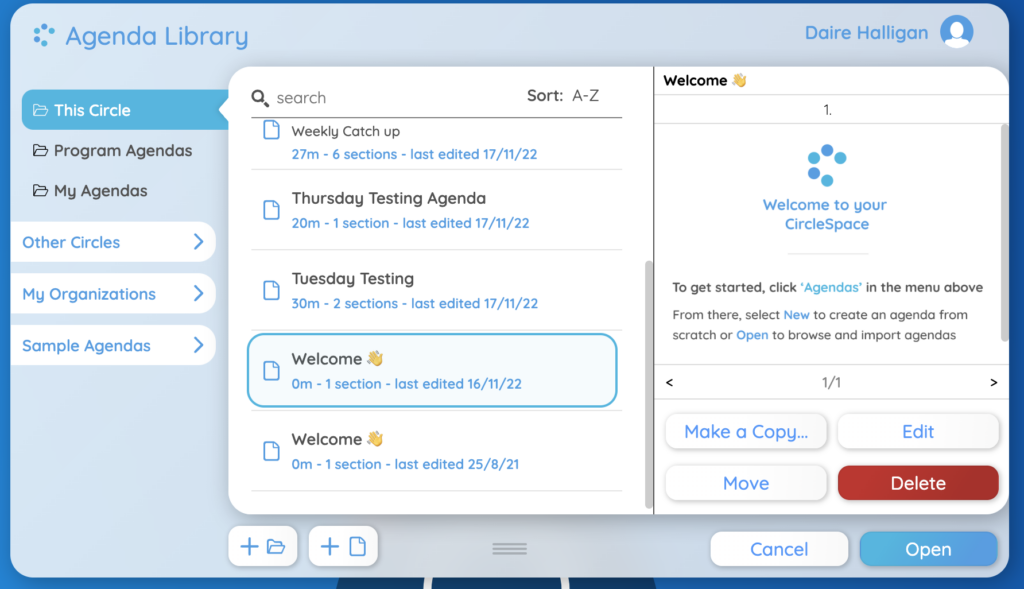
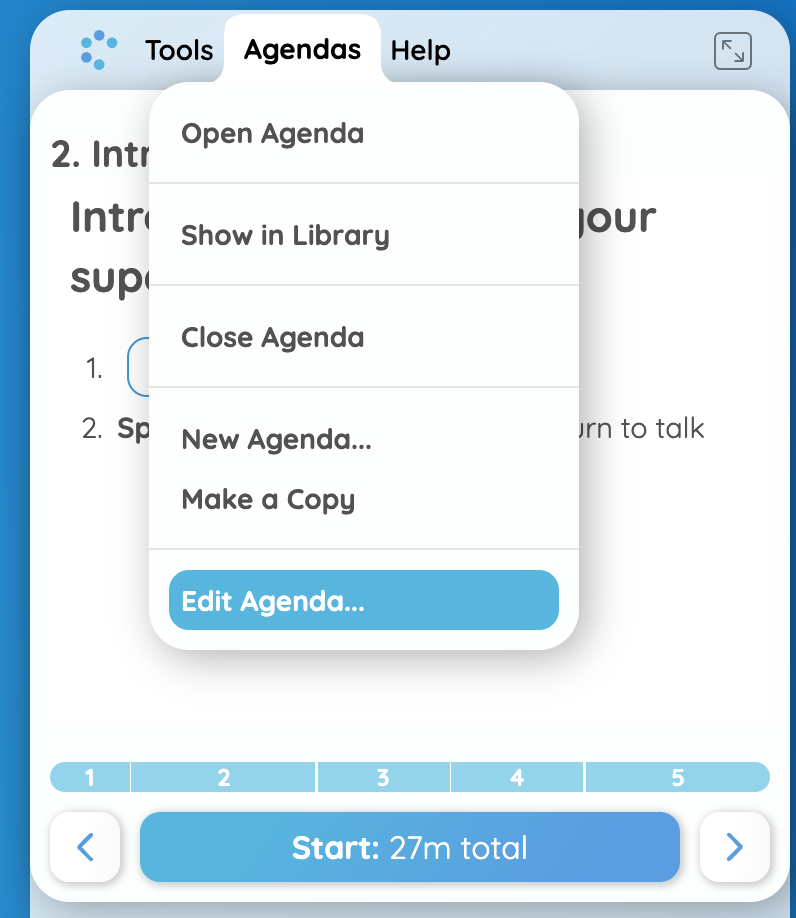
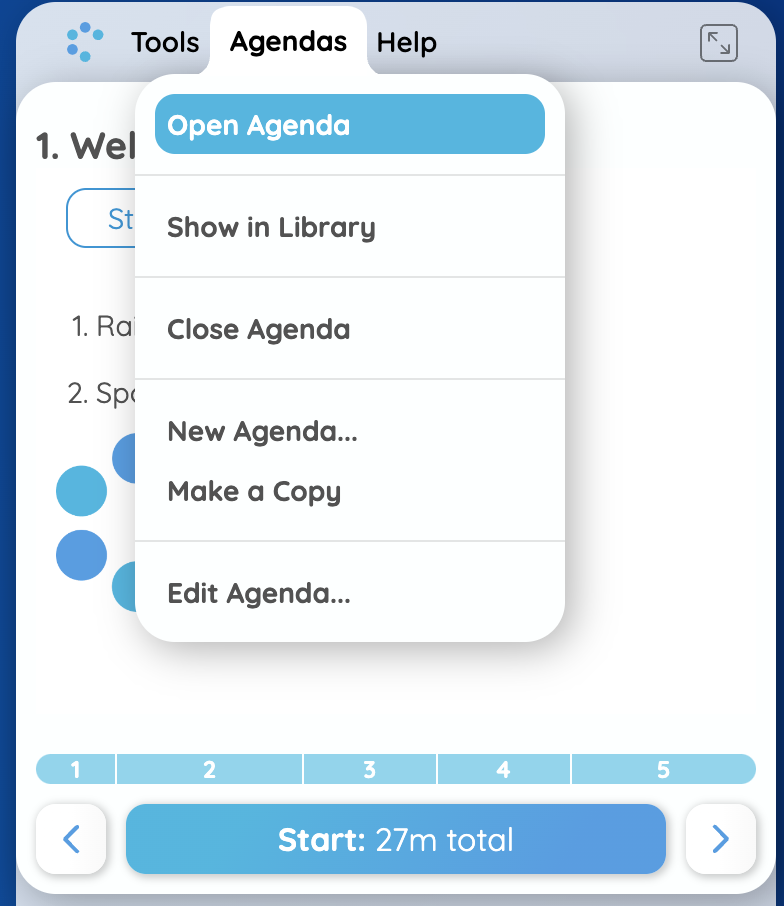
  1. In case you need to open an agenda, select ‘Agendas’ in the header at the top of the agenda. Then select ‘Open…‘ in the menu that pops up. This will bring up your agenda browser.

NOTE: In your agenda browser you can access all of your agendas: You will immediately see the agendas of the circle you are in, the Program Agendas folder (agendas that will appear in the CircleSpace if there is no agenda open) and the Sample Agendas folder, which contains agendas available to everyone on themes like challenge exploration or team gelling.

To access agendas from other circles or organizations, you’ll need to log in using your my.circl.es credentials through the Log In button on the top right.

  1. Click on an agenda to preview it and use the arrows to flip through the pages. Select ‘Open‘ on the bottom right of the agenda browser to load the agenda for your current session into the Circles Space.

NOTE: You can also edit your agenda. Read more about it in how to edit your agenda here.

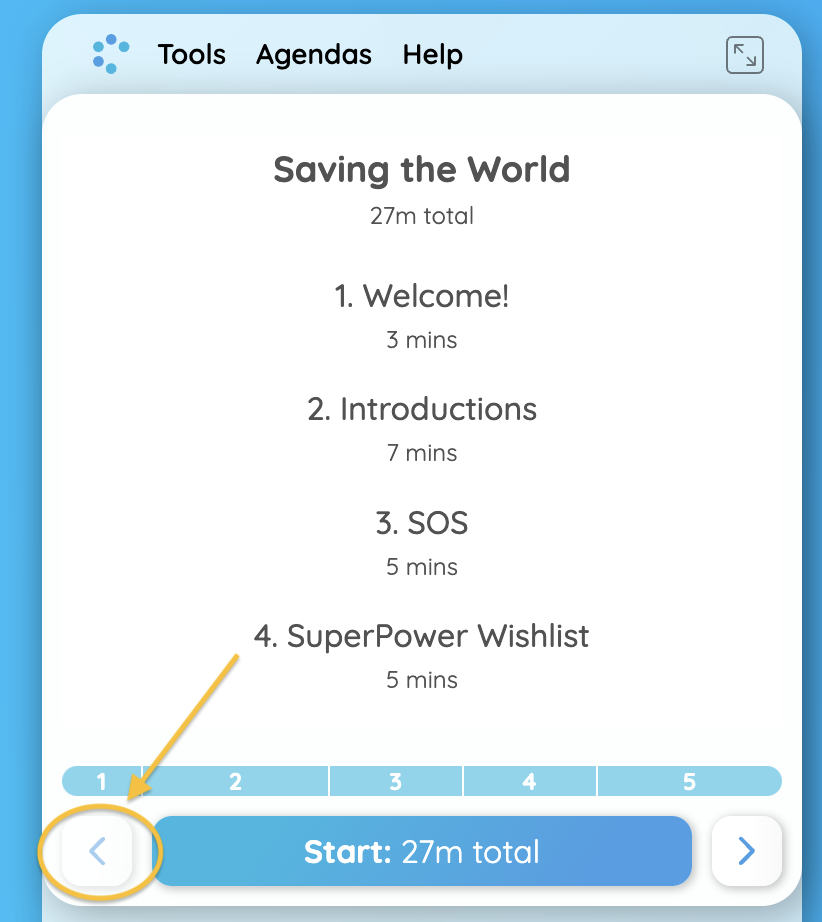
  1. To view the table of contents of your agenda, navigate all the way to the left of the agenda by using the left arrow in the progress bar.
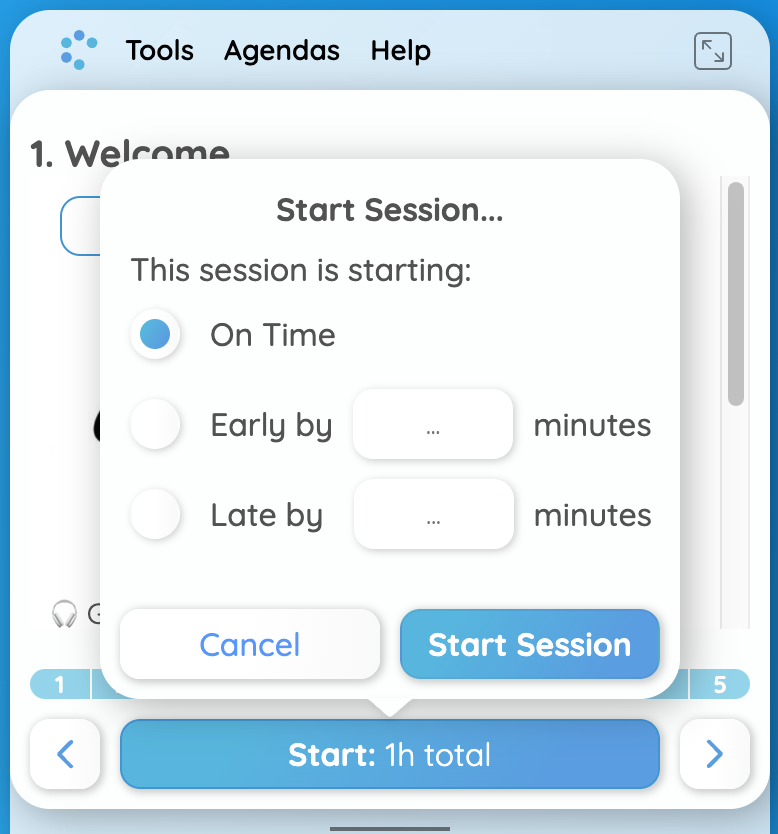
  1. When you and your participants are ready, click the blue ‘Start‘ button to begin the session. A window will pop up and allow you to indicate whether your session is starting ‘on time’, ‘early’ or ‘late’.

TIP: If you don’t start on time, indicate how many minutes early or late you are starting, so the progress bar is accurate in your session. This way, you can easily see if you are late or early in a particular section of your agenda.

STEP 2: Use the agenda

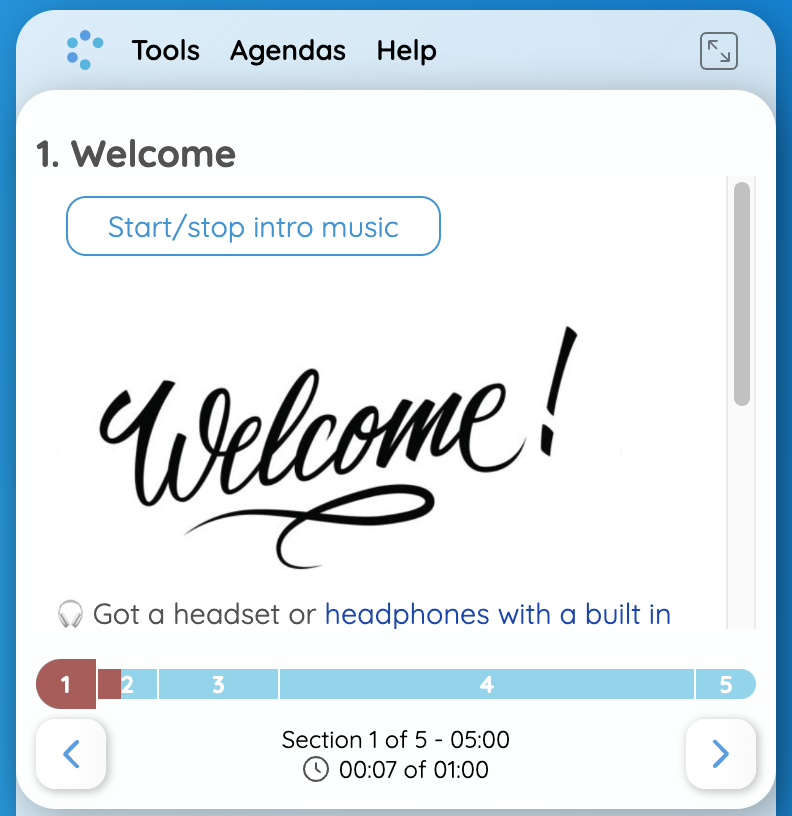
  1. The progress bar guides you through the sections of the agenda. Click the arrow below it to navigate to the next section.

NOTE: In the picture on the left, you can see that hovering your mouse over a section on the progress bar, you will see its time indication. If you are behind schedule, the progress bar turns red. The dark hue of blue shows where you are with regards to timing and a slightly lighter blue indicates which agenda section you are in.

  1. In the agenda, you can find buttons that trigger different functions in the room when you (or someone else) click them. Here are two examples:
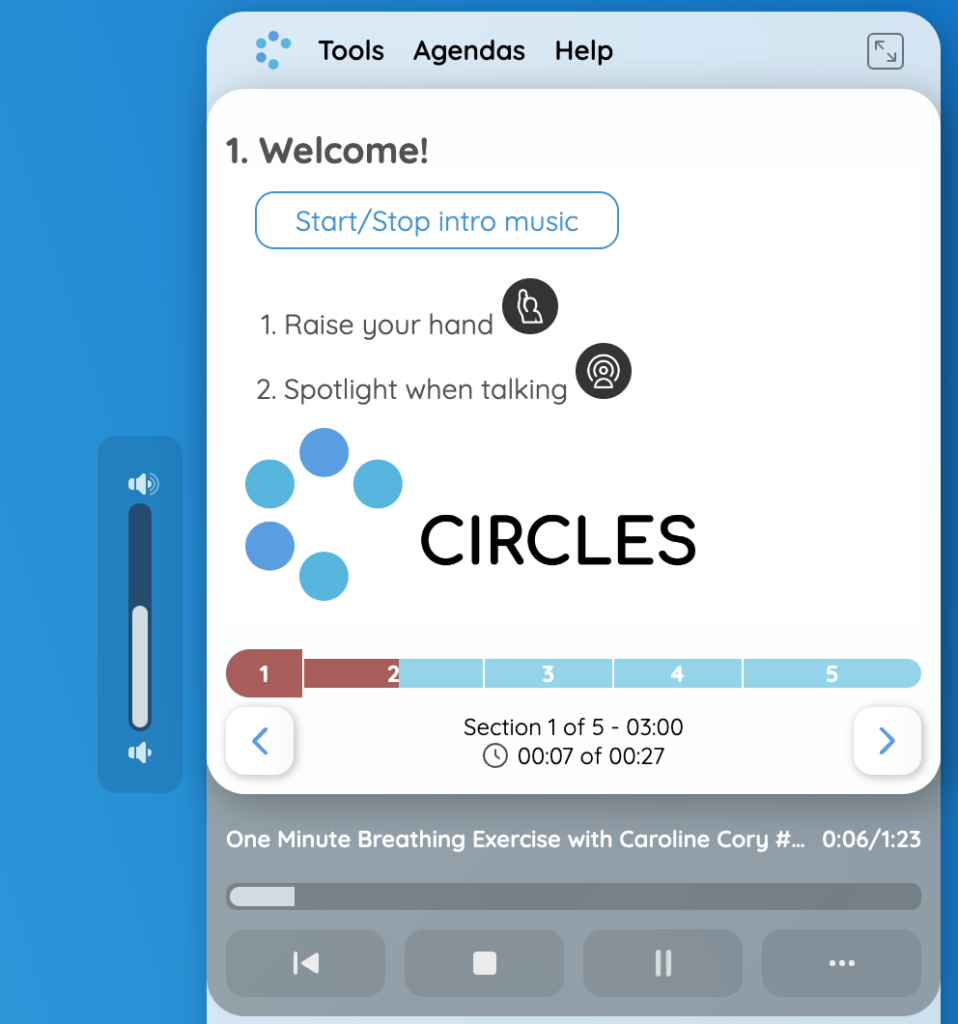
  • Music buttons start playing music for all participants. Each participant can adjust their own music volume by moving the lever up or down, and the timer above shows how long the music has been playing. Stop the music by clicking the button again. You can also control the music from the gray media tray below the agenda.
  • Random order assigns a number to each person’s video stream to determine who speaks first, second, third and so forth.
  • To learn more about agenda buttons, read on here.

TIP: Hover your cursor over their video stream and click the top middle symbol to “spotlight” each participant. This clears their assigned number and activates the timer in the top right corner to make sure they stay within their time limit.


NOTE: If you do not need your agenda, you can also hide it. To do this, go to the header of the agenda menu and select ‘Tools‘, this then opens up the control panel. Then select ‘Hide agenda‘ from the options shown.

STEP 3: Use your video stream features

When moving your mouse over your own video steam you can find the following five funtions:

STEP 4: Use the text box

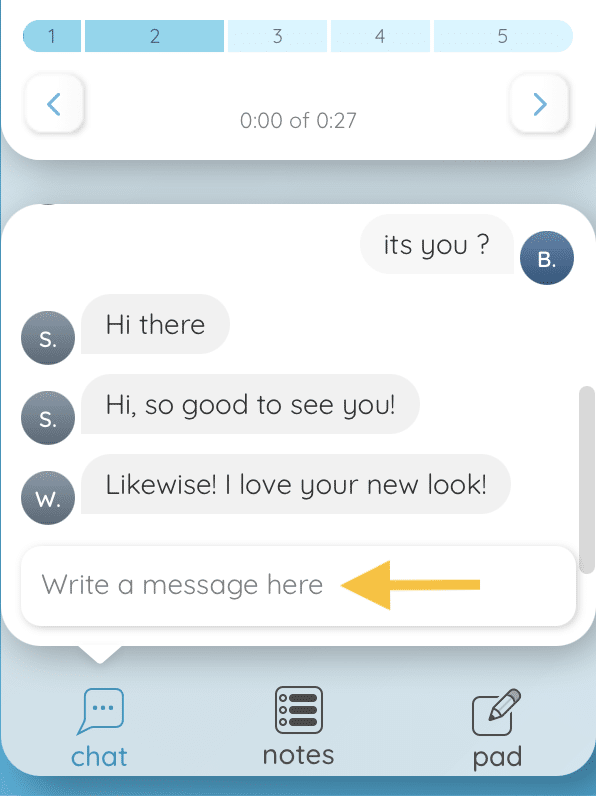
There is a text box in the bottom righthand corner of your CircleSpace™️. By selecting one of the three sections, you can switch between its functions.

Each of the functions help you run your sessions:

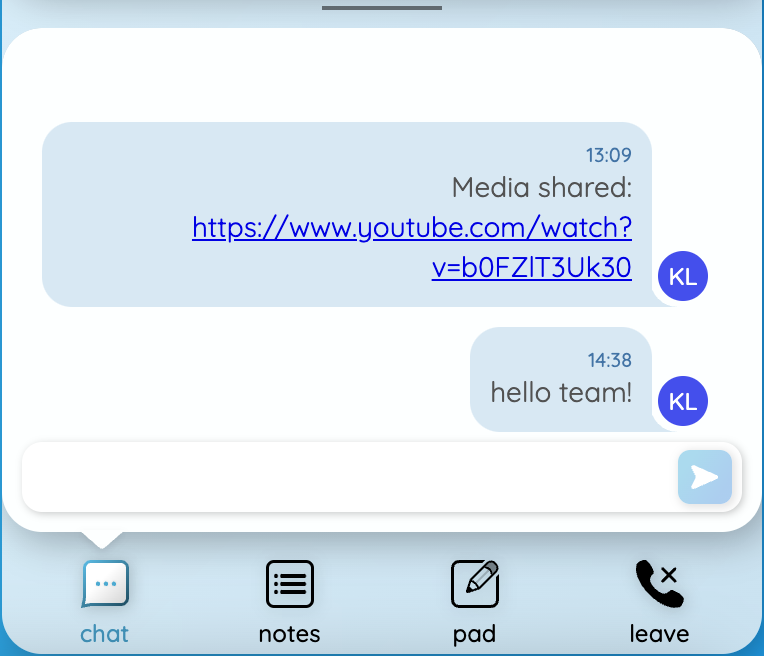
  1. Chat – anything typed here is shared with all people in a Circle. Under ‘Advanced‘ in the lefthand side menu, it can even be downloaded for later reference.
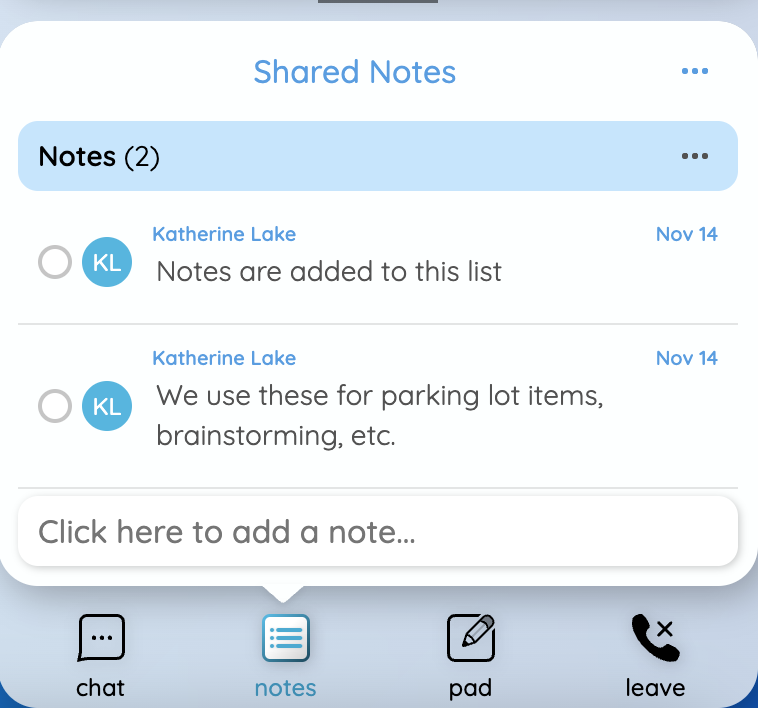
  1. Notes – can be reordered, deleted or marked as completed while the Circle is in session. They are saved in the Circles space until deleted. An overview can be brought into the room through a button in the agenda. Read more about the Notes feature here.

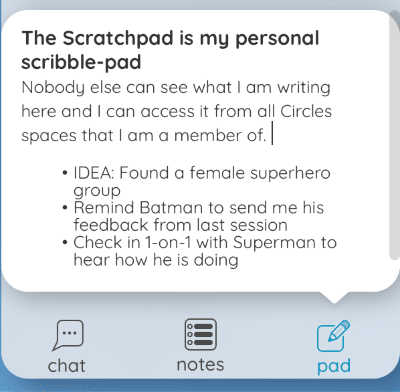
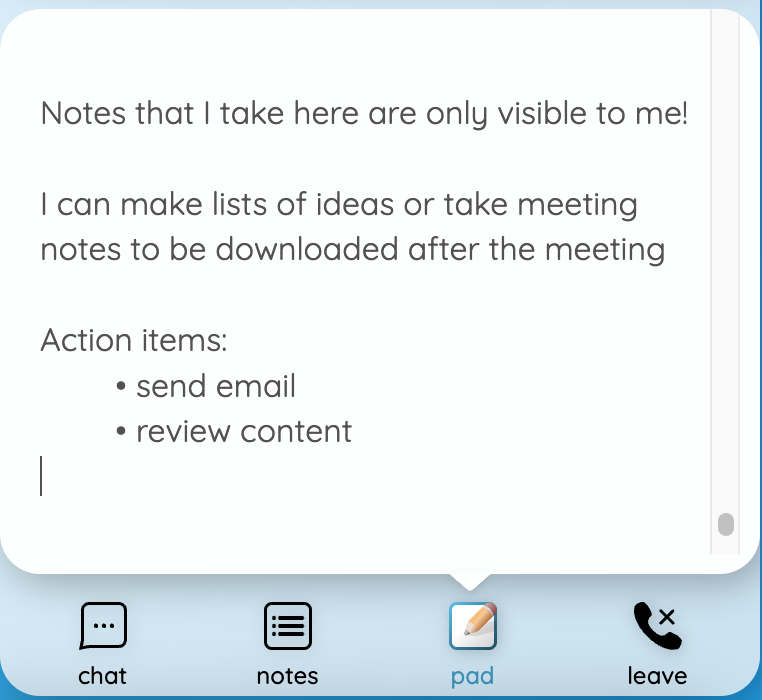
3. Pad – your personal scribble-pad and only visible to you during your Circle session.

How to Share Your Screen

At some point during a session, you might want to show your fellow participants something on your own screen. Luckily, it is very easy to share your screen with the people in your Circles session:

  1. Go to the Share menu and choose ‘Share Screen…’.

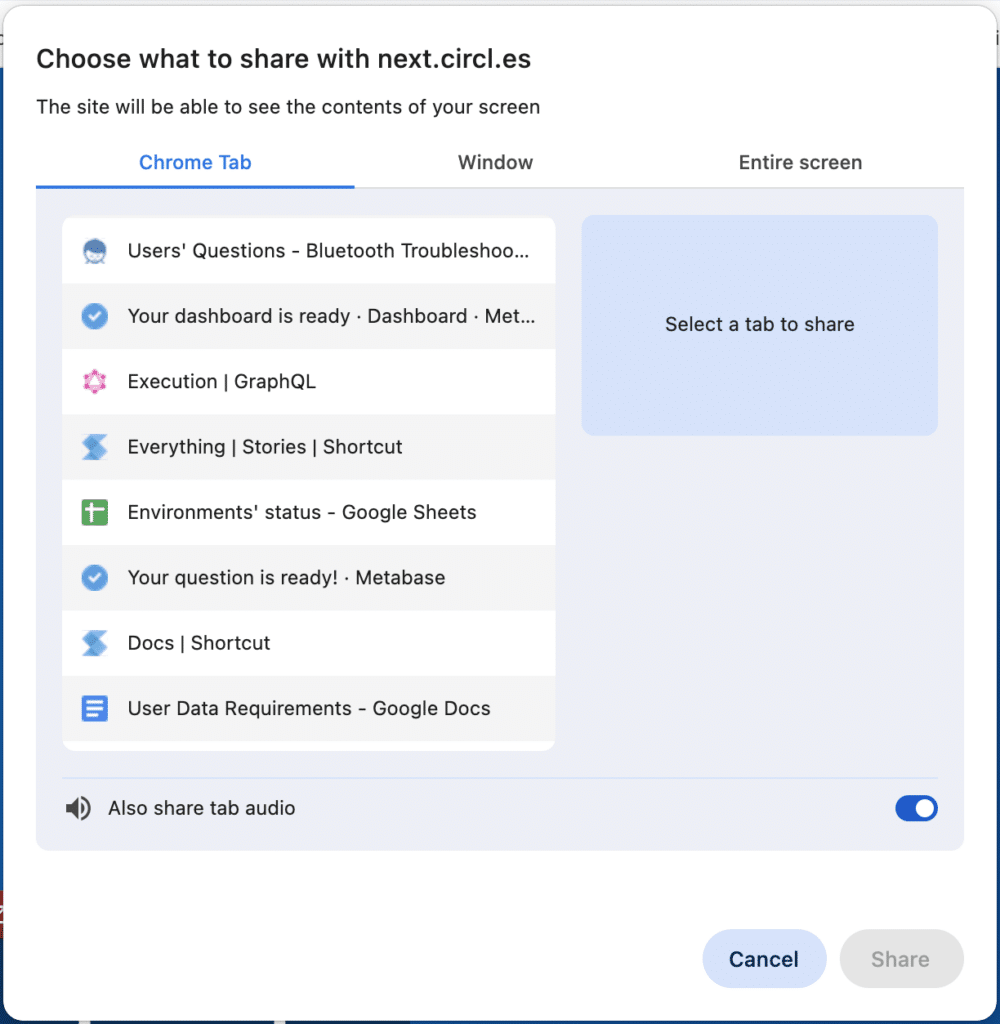
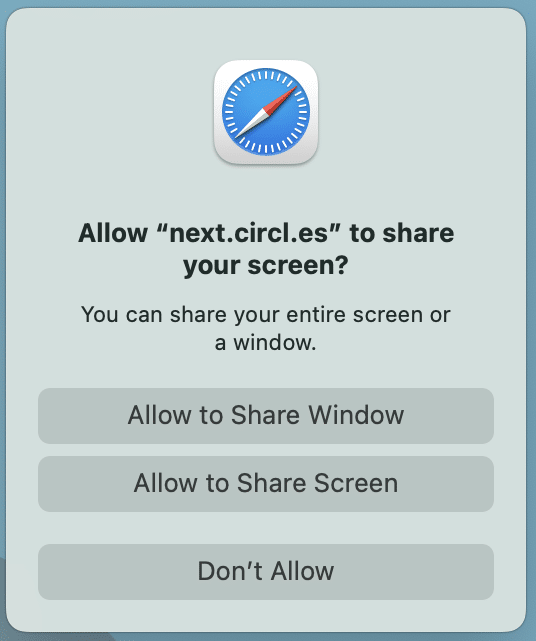
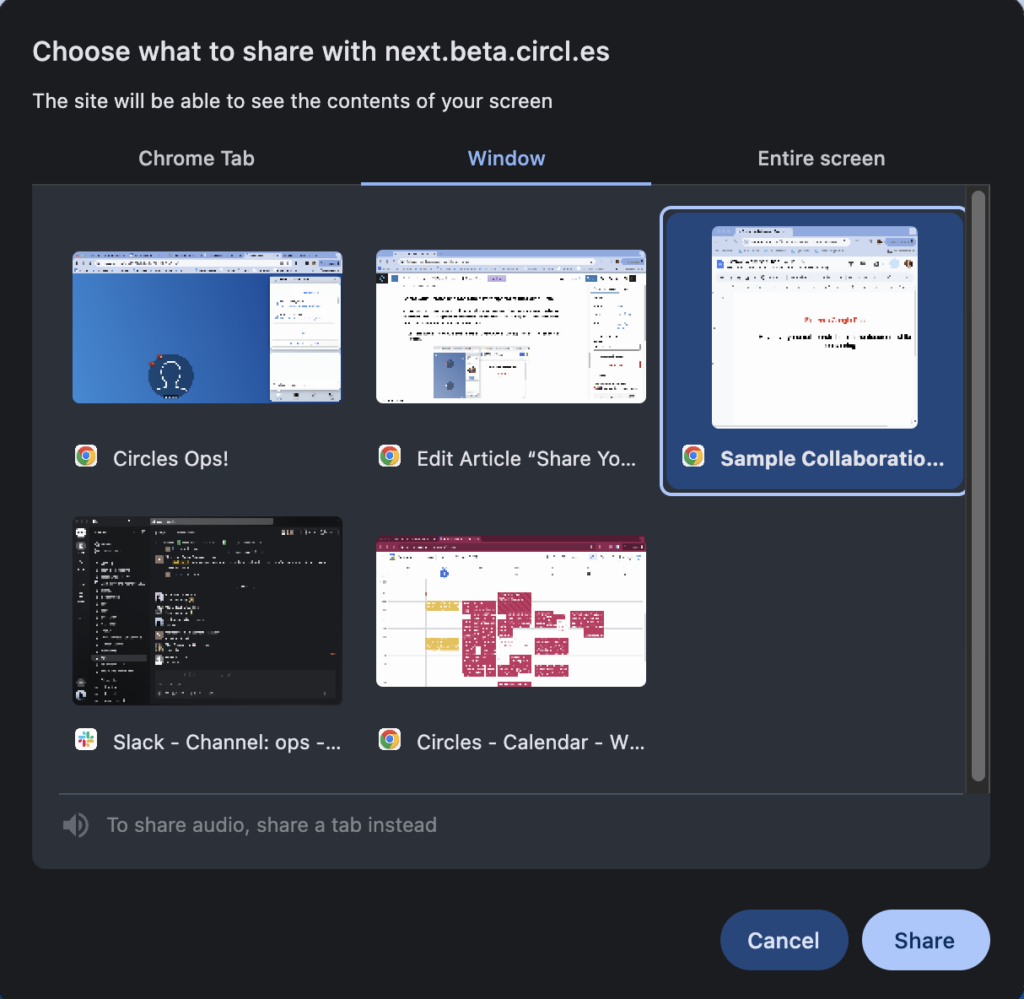
2. Depending on the browser you are using, the available options will be different. On Chrome and Edge, your can share a specific tab, the Window or the Entire screen. On Safari, only Window and Entire screen options are available.

Chrome/Edge

Safari

3. The gray media tray under the agenda confirms that you are sharing your screen. Your fellow participants can see what you see on your screen in a pop-up media window.

4. To stop sharing your screen, simply click the X in the gray media tray in the little bar below the agenda.

Following all the steps correctly and still can’t share your screen? Check out this article on how to fix your problem.

Share your Screen and See Circle Participants at the Same Time

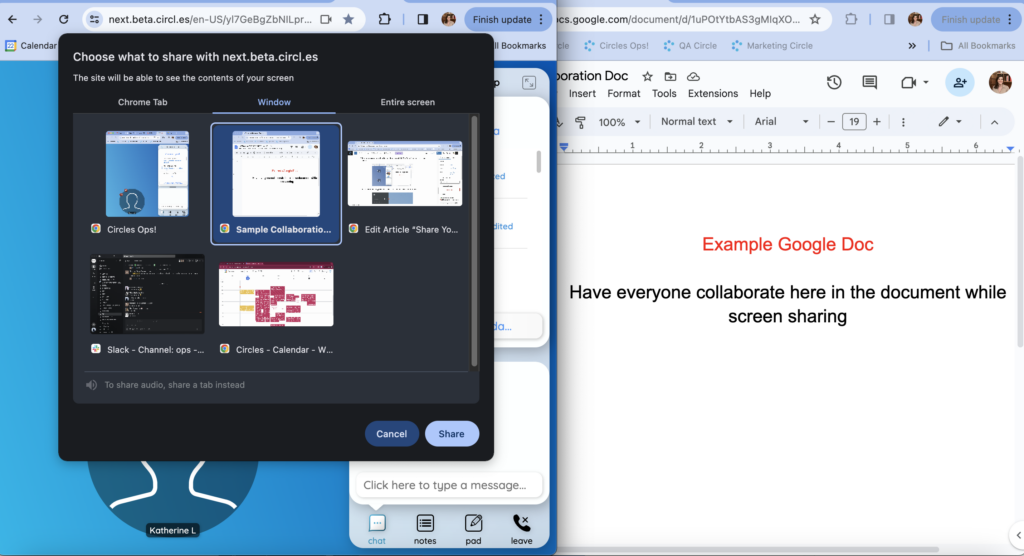
You may wish to be able to see and interact with the other members of your circle while you are sharing your screen. The following steps will demonstrate how to do this. NOTE: This process does not work on Safari, but will work with Chrome and Edge.

  1. Position the window you wish to share and the window with the CircleSpace™️ side-by-side on your screen,

2. In the window that pops up, select to share a ‘window’ (on the top), then select the image of the window you want the other participants to see. When ready, click ‘Share’ to start sharing.

How to Use Session Review

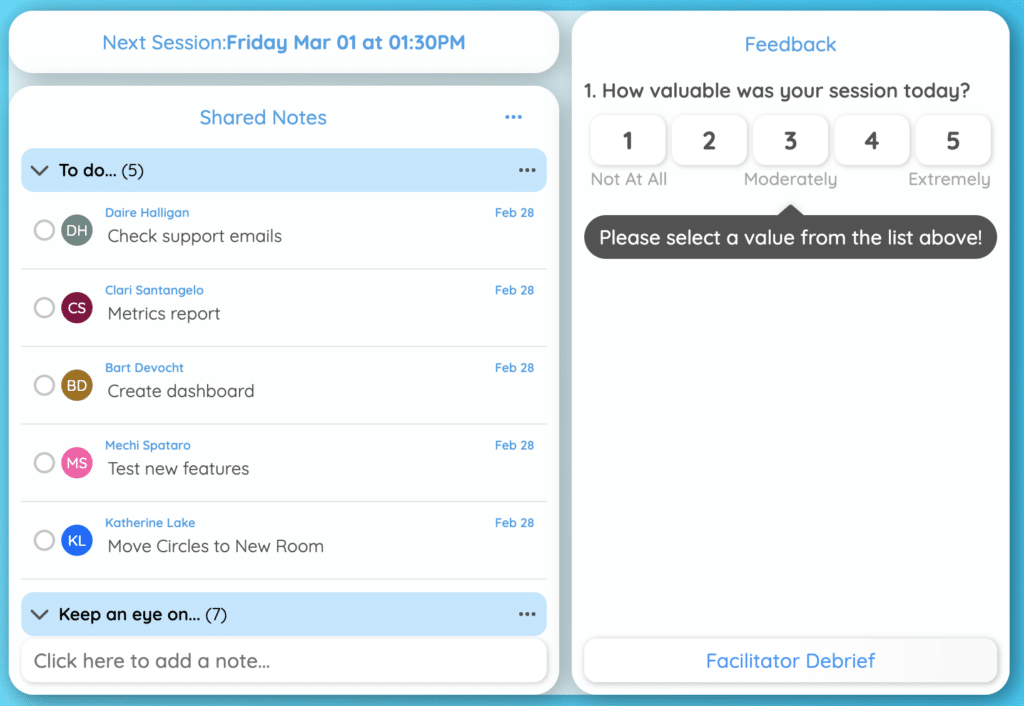
The Session Review panel serves multiple important purposes: checking the next session date, reviewing/editing the Notes and leaving feedback about the session. You can start the Session Review on the go, or via a button in your agenda.

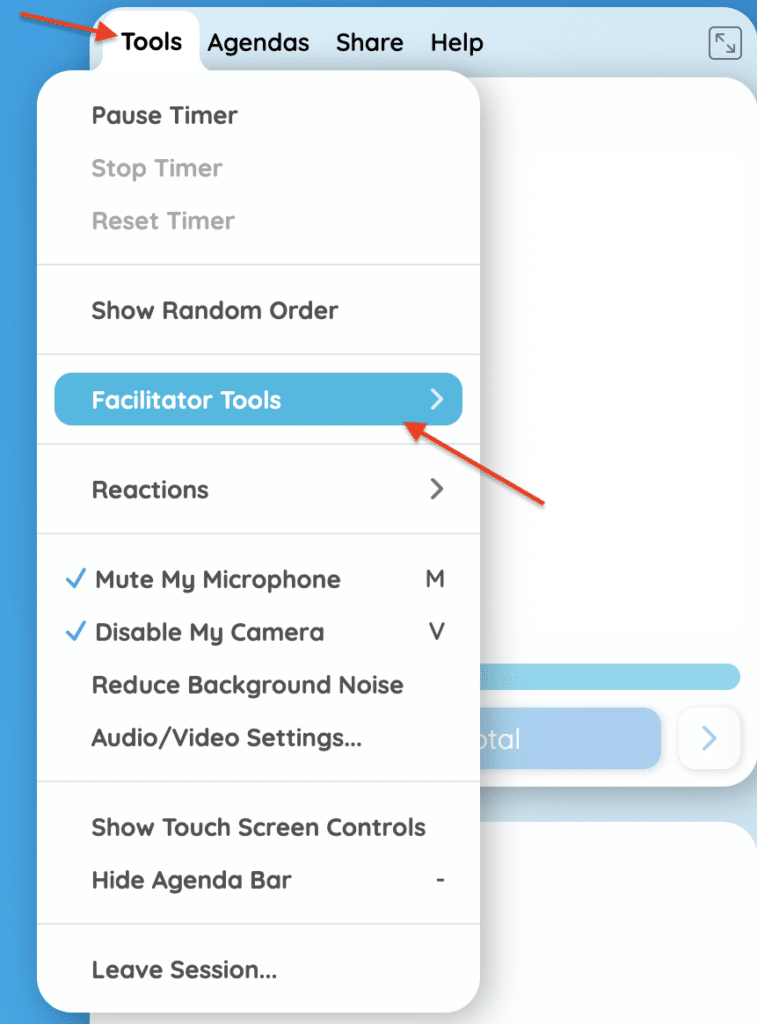
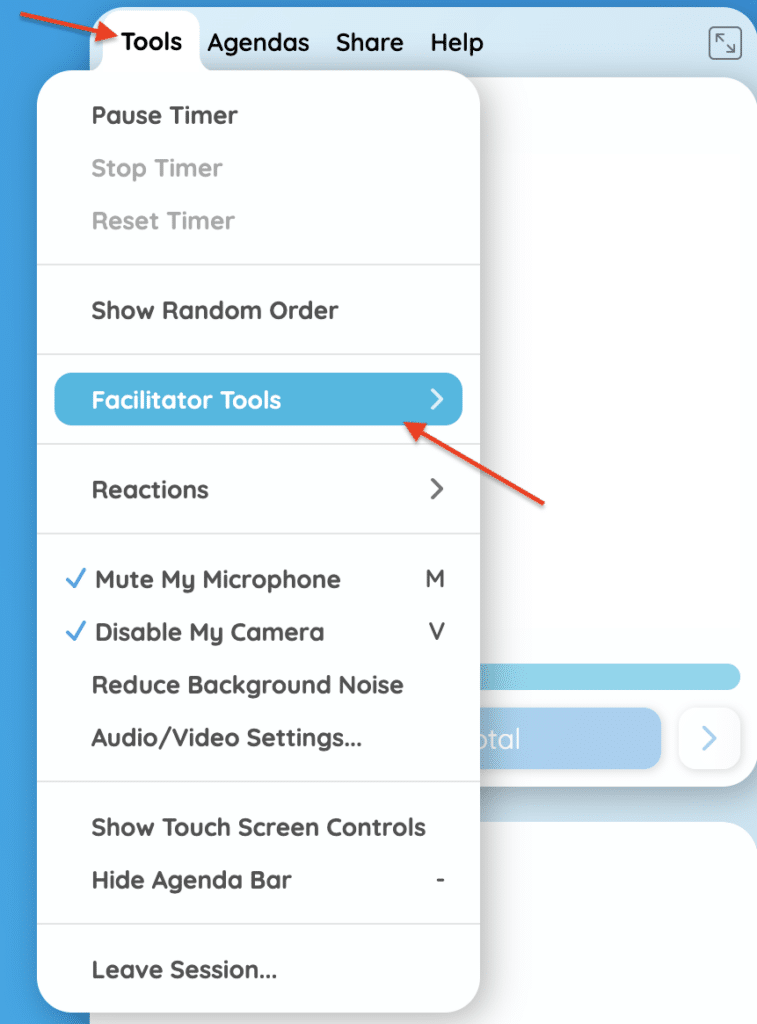
To open the Session Review panel on the go, go to the Tools Menu on the top right of the CircleSpace, select Facilitator Tools and then Session Review.

To add a Session Review button to the Agenda:

  • In the agenda editor (on my.circles or in the CircleSpace), click the magic wand icon to open the list of agenda buttons
  • Select ‘Review Session’ at the bottom of the list.

Session Review Functions

Next Session Date

The Next Session Date on the top right will be only be visible if a next session has already been scheduled.

Notes

Everything you can do using the Shared Notes feature, you can also do here. For more Notes details, check this article.

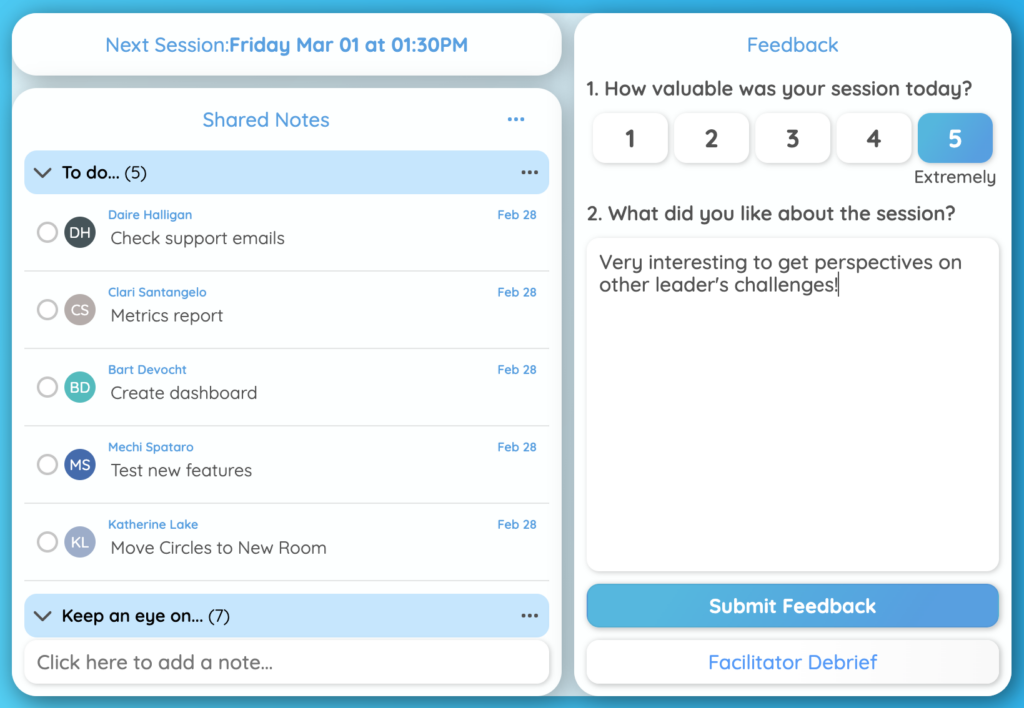
Feedback

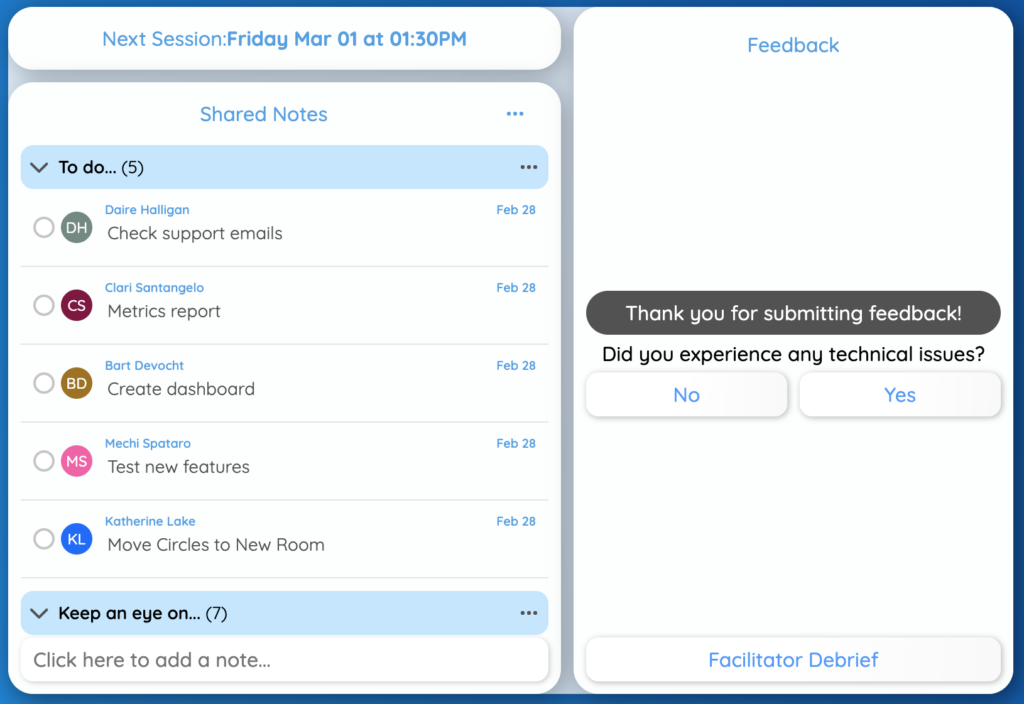
The CirclesSpace survey consists of two questions. First you will rate how valuable your session was, and then you’ll have the chance to give more details depending on the number that you choose. After submitting your answer, you are presented with the opportunity to answer another brief survey in case you had any technical issues that you want to report.

There is also a separate button for the Facilitator Debrief.

The button to close the Session Review panel is placed in the Agenda bar on the right:

Add a Video Button to Your Agenda

Adding a video button to your agenda is super easy.

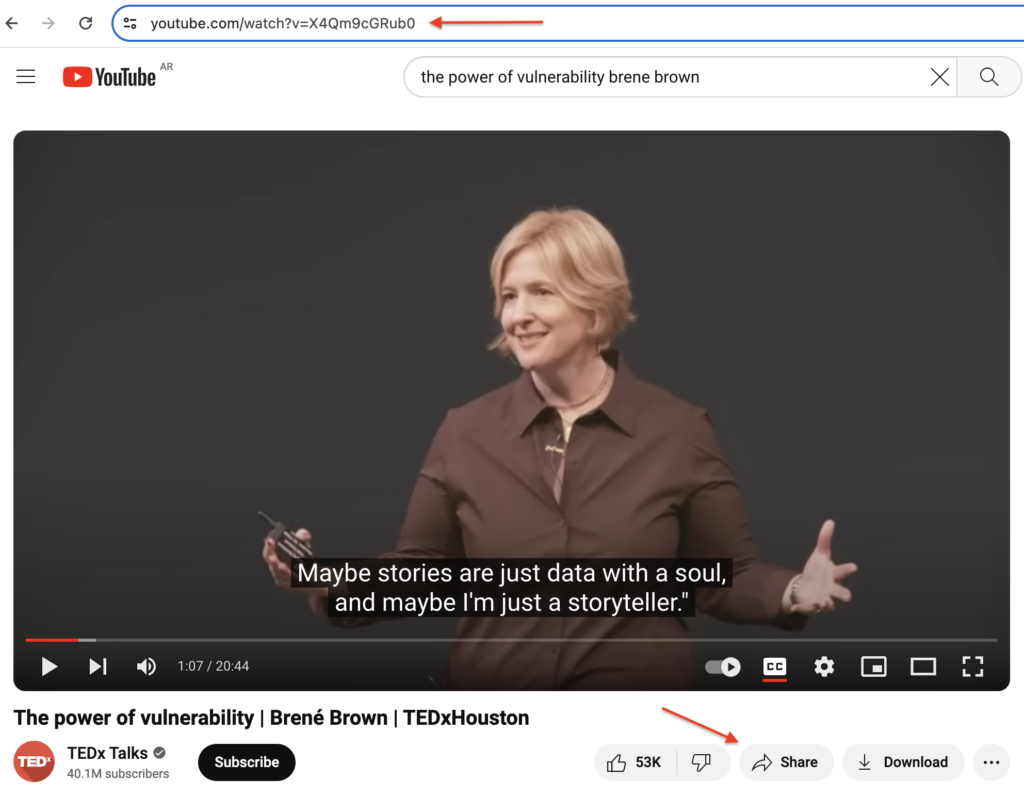
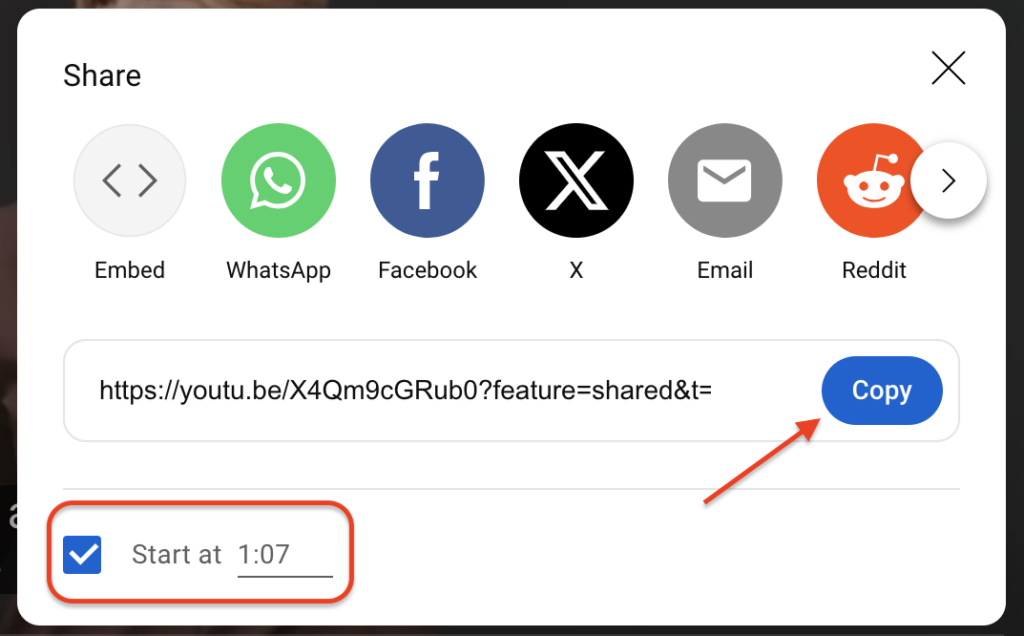
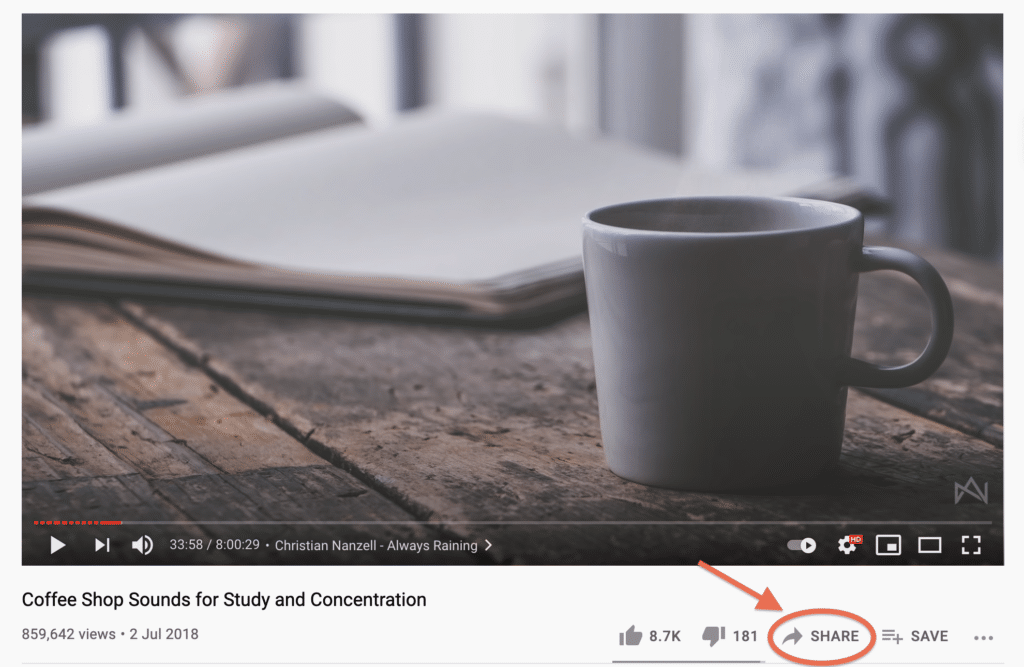
  1. Copy the URL of the YouTube video you want to show. You can do this simply by copying the link on the browser or by clicking ‘Share’ underneath the video. This second way lets you specify a start time for the video in case you are interested on a specific part of the video and want to avoid the intro.

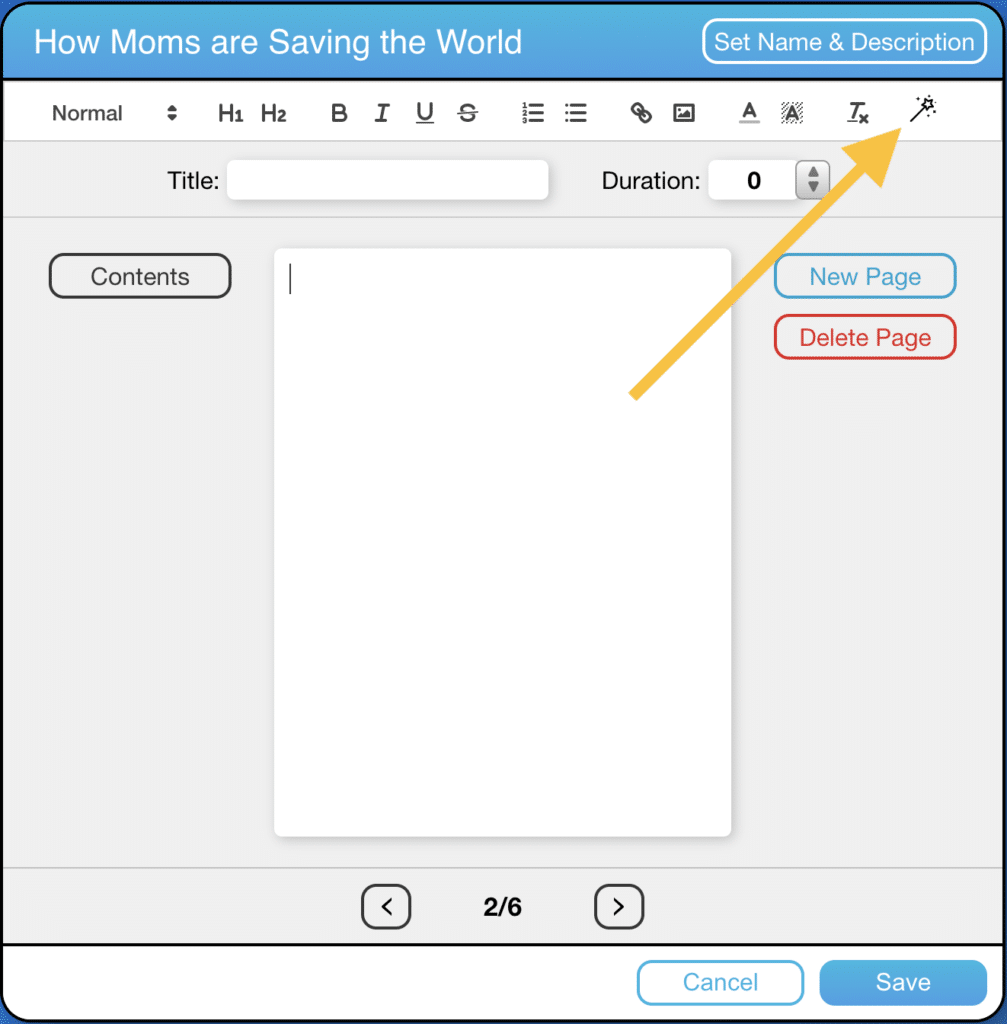
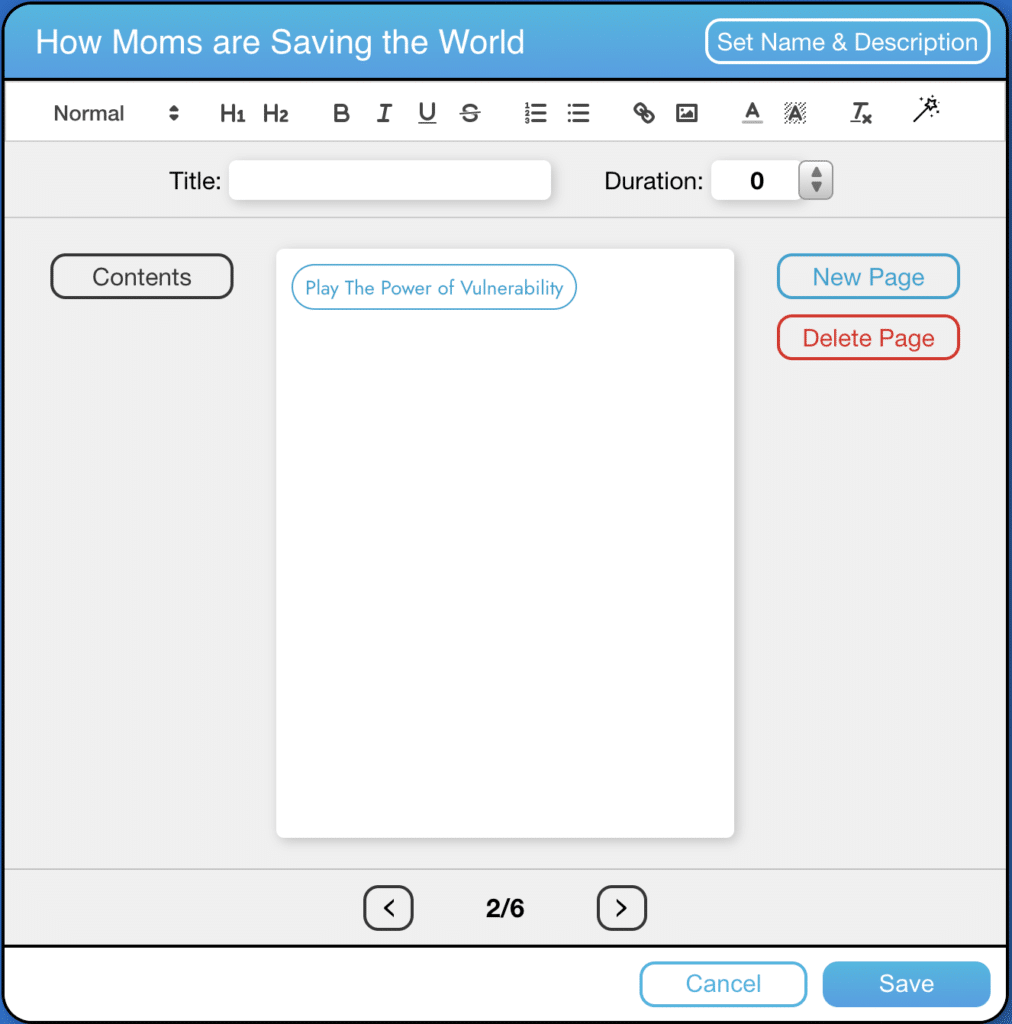
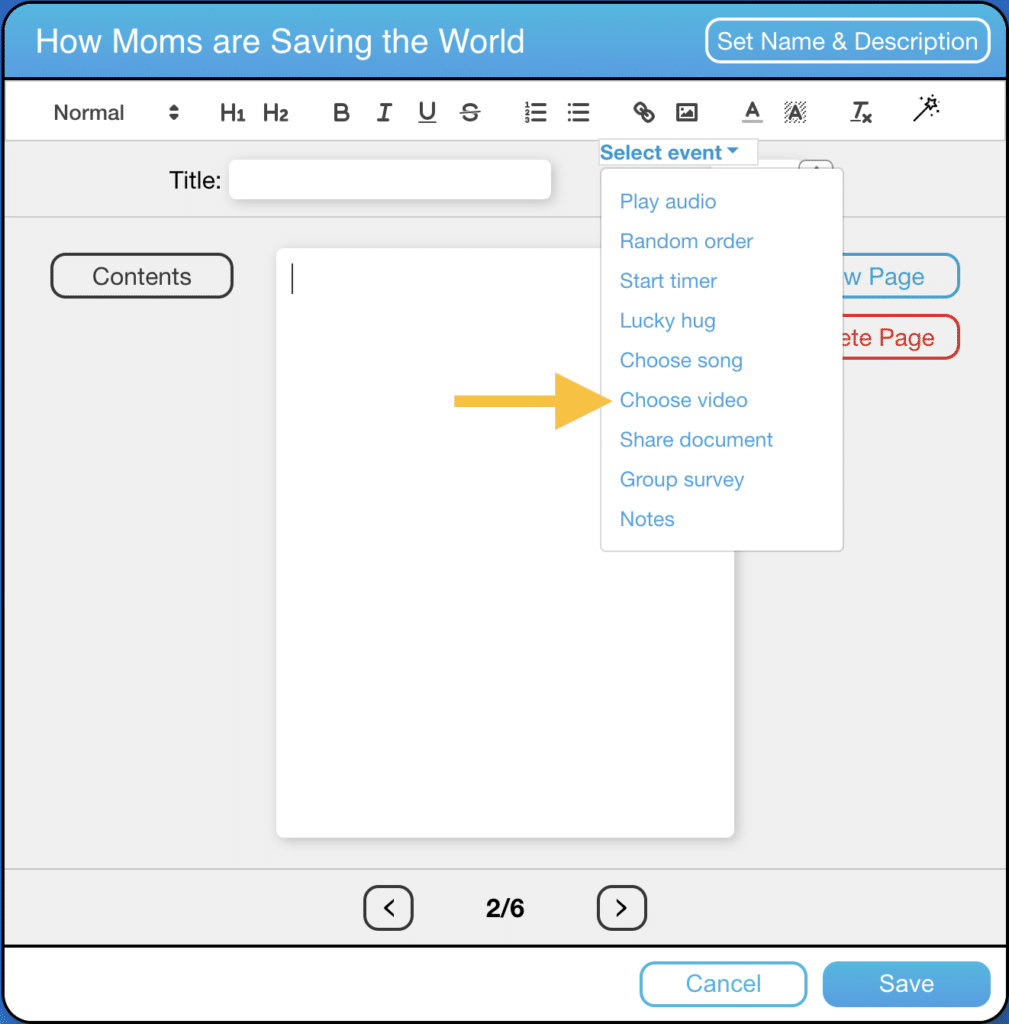
2. In your agenda editor (on my.circles or the CirclesSpace), click the magic wand icon to display a list of possible button functions.

3. Click ‘Choose Video’.

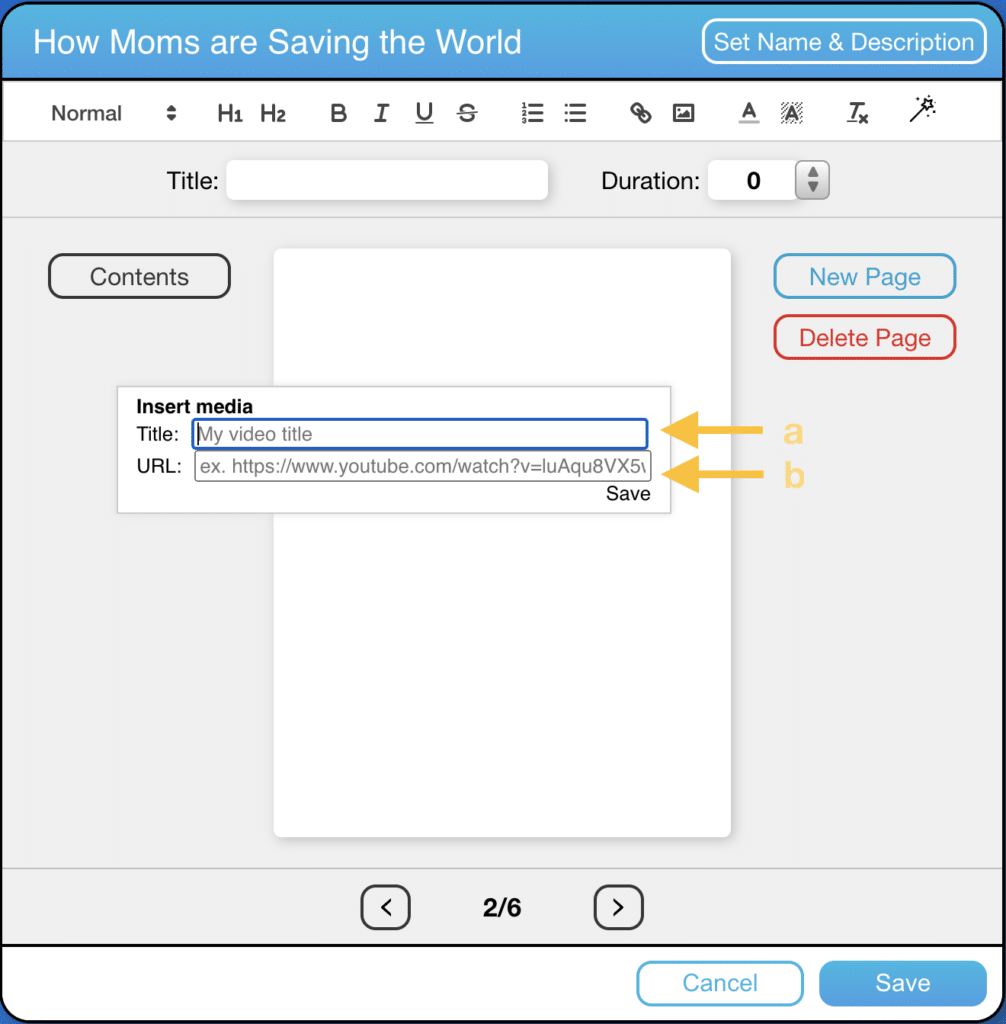
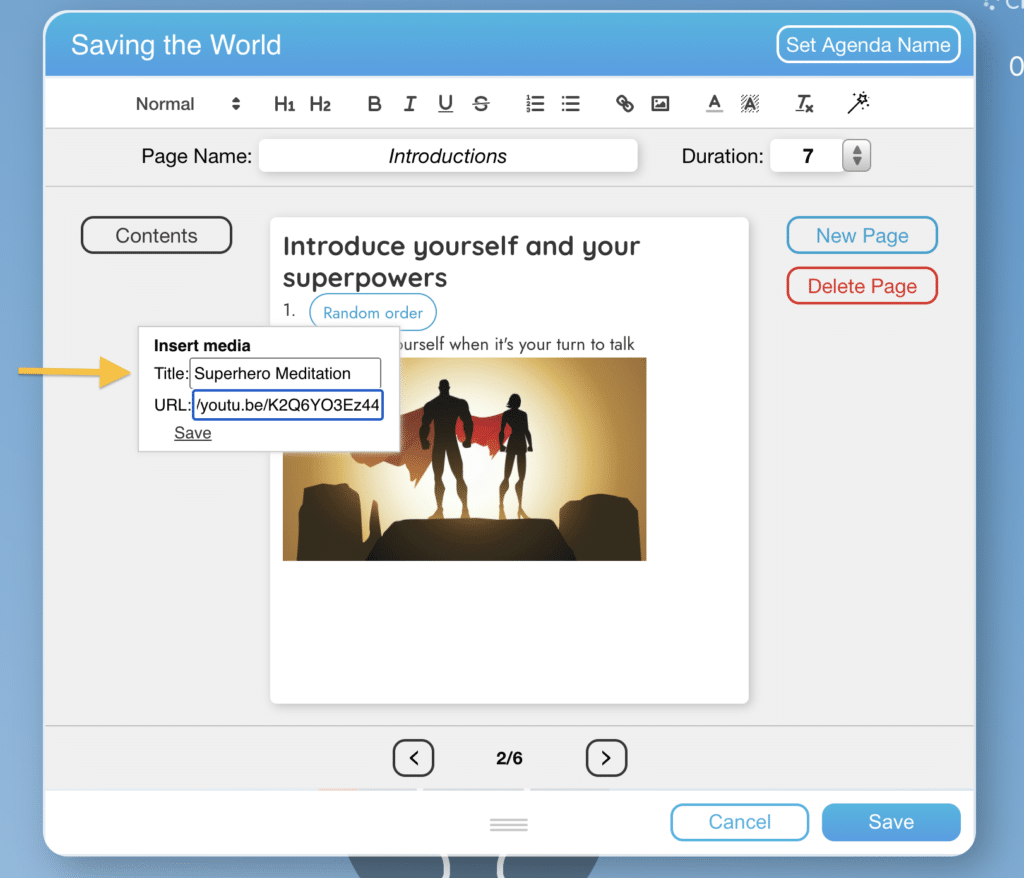
4. Here you will be prompted to:

a) Enter a title for the video. This will appear as the text within the button.
b) Enter a URL (your copied youtube link)

5. Click ‘Save’. You’ll now see the button appear within your agenda.

6. You can change the text of your button simply by clicking on it and typing.

7. Click ‘Save’ at the bottom of the editor once you’re happy with the agenda.

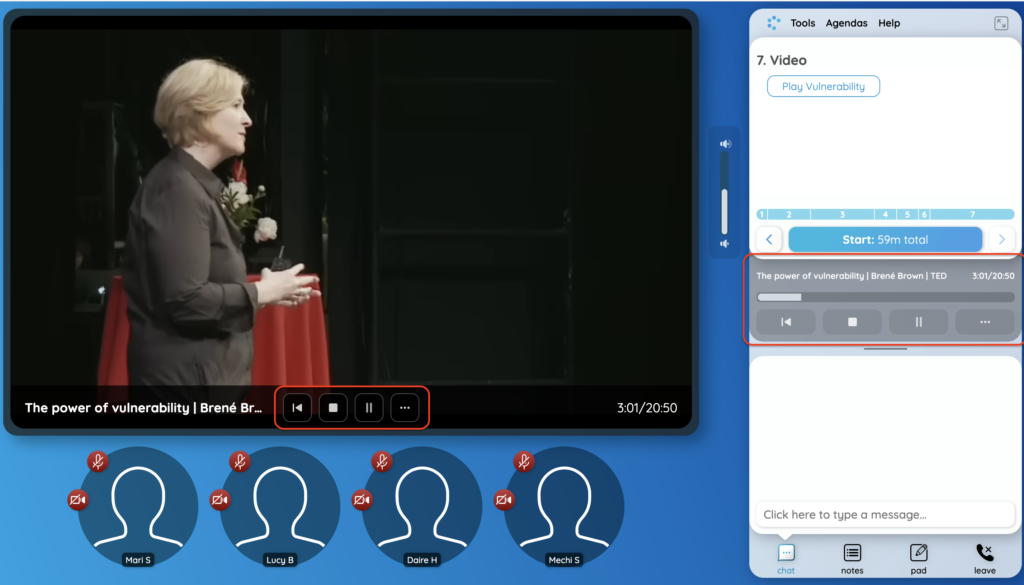
  1. To play the video In the CircleSpace™️, click the button you created when ready and the video will appear, moving all the participant’s circles to the bottom.
  2. Once the video ends, both the video frame and the media tray will vanish, and participants will go back to their original position forming a circle. If you want to stop sharing the video before it’s over, you have to click on the STOP button in the media tray on the right.

MEDIA TRAY

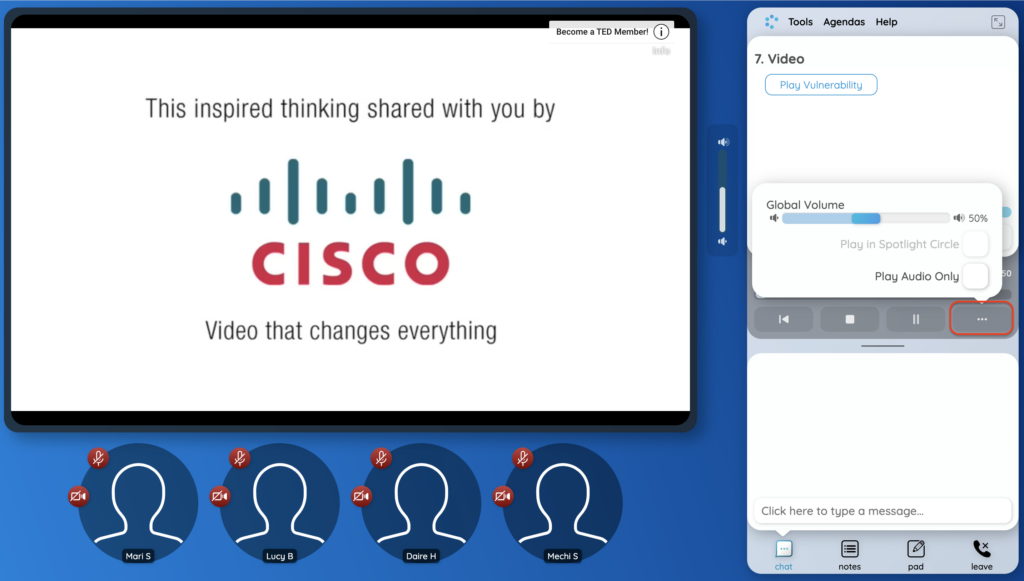
Pause, rewind and stop your video either from the Media Tray that slides from beneath the Agenda or from the controls that appear when you mouse over the video frame. You can also control the Global Volume and turn the video into an audio only track from the 3 dots menu in the Media Tray.

NOTE: If you want to see how you can share a video on the go in the CircleSpace™️, check out this article.

How to Create, Launch and End Breakout Groups

One of our most exciting features is the ability to create breakout groups in the CircleSpace™️. This step-by-step guide will explain how to sort your participants from your main session into the subgroups you want and to send them on their way to the breakout circles.

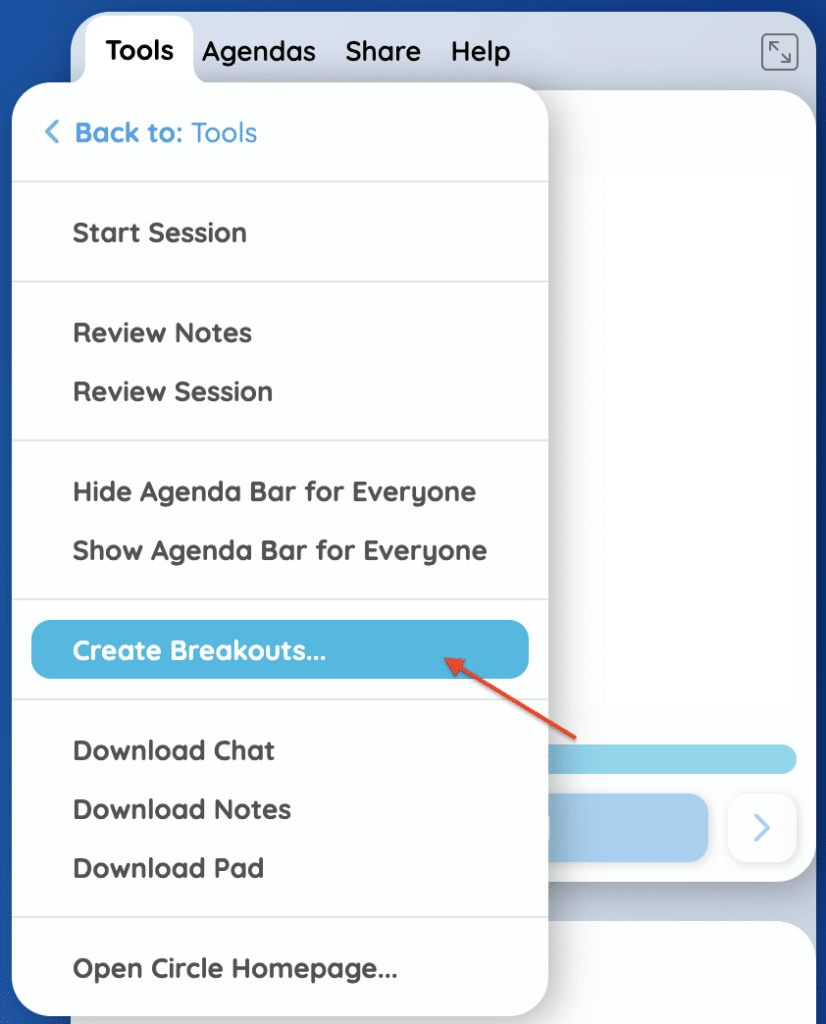
Breakouts are created, launched, monitored and ended from the breakouts panel in the Tools menu of the CircleSpace™️. To open the breakouts panel, click on the Tools button at the top right of the room, above the agenda space, and select ‘Facilitator Tools’. Then select ‘Create Breakouts…’

Now that you have the breakouts panel open, you can begin to sort your participants. You can do this by either automatically assigning them to breakout groups, or by intentionally assigning each participant to a particular group.
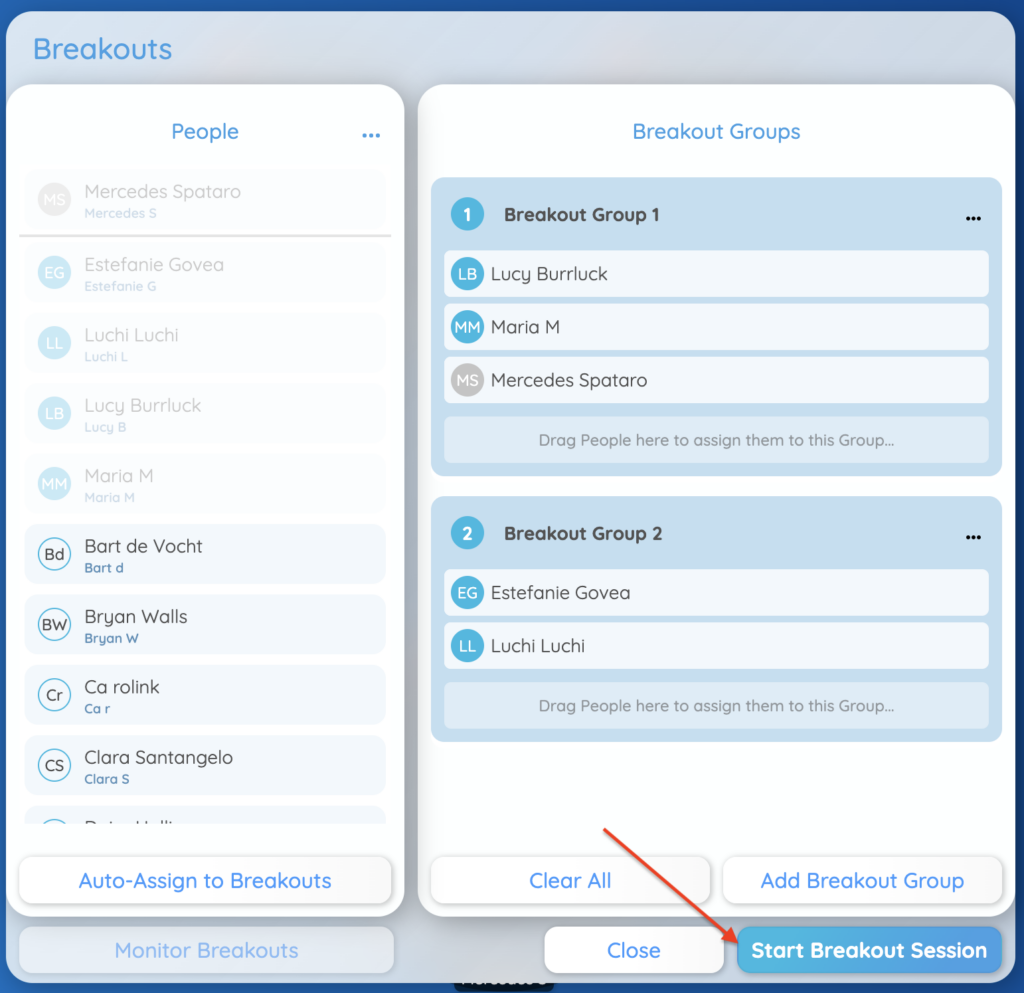
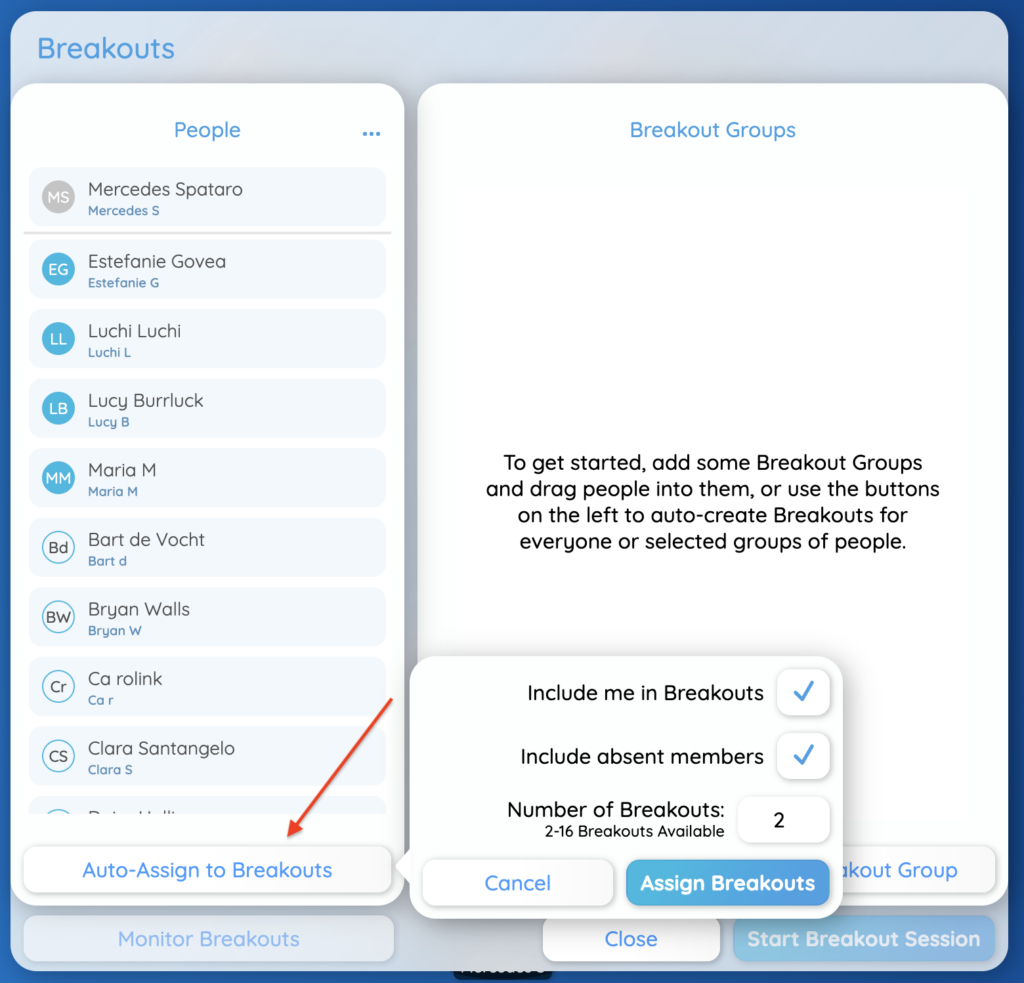
To place participants at random into groups, click the ‘Auto-Assign to Breakouts‘ button on the bottom left side of the panel. You will then be asked how many groups you wish to create, and whether you would like to include yourself in a breakout. The number of groups available to create depends on how many participants are in the room. You can even include Circle members, who are still absent (for example, when you know they will be arriving shortly). Upon arriving, they will be redirected to the breakout directly.

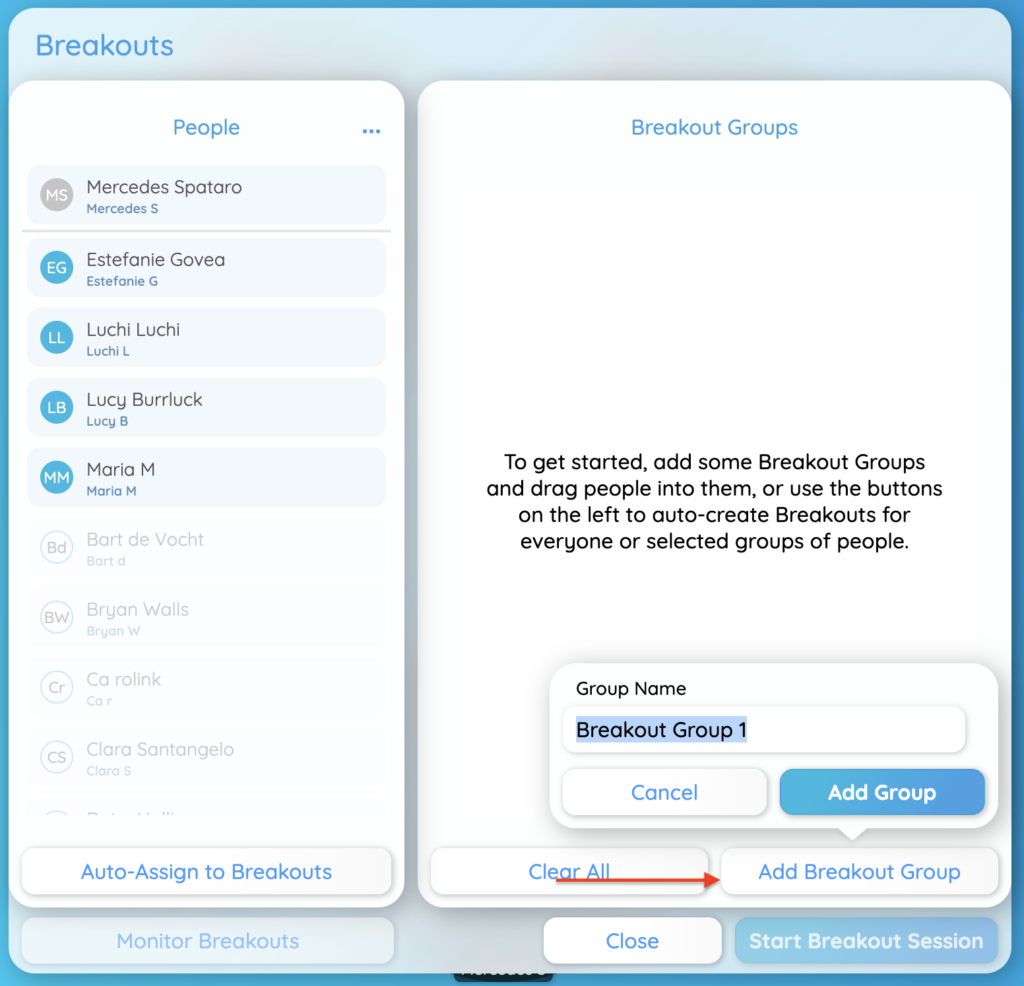
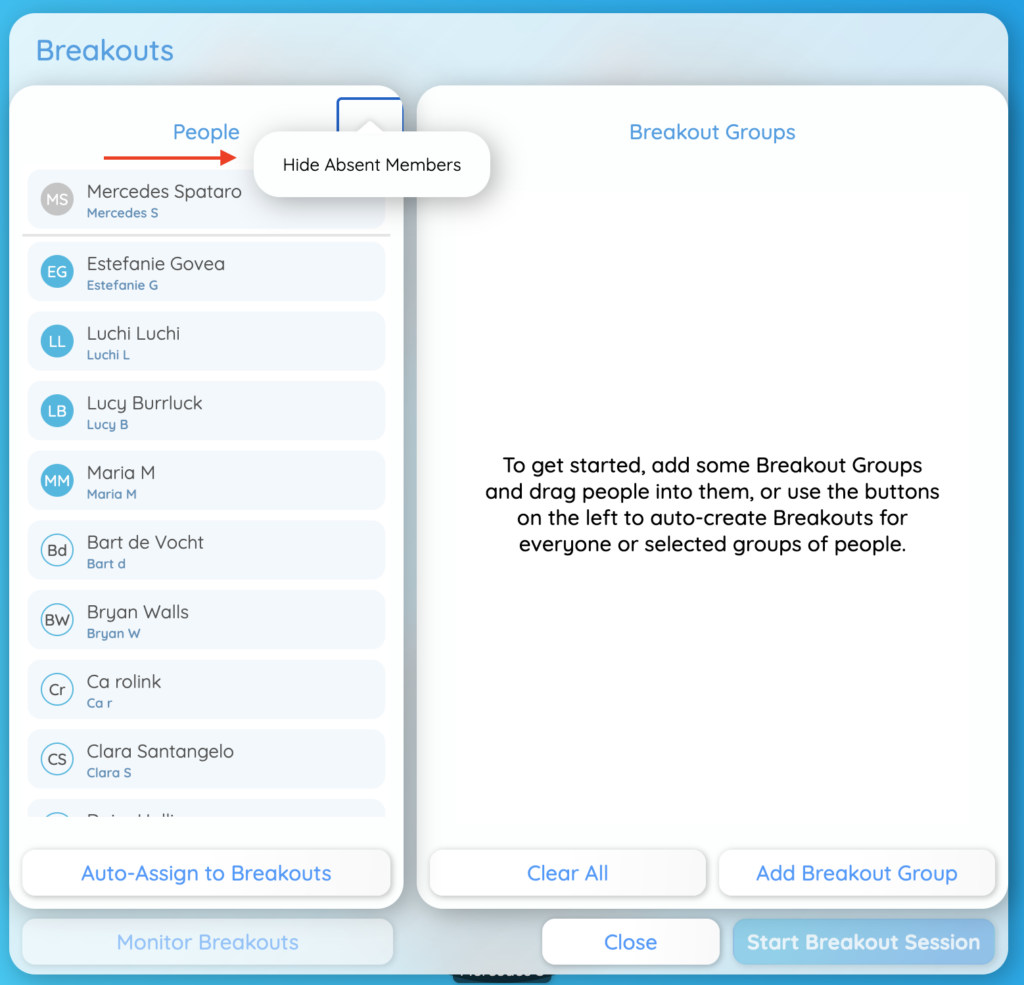
Your name will always appear first, then you will see the present members, whose initials are in blue circles, and below them the absent members, whose initials are in white circles (e.g. Bart de Vocht in the above image). If you prefer to see only the present members, you can hide absent members from the list by selecting the option “Hide Absent Members” in the three dots menu next to “People” on top (see image below).

If you want to intentionally sort your participants, simply start dragging participants into the breakout group section, or create a group by clicking ‘Add Breakout Group‘ on the bottom right of the panel. With this second option, you’ll be asked to name the group, and from there all you have to do is click and drag the participants you want to place in each group.

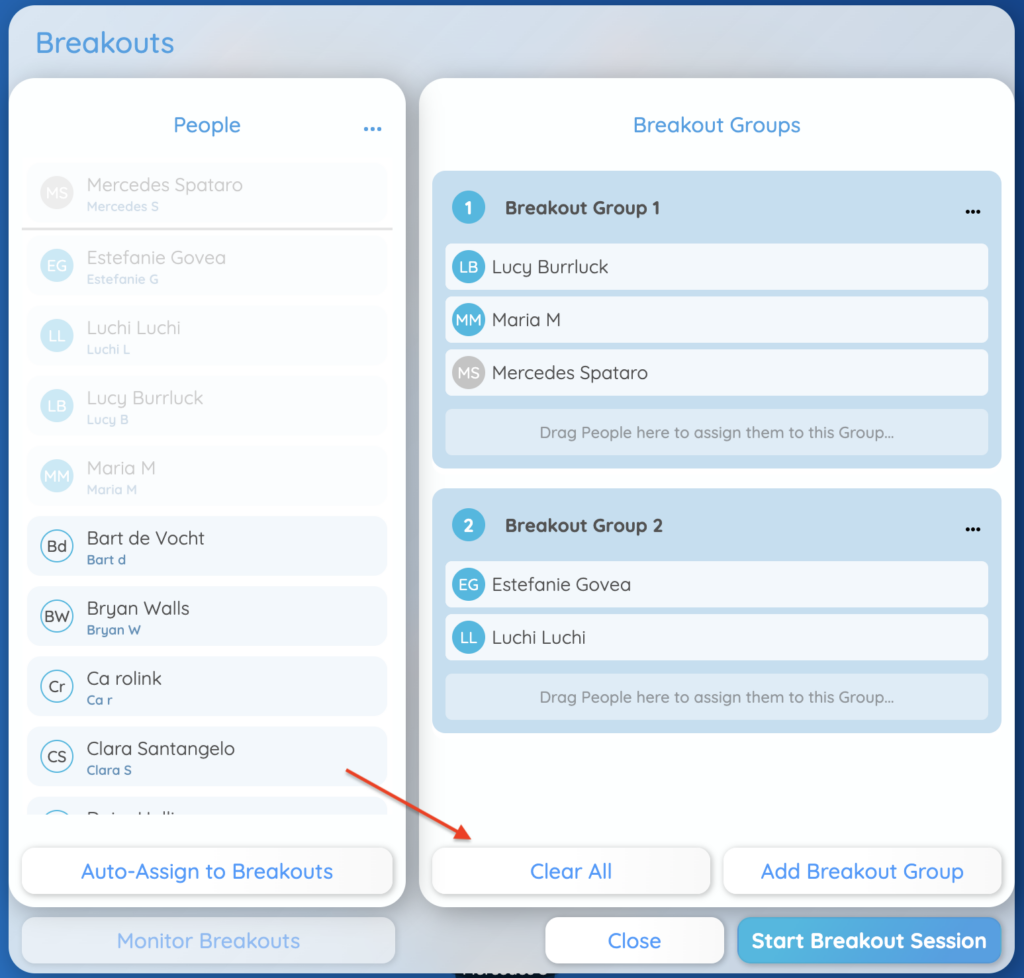
If you make a mistake or want to get rid of the groups you have already created, simply click the ‘Clear All‘ button at the bottom of the panel (see image below). You can also click and drag participants out of a group again in order to remove them from the group or to drag them to another group.

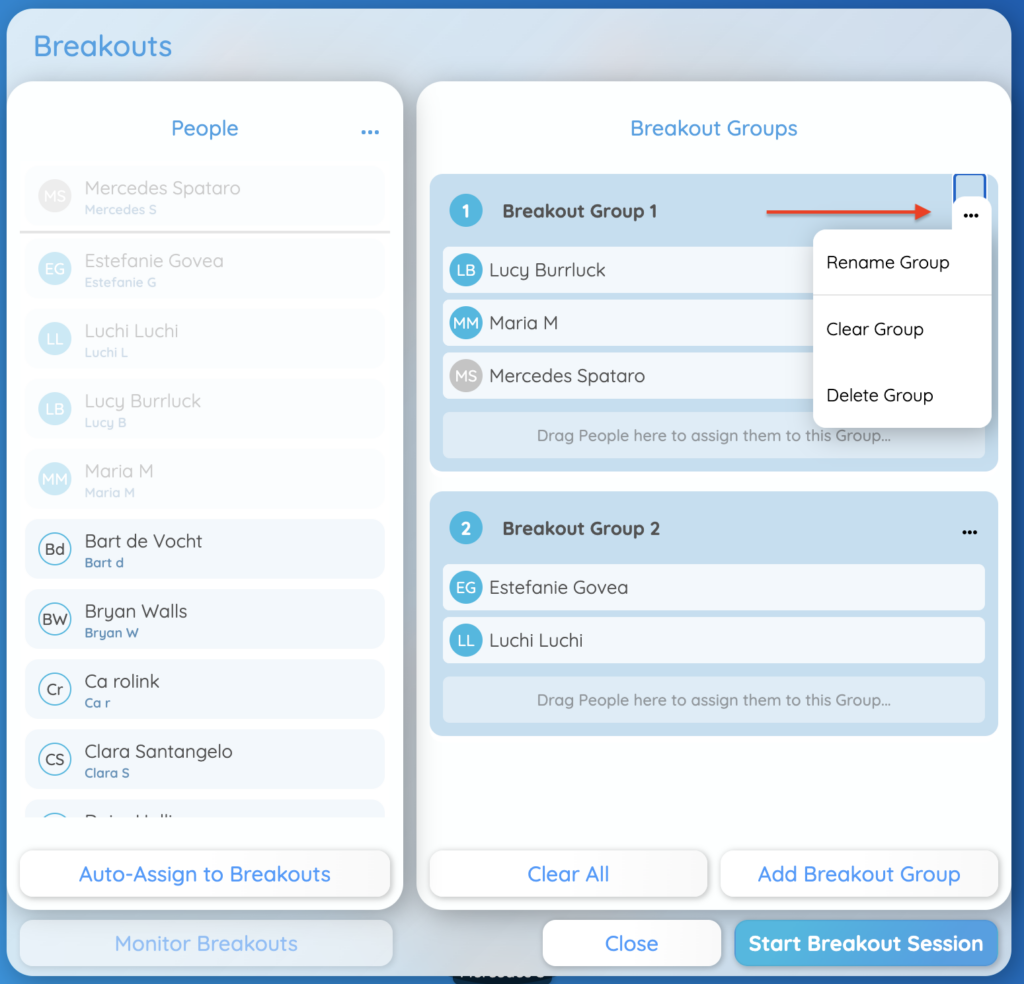
When you have created a breakout group, you may wish to edit it (renaming, clearing it of participants, or deleting it altogether). Click the three dots menu on the right of each group to do so.

The ‘Rename Group‘ button will open the text editor where you can type in a different name for your group.
Clicking the ‘Clear Group’ button will remove all participants from that group and return them to the People list on the left.
Finally, you can delete a group entirely by clicking ‘Delete Group’.

When you have completed filling the groups and are ready to launch the breakouts, all you need to do is click ‘Start Breakout Session‘. This will immediately send each participant to with the assigned group into a separate room.

To end your breakouts and call people back into the main group, click ‘End Breakout Session’. This will send a message to the participants in the breakouts to come back to the main room.

When in the breakout room, participants can click ‘Return to the Session’ when they are finished to come back to the main room.

Once you have sent people to breakouts, you can monitor them. Head over to How to Monitor Breakouts in Progress to learn more!

Text Box Functions

At the bottom right of your CircleSpace™️, you can see a text box. This text box is so much more than just a chat. You can chat with everyone (chat), make lists for later (notes) or take notes that will only be visible to you (pad).

  1. Chat is shared with all people in a room. Under ‘Advanced‘ in the left-hand side menu, it can even be downloaded for later reference.
  1. Notes can be reordered, assigned to other people, added to different groups, deleted or marked as completed. Want to learn more about the Notes feature and how to use it? Read on here.
  1. Pad is a personal place for scribbles. You automatically take it with you in each Circles session you join.

NOTE: You can download both the Notes and the Chat of your session in the tools menu. For more instructions check out our article about the Notes feature.

Share a PDF from Your Google Drive

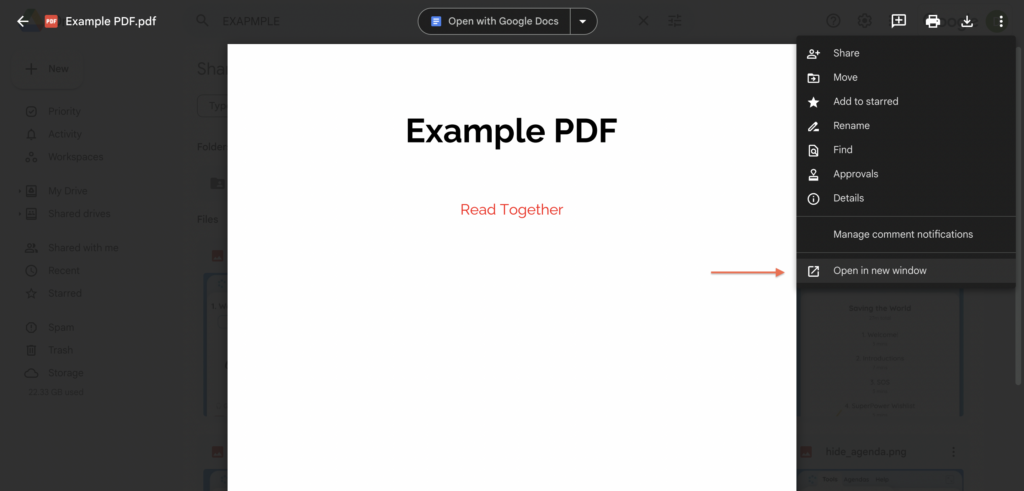
You can easily share a PDF in CircleSpace™️. Either add a button that opens it to your agenda (INSERT LINK), or follow the steps below to bring it into the CircleSpace™️ immediately:

  1. Open the PDF you want to share from your Google Drive.
    Click the three dots in the top right corner and select ‘Open in new window
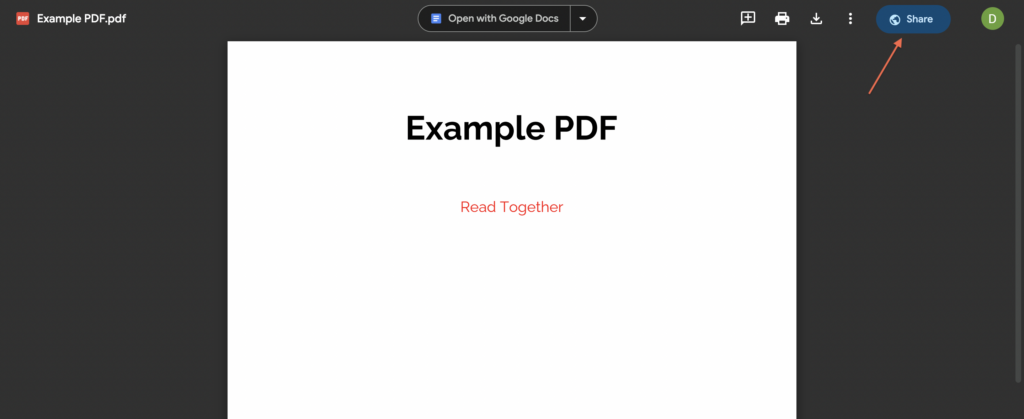
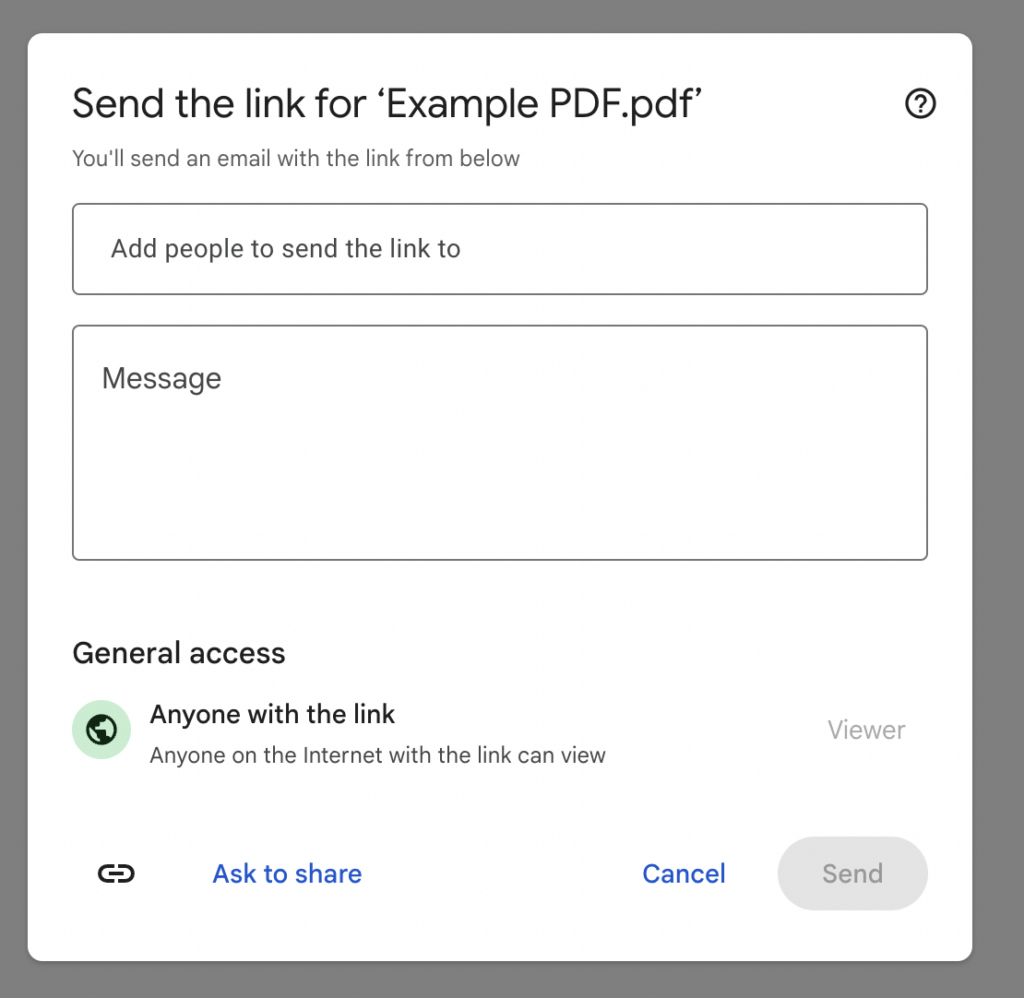
  1. In the new window that opens, in the same menu click “Share“.
  1. Make sure that permission settings are set to ‘Anyone can View’

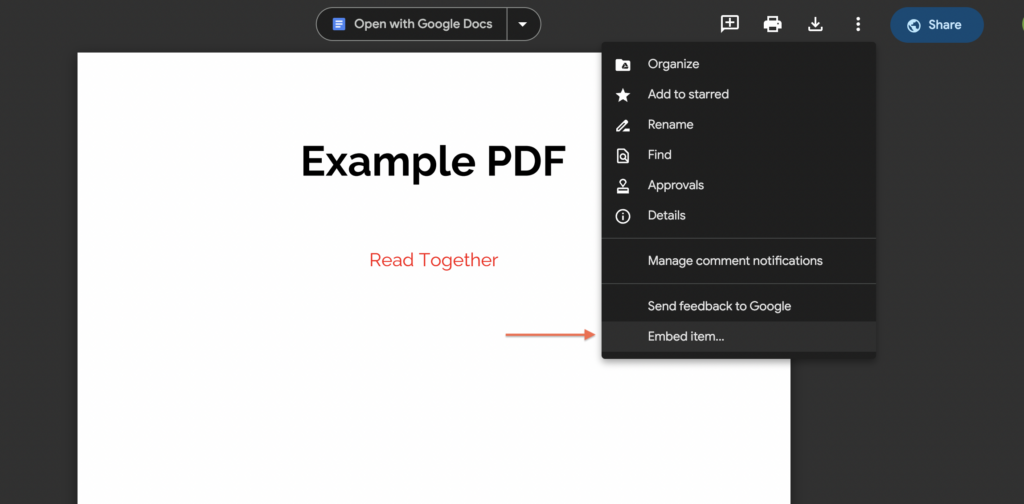
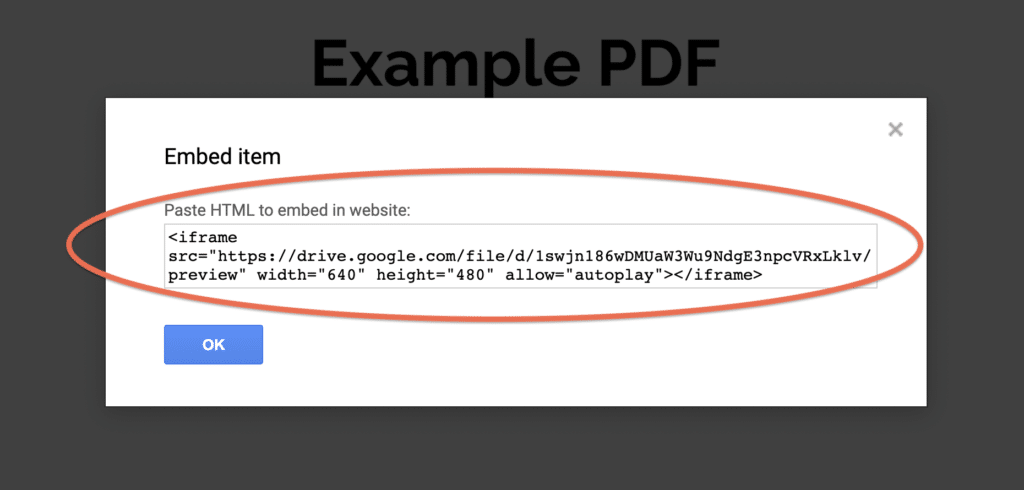
  1. Now, click on the three dots in the top right corner again and select ‘Embed item‘.
  1. Copy the embed link.

  1. You can create a ‘Share document’ button in your agenda using this embed link. To learn how to add a button to share a document in your agenda, check out this (INSERT LINK) article. If you want to show the PDF right away follow the steps below:
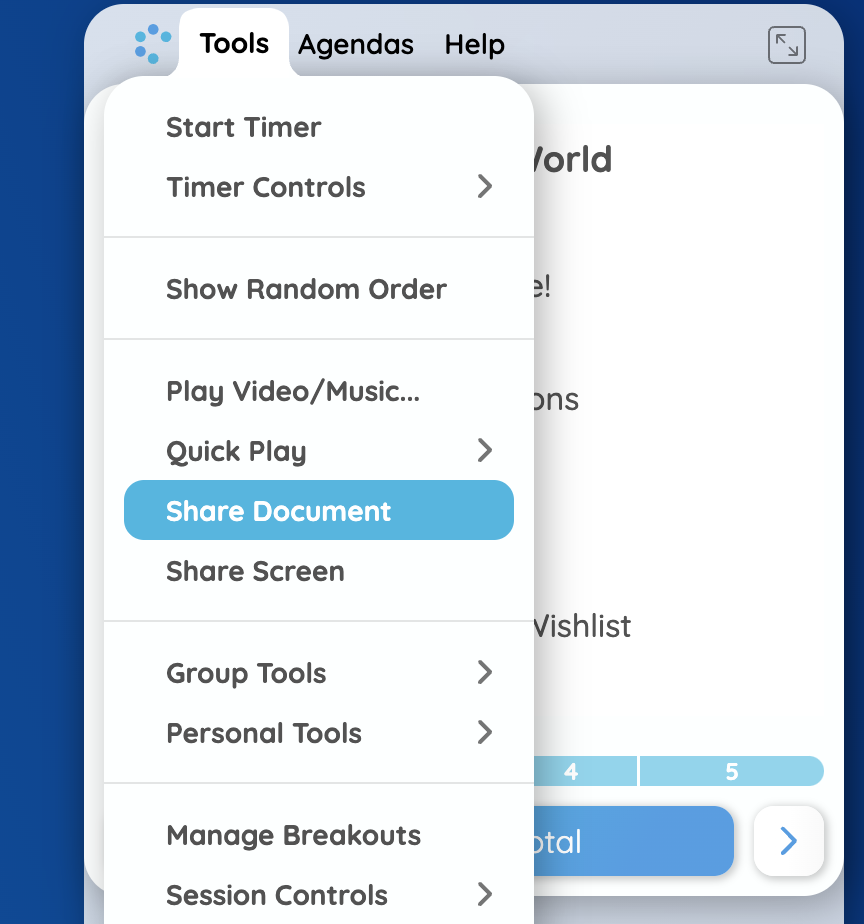
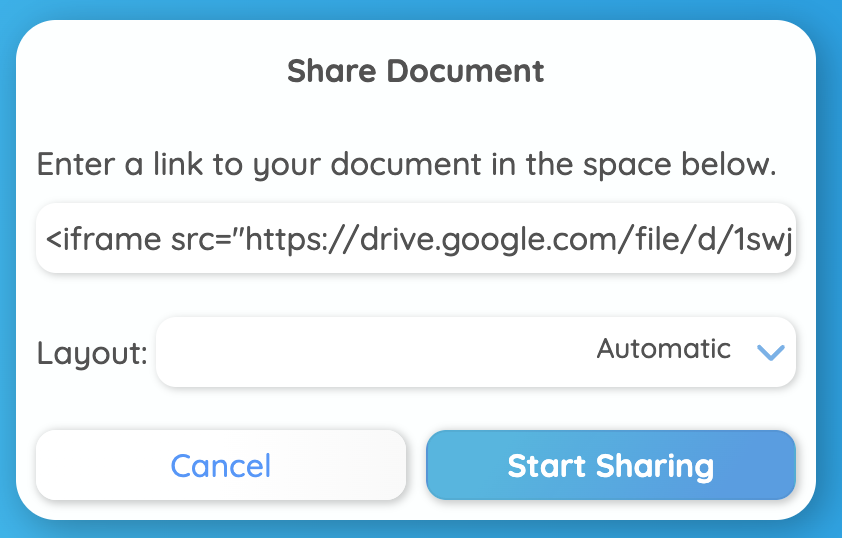
  1. In the CircleSpace™️, open the Tools menu on the top right and select ‘Share Document’, where you’ll paste the embed link you just copied
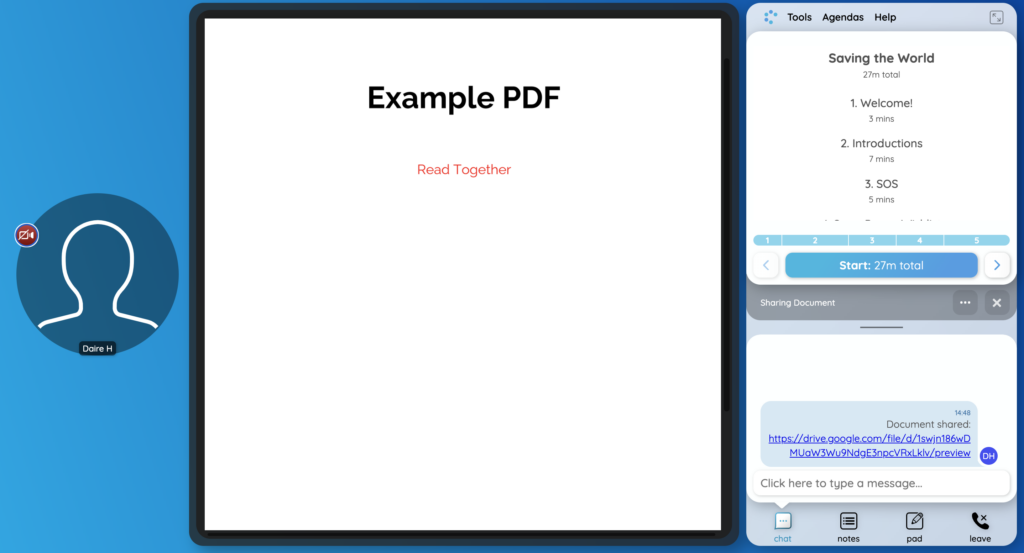
  1.  The PDF will display for all of the participants in the room, and the link will share in the chat allowing participants to open the document in another tab if they wish.

NOTE: Each participant can independently choose whether to display the document in portrait or landscape mode by clicking the three dots in the media tray under the agenda.  

To close the document for all participants, click the ‘X‘ in the media tray under the agenda.

Edit an Agenda in the CircleSpace™️

At Circles, our easy to use and interactive agendas allow structured and facilitated sessions without taking up too much attention.

You can edit your agendas on either the My.Circles Dashboard, if you have access to it, or in the CircleSpace™️. To find out how you can edit agendas in the My.Circles Dashboard, check out this article (INSERT LINK). If you want to know how to edit your agenda within the CircleSpace™️, read on.


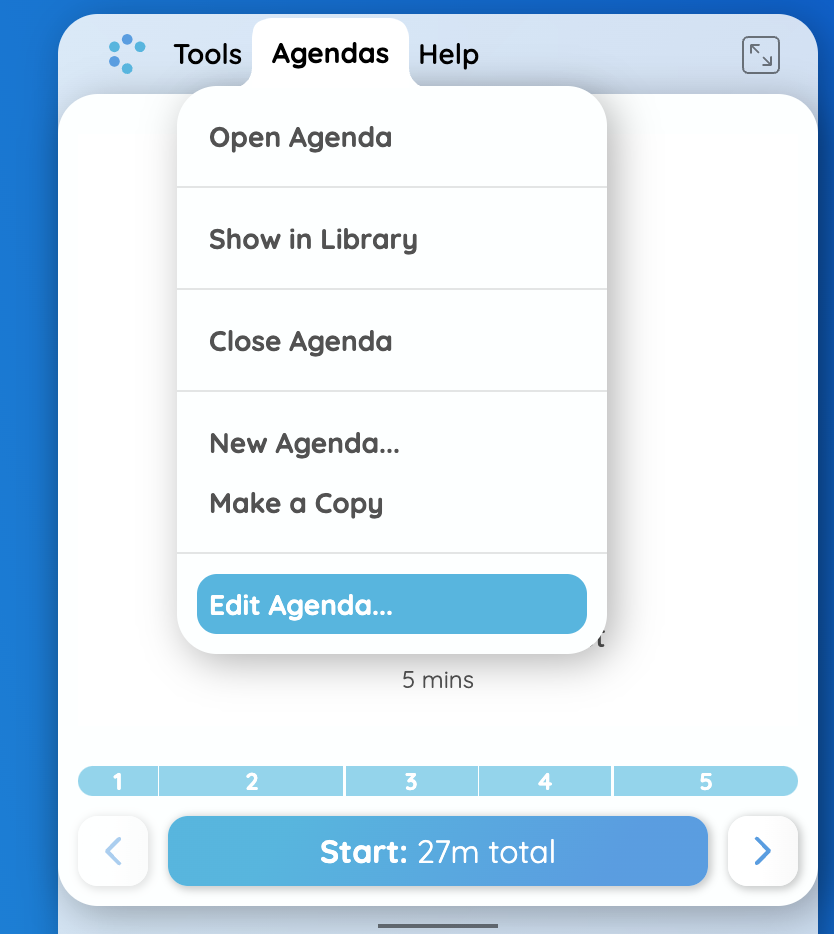
  1. Click on the ‘Agendas’ button in the top right of the Circles meeting space.
  1. Click ‘Edit Agenda…’ on the dropdown menu to begin editing the agenda.
  1. To exit the agenda editor, click on the ‘Save’ button to keep any changes you’ve made, or cancel if you want to discard your changes.
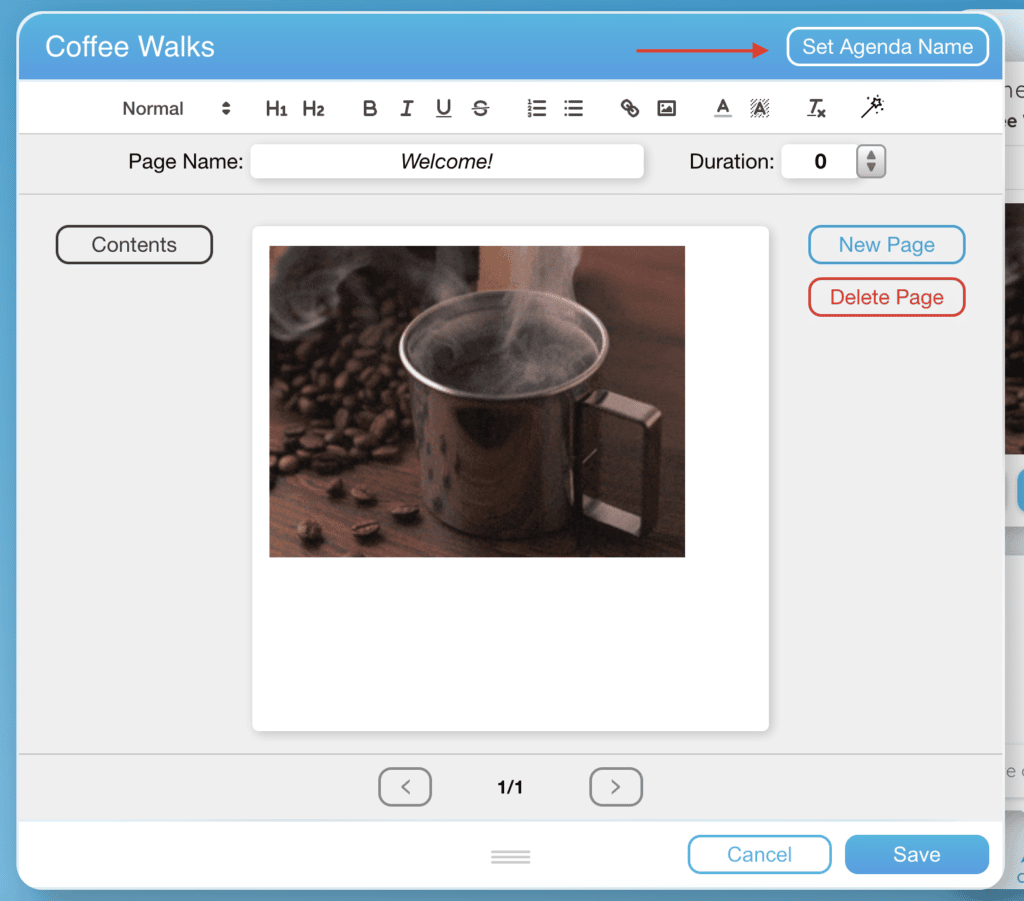
  1. To edit the name of the agenda, click ‘Set Agenda Name’ on the top right of the editor.
  1. Again, you can click the ‘Save’ button to exit agenda edit mode if you want to keep your changes, or ‘Cancel’ to discard your changes.
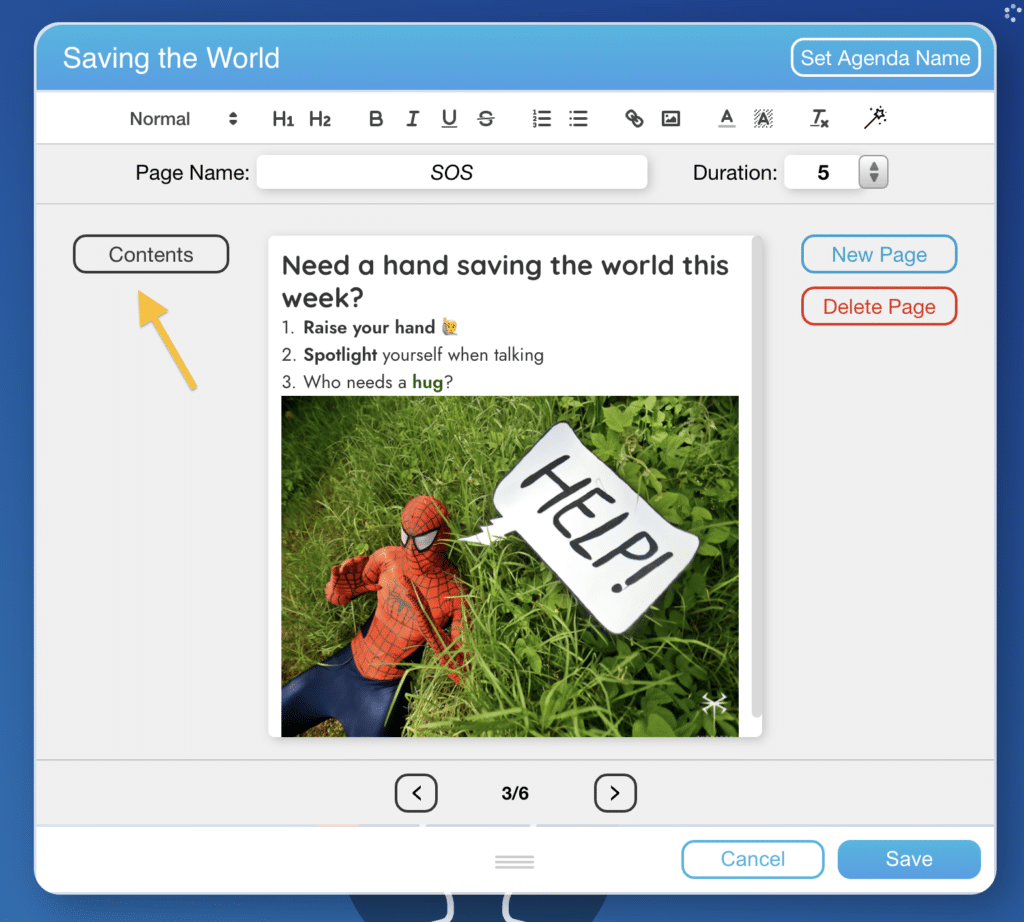
  1. Click ‘Contents’ in the agenda editor to see the table of contents and the timings for each page. 
  1. To move between pages of the agenda, click the arrows at the bottom of the page.
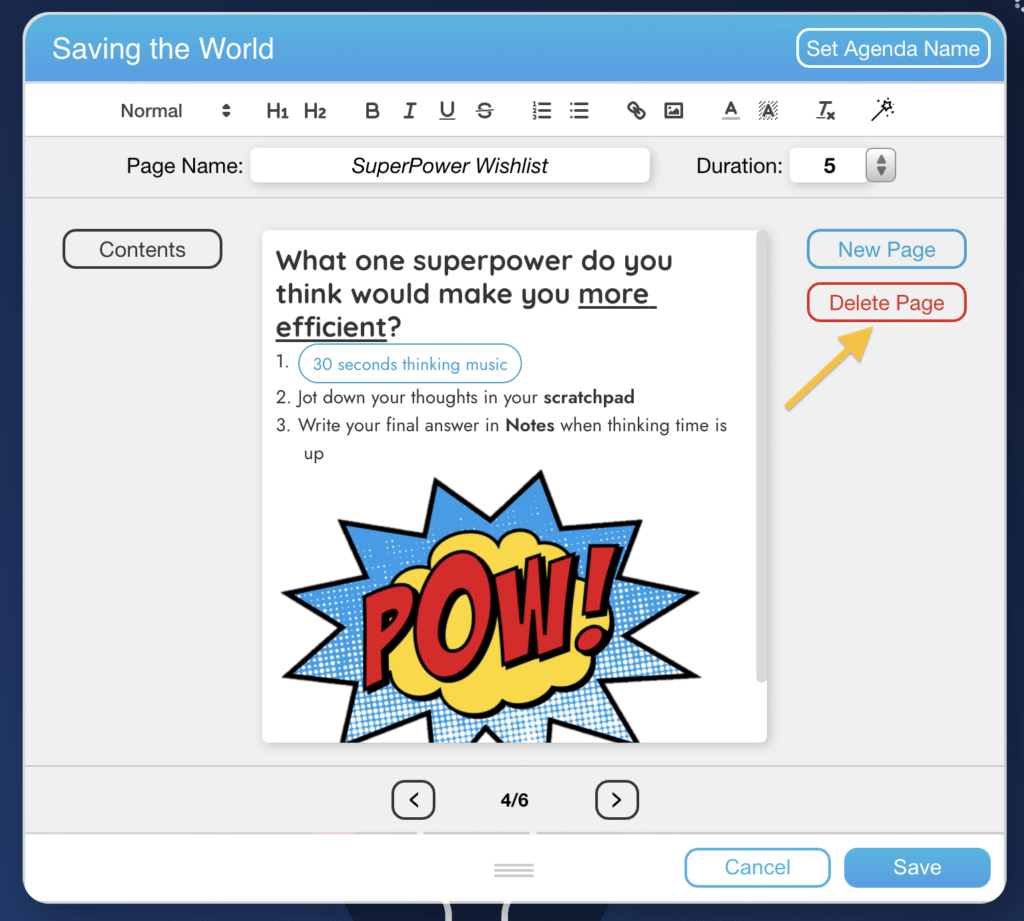
  1. If you want to delete a page, click the red ‘Delete’ button and then confirm your selection by clicking ‘Delete’ in the popup window.
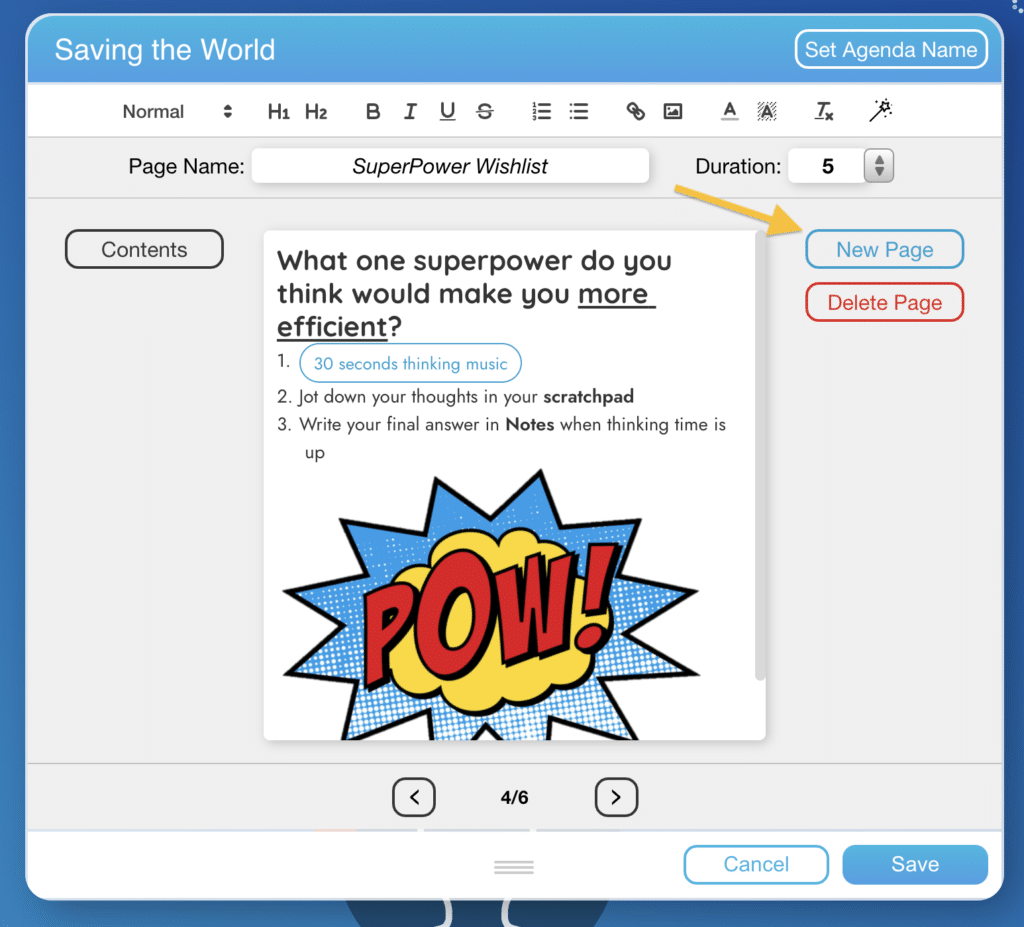
  1. To add a new, blank page to your agenda, click the blue ‘New Page’ button.

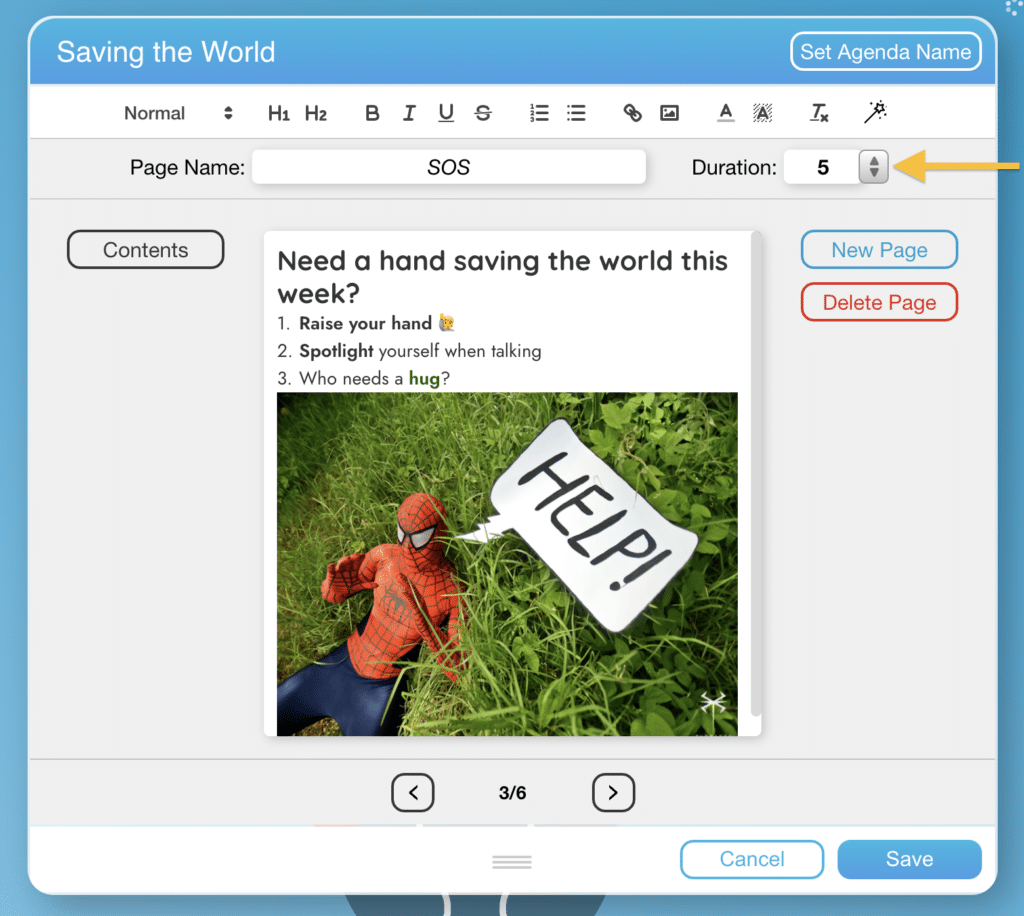
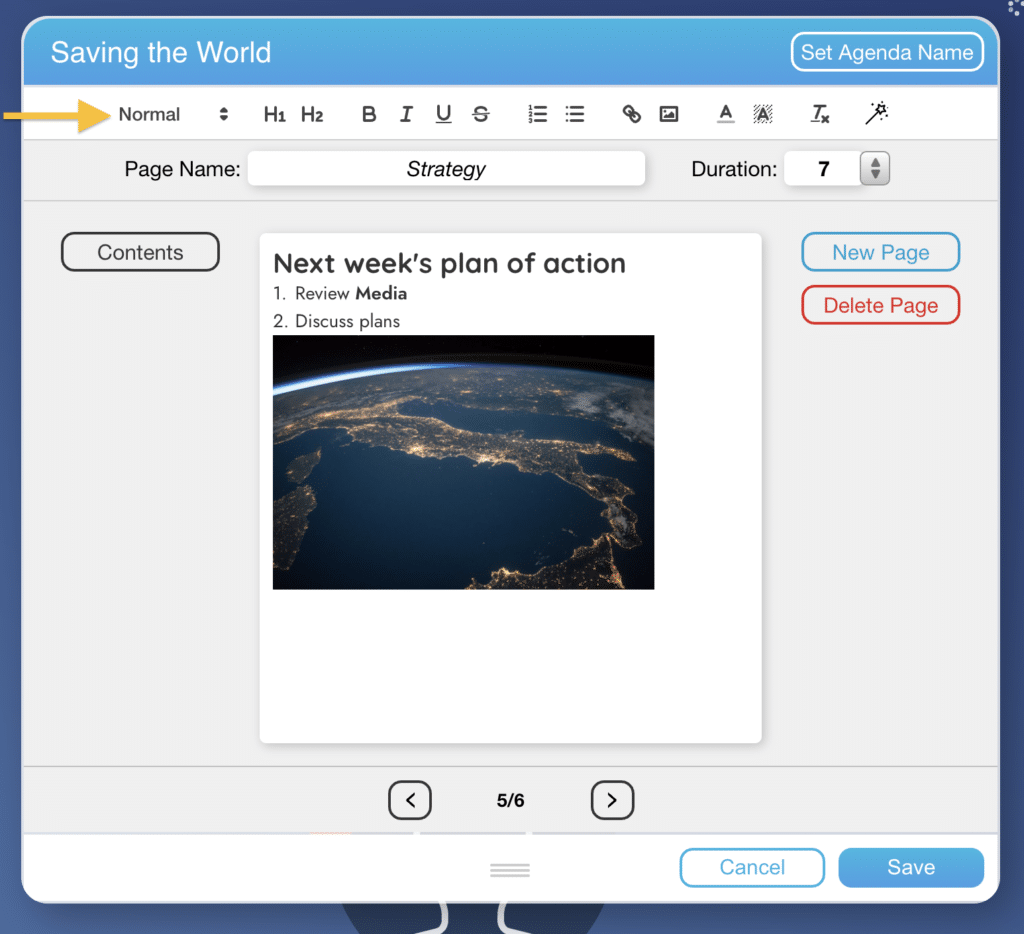
5. You can adapt the time of each agenda page by clicking in the ‘Duration’ box next to the slide name and typing the number you want, or by clicking the arrows to the right of the box. The total time of your agenda is displayed in the table of contents by clicking ‘Contents’.

  1. You can write in the main body of the agenda page by clicking in the main field of the agenda editor.
  2. To adapt the contents, use the icons at the top of the editor.

This menu will allow you to:

  • Adapt the font size
  • Select a heading style (we recommend to use H2 within the body)
  • Write something in bold, cursive, underlined or crossed out
  • Make a numbered list or bullet points
  • Add a hyperlink (select the word you want to be hyperlinked and then click on the link sign to add the URL)
  • Insert a picture (click on the image and insert the image URL)
  • Change the color of the font or the background
  • Remove formatting
  • Add a button 

One of our favorite features of the CircleSpace™️ is the ability to add buttons to the agenda that allow you to do different things with just one click. Below you’ll see how to add these buttons to the agenda while in the meeting space.

  1. Click the buttons icon on the top menu and select which one you’d like to use from the drop-down menu.
  1. If you want to add a media button (an image, a song, a video or a document), select the relevant media from the list. A window will appear in which you can insert the button title and the URL. Make sure that the link you are adding is publicly available! For videos and music, we recommend using YouTube URLs.
  1. To change the name of a button, simply click on it and type the desired name.

Any edits you make to the agenda in the CircleSpace™️ will be saved permanently once you click the ‘Save’ button on the bottom right, so you won’t need to also edit the agenda in your my.circles dashboard.

Playing Audio/Video on the Go

NOTE: The easiest way to bring media into your session is by preparing a button in your agenda ahead of time. Check out Create your own Agenda and Edit an agenda in the CirclesSpace™️ for more info. However, sometimes you need to quickly add in some work music or a birthday song.

Playing audio, like a song or a guided mediation, with your participants is very easy:

  1. Copy the URL of the YouTube video you want to listen to by clicking ‘Share‘ and copying the link.
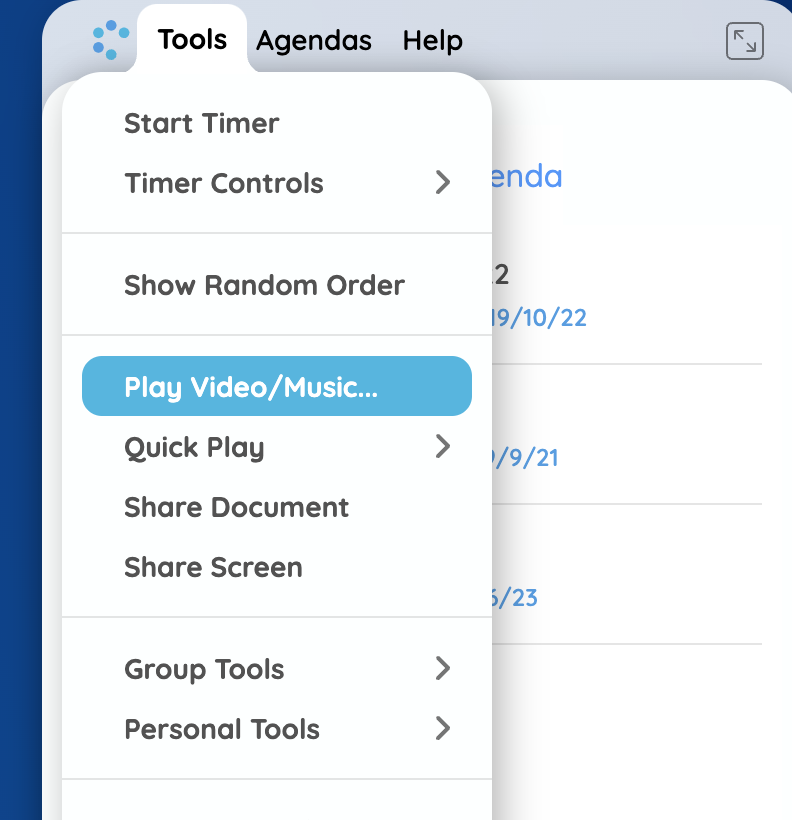
  1. In the CircleSpace™️, open the Tools menu in the top right above the agenda and select ‘Play Video/Music..’ from the list
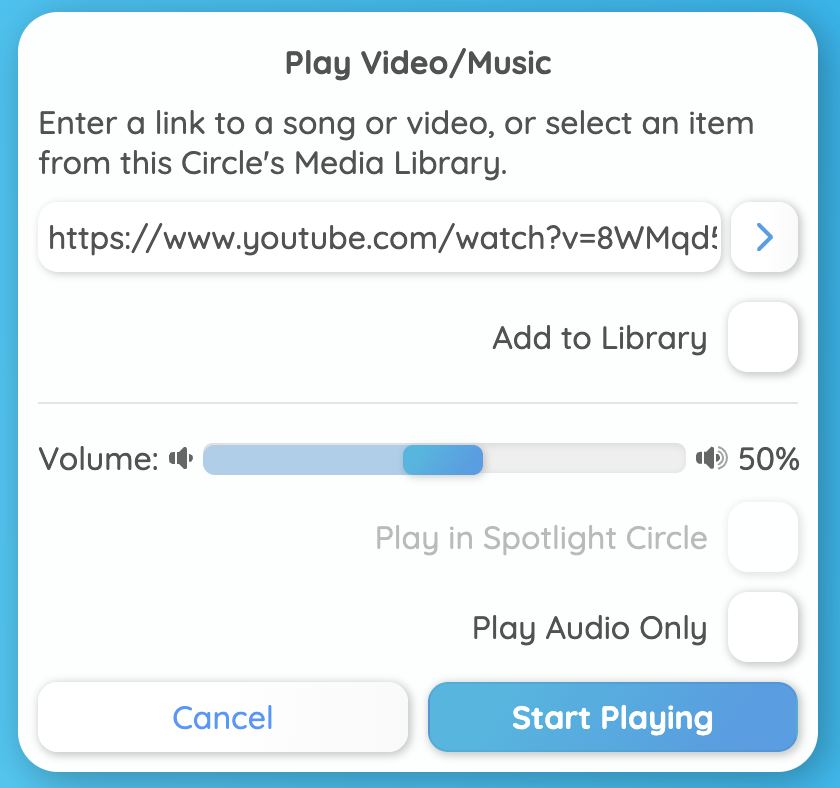
  1. In the panel that appears paste the link that you’ve copied from YouTube. You also have the option to:
    • Set a global volume for everyone in case the default is too high or too low
    • Add to Library – this keeps the track in your circle’s Quick Play library so you can easily access it in future
    • Play in the spotlight
    • Play as audio only
  1. Press the ‘Start Playing’ button to start your video or audio.

NOTE: You can control the video or audio from the media panel that appears under the agenda while it is playing.