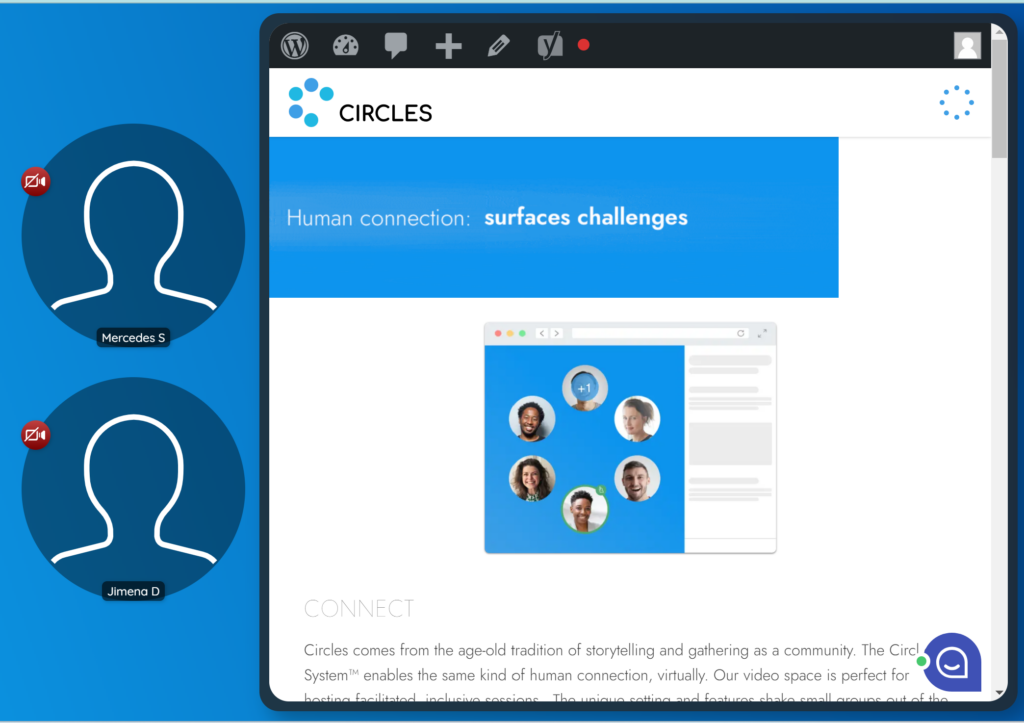
At Circles, you have the possibility to use many types of agendas for the different sessions that you might be facilitating. We recently updated the agenda library and browser system to make it even more seamless and straightforward. You can use one of our samples, adapt it to your needs, or create your own agenda from scratch. Learn more about agenda creation here.
In this article, you will learn how to bring up the agenda you want to use in your CircleSpace™️ and start the progress bar.
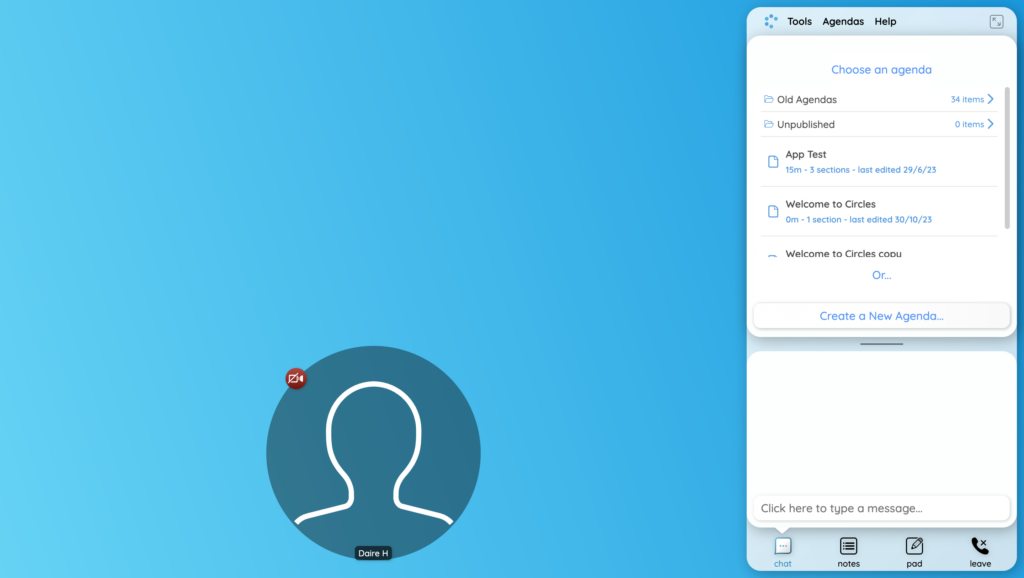
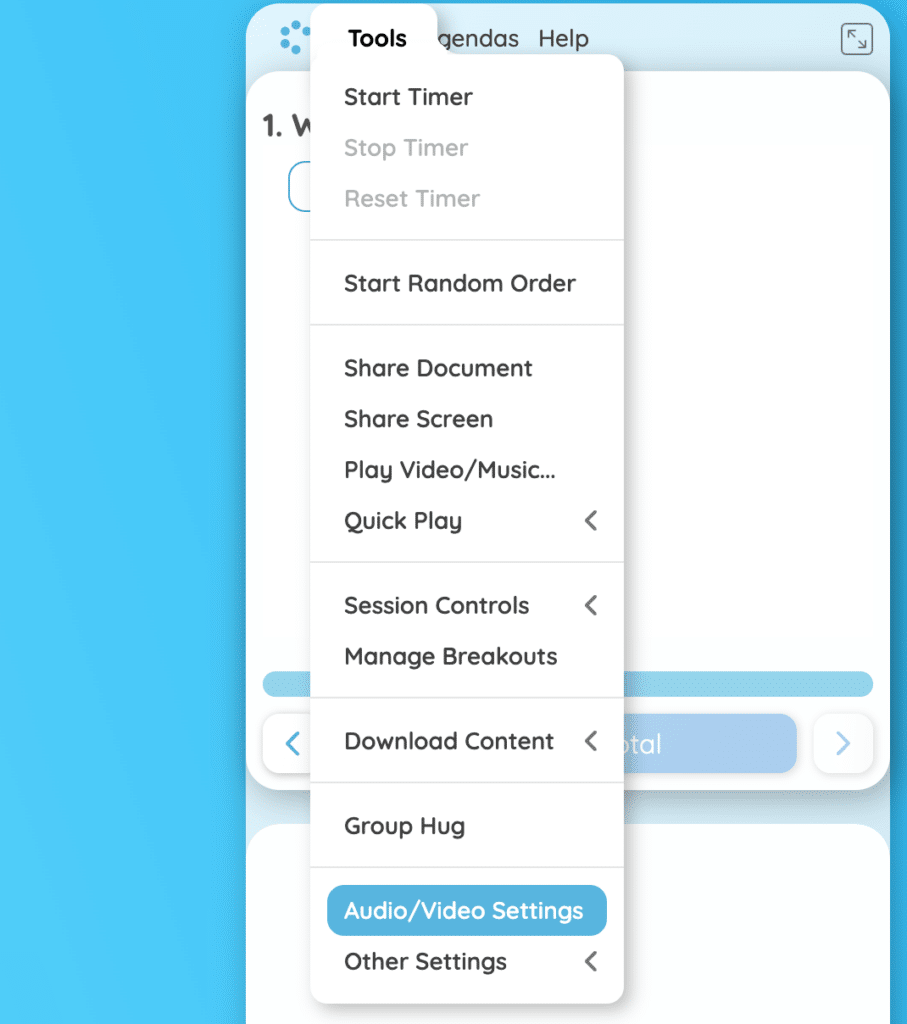
After entering the meeting, you will see a blue background and your agenda space on the right side of your browser window. The agendas that show as immediate options are those that have been put in the Program Agendas folder from the agenda library (more on that later!)
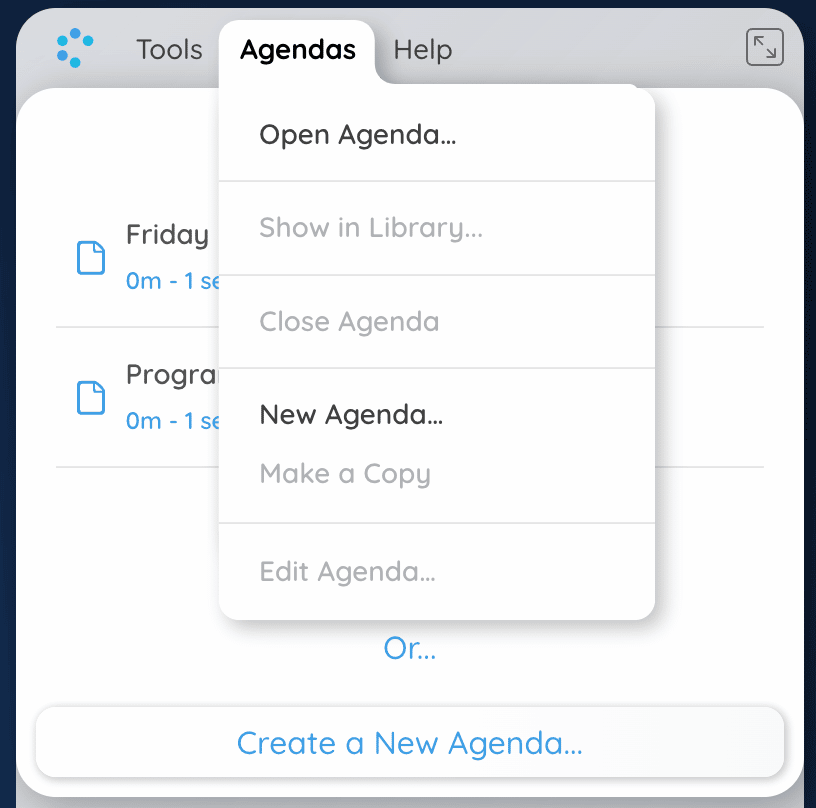
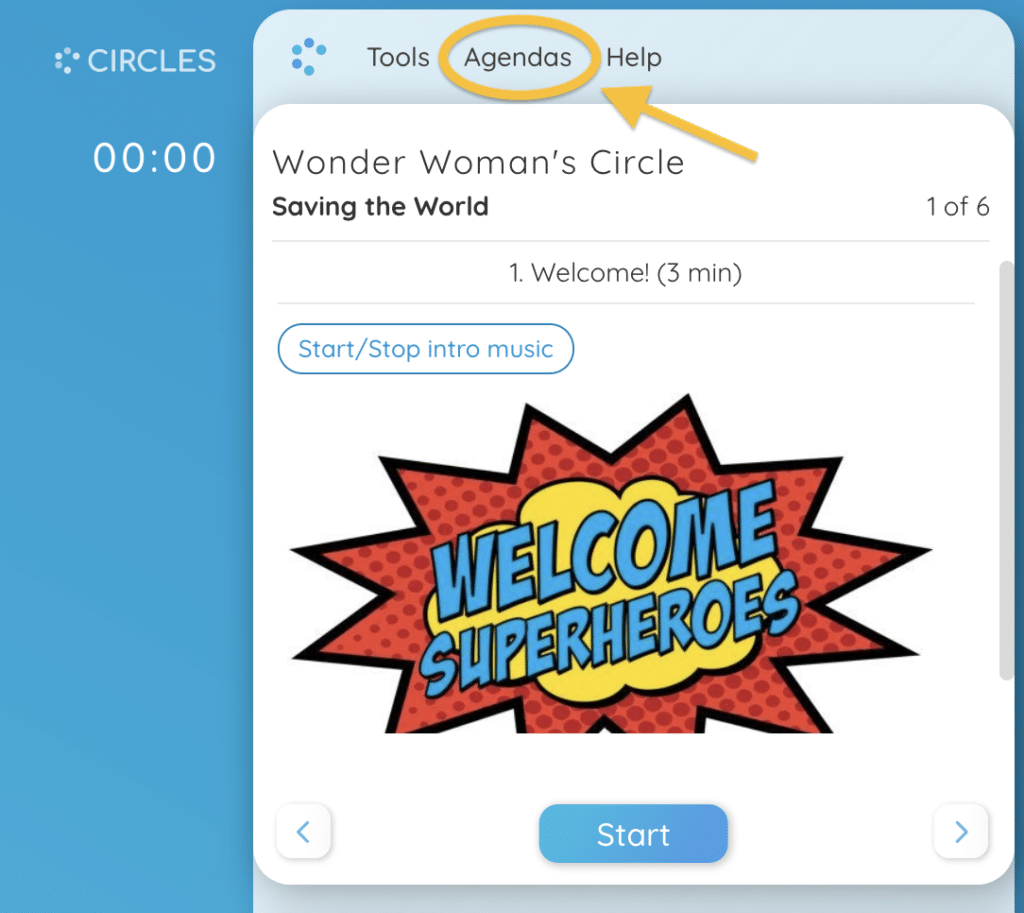
Select one of the available agendas by clicking on the Agendas tab at the top right of the agenda space on the right and selecting ‘Open Agenda…‘ You also have the option to begin a new agenda, make a copy, and edit agendas directly in the CircleSpace!
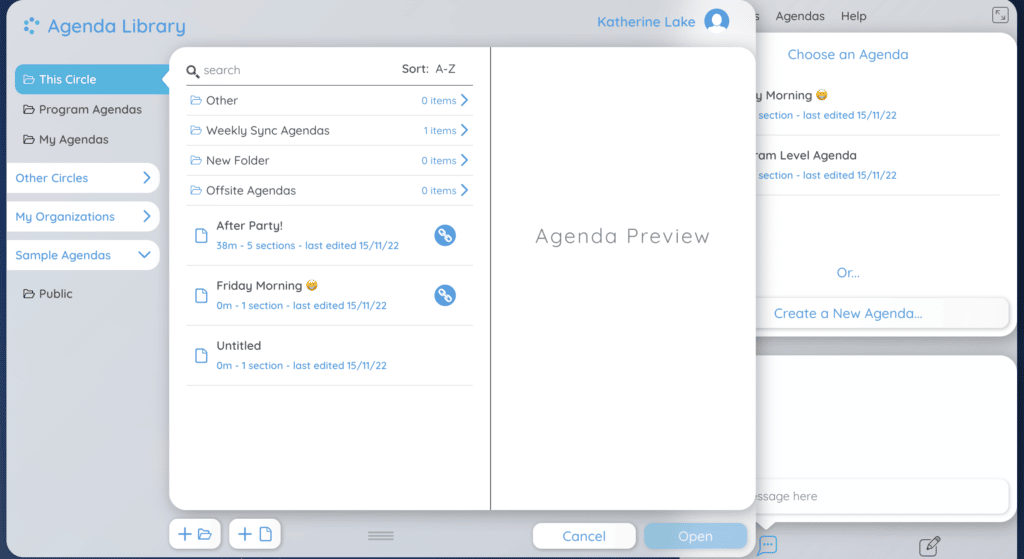
Click on “Open Agenda…” to see your current circle agendas. From this window, you can browse the Agenda Library and select between the agendas already published to your circle, other circles in your organizations and a host of sample agendas.
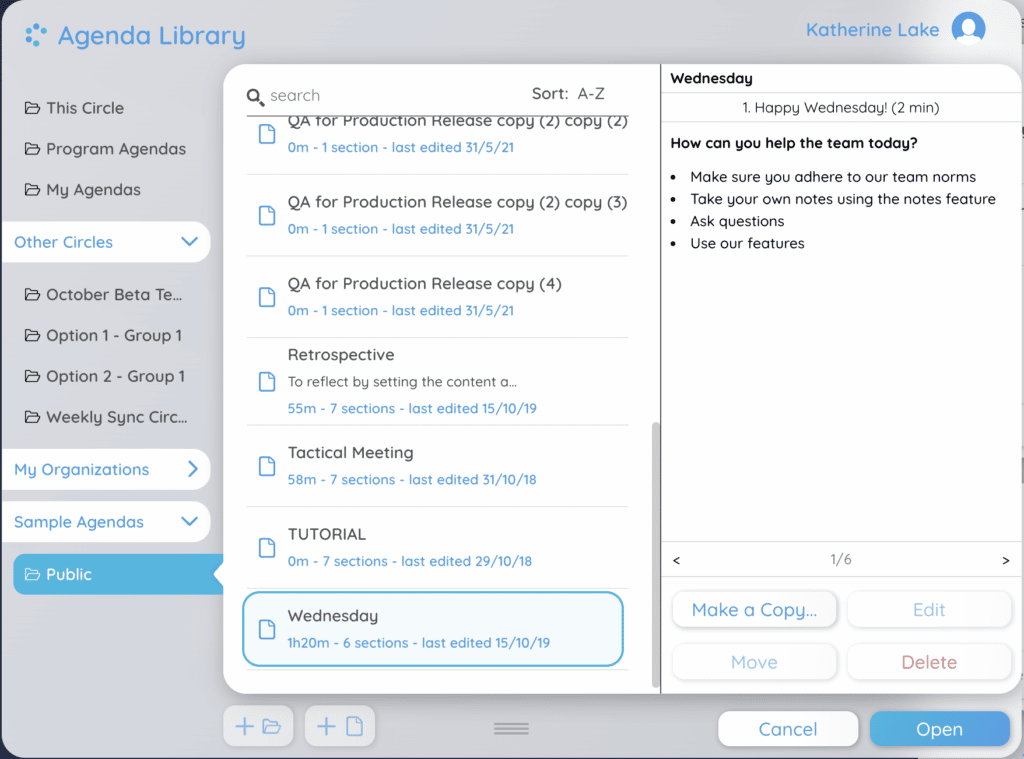
You can browse the other available agendas by clicking through the sections on the left of the agenda library. You can select agendas to open them from other circles in your organization into your current circle, make a copy and edit them directly in the CircleSpace™️, and even select from our ‘Sample Agendas‘ library to take a pre-made agenda template and edit as your own. To use an agenda, simply select the blue ‘Open‘ button in the bottom right corner of the Agenda Browser.
If you would like to edit your agenda, select the Agenda tab in the agenda space on the right and click ‘Edit Agenda…’ Clicking this will prompt the Agenda Editor to appear directly into the CircleSpace. Once finished, click ‘Save’ in the bottom right corner of the Agenda Editor. Any changes you make to this agenda in your circle will only apply to this version of the agenda; the parent agenda that you chose to import will not be changed.
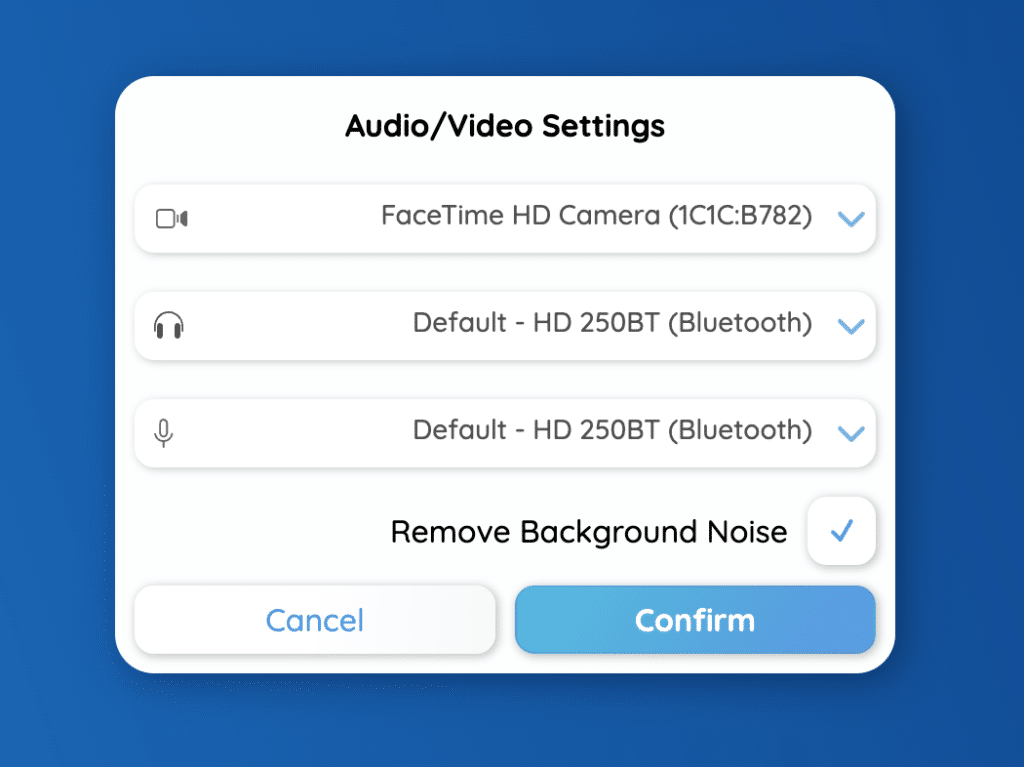
Sat in a noisy cafe? Dog barking in the background? We hear you… literally. Noise Reduction is here to help by making sure your fellow participants can only hear you and not the distractions in the background. Designed to isolate your speech from any other sounds around you, this tool will allow you to reduce the background noise that other participants may hear while you’re speaking.
To switch it on, navigate to the Tools menu at the top right of the circle above the agenda space, and open the ‘Audio/Video Settings‘ menu.
Click in the box next to ‘Remove Background Noise‘ and select ‘Confirm‘ to activate it. Try clapping your hands to see if the other participants in the circle can hear!
On some older devices, this feature may cause battery levels to drop slightly faster than usual.
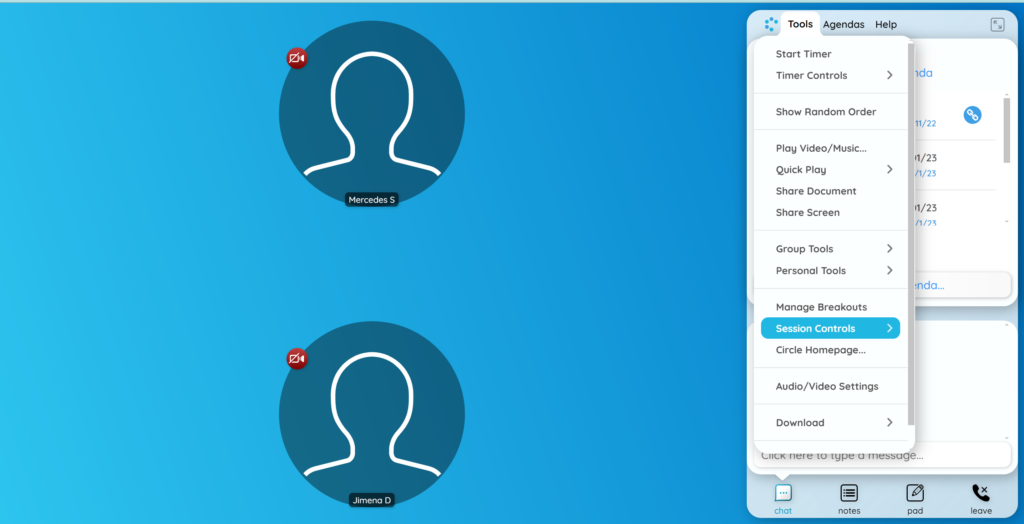
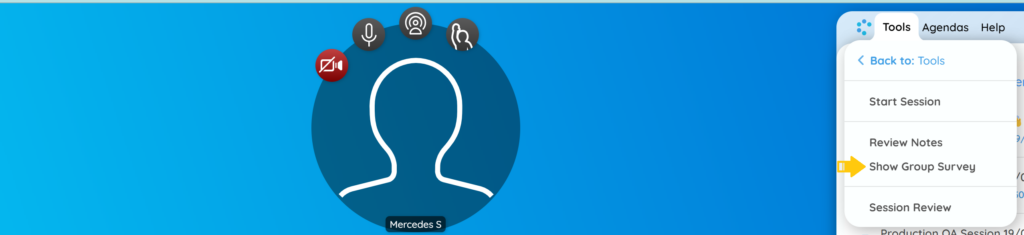
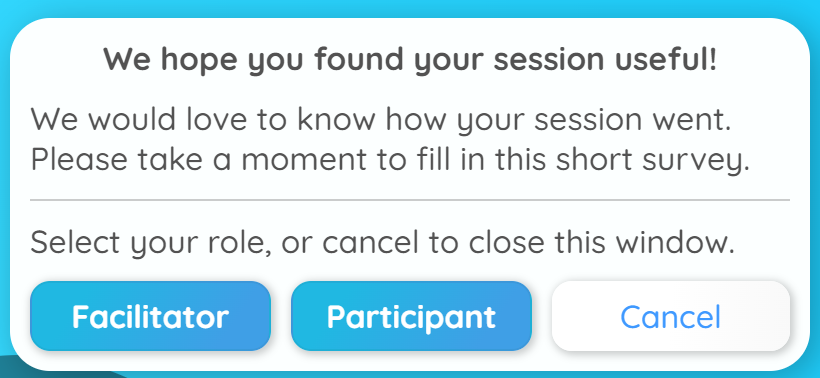
Trigger the survey by clicking the button in your agenda, or selecting ‘Group Survey’ inside the Tools Menu under “Session Controls”
A pop-up window will open in your CircleSpace™️. Each circle member will be able to individually select whether they facilitated today’s session or participated in it.
Matching their selection, each circle member will subsequently be shown be shown the facilitator survey or the participant survey.
Clicking the x on the top right of the survey window will only close the survey for the person who clicked it. This way, each person can take as much time as they need to complete the survey.
STEP 2: Analyze your data
Go to your My.Circles Dashboard to consult your data. In the History & Metrics section, you can find the numerical scores, averages and evolution over time and selecting an individual circle and session, you can read the feedback each participant left.
MORE INFO
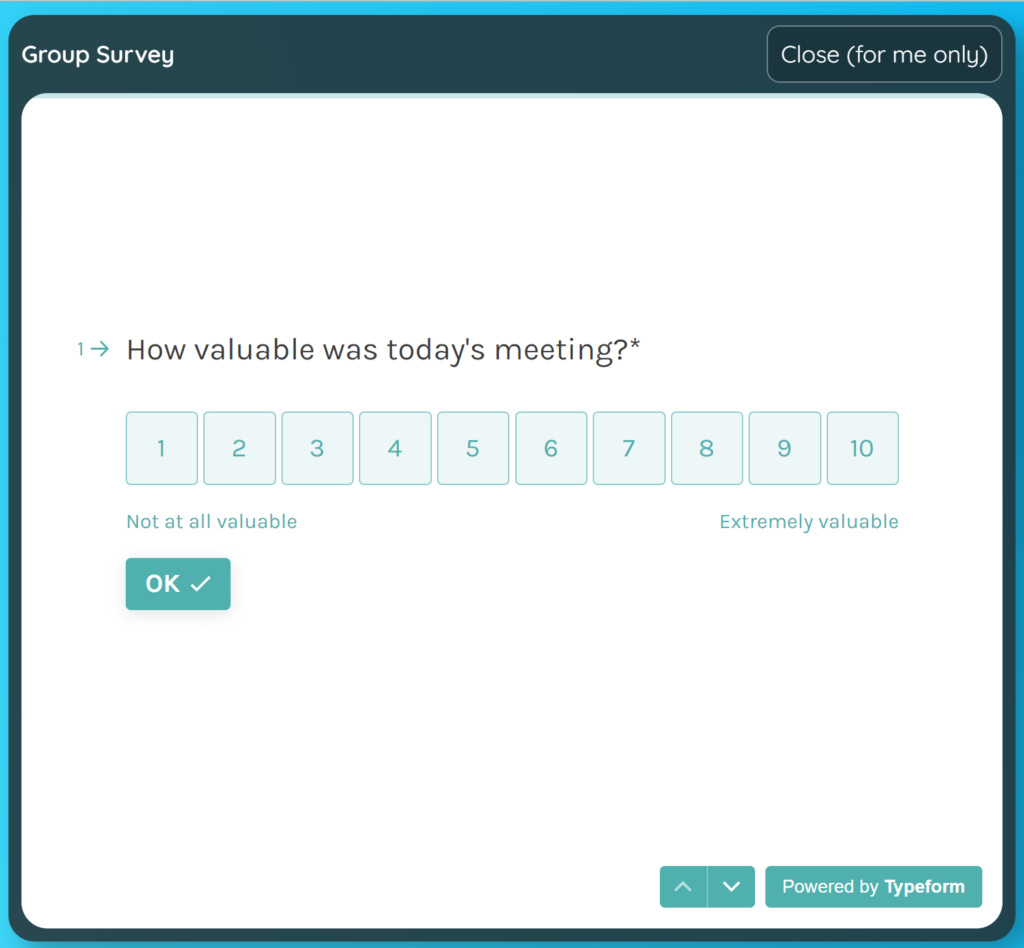
The participant survey consists of 6 easy but useful questions:
How valuable was today’s meeting? 1 = not at all valuable, 10 = extremely valuable
Why?
Please assess your facilitator on how well they facilitated today’s meeting: 1 = very poor, 10 = excellent
Why?
Did you experience any technical issues during the session?
What did you have problems with?
The facilitator survey goes beyond to work as a tool for more analysis and allow for easy communication with Circles:
Rate your performance as a facilitator during today’s session 1 = very poor, 10 = excellent
Why?
How valuable was today’s meeting? 1 = not at all valuable, 10 = extremely valuable
Why?
What was most valuable for the circle?
What needs improvement? *(Agenda, structure, technology, training, or other)
Technology status: How was the video platform experience? 1 = Major issues, meeting had little to no value as a result 2 = Many higher priority issues, meeting was severely affected 3 = Several low to medium level issues, was distracting the meeting 4 = Some minor issues, did not greatly affect the meeting experience 5 = No issues. Everything worked great!
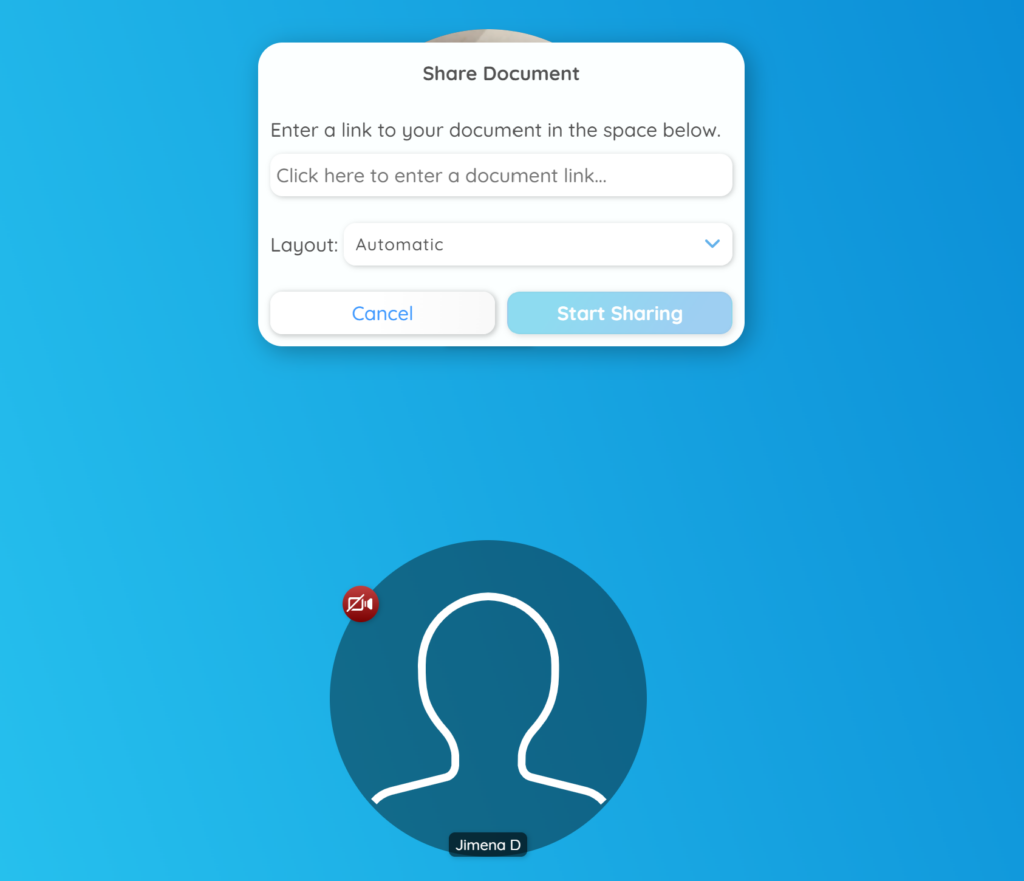
The best way to share media, like a website, with your peers is to prepare a button in the agenda ahead of time. However, sharing it immediately in the CircleSpace™️ is very easy, too. All you need is the link:
Copy the URL of the website you want to share. (You can do this by just clicking on the address line in your browser and then right-clicking and selecting ‘Copy’. You can also copy with your keyboard by simultaneously pressing the ‘CTRL‘ and ‘C‘ keys, or ‘Command‘ and ‘C‘ on Mac. )
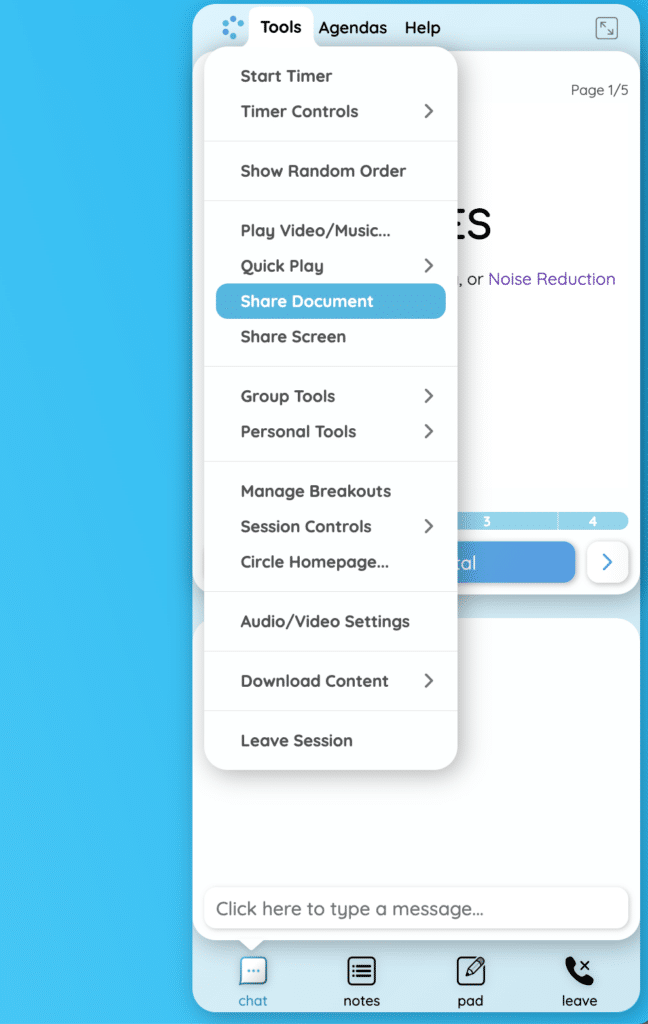
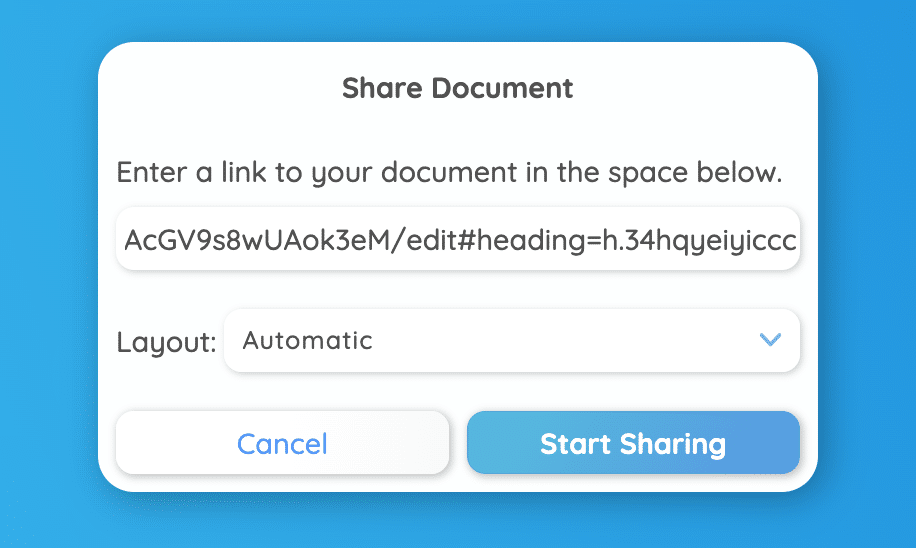
Open the Tools menu in the CircleSpace™️ and choose the ‘Share document‘ option. Then, right click and select ‘paste’, or press the ‘CTRL‘ and ‘V‘ keys in the space provided.
Pressing Start Sharing will open the website within the CircleSpace™️ for all participants to see.
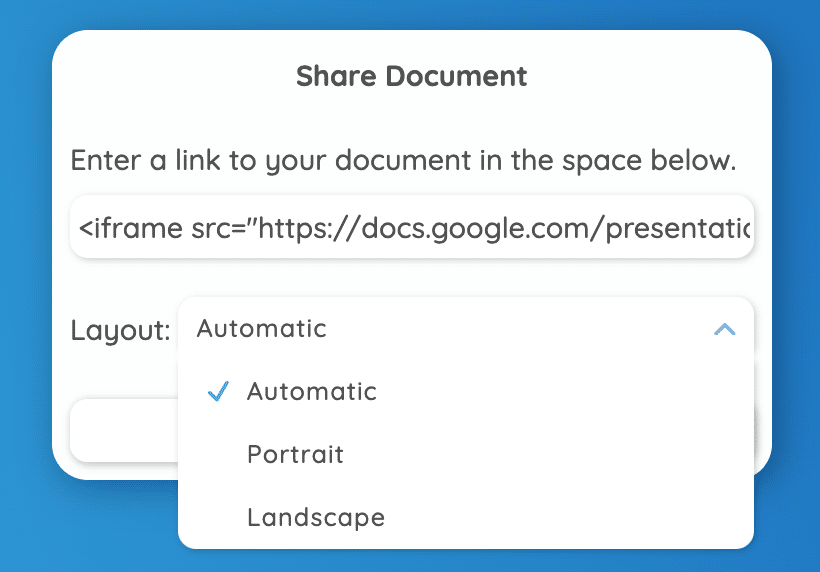
NOTE: Each participant can independently change the layout between Portrait or Landscape mode by clicking on the three dots under the agenda.
4. To close the website for all participants, click the “X” on the tray below the agenda.
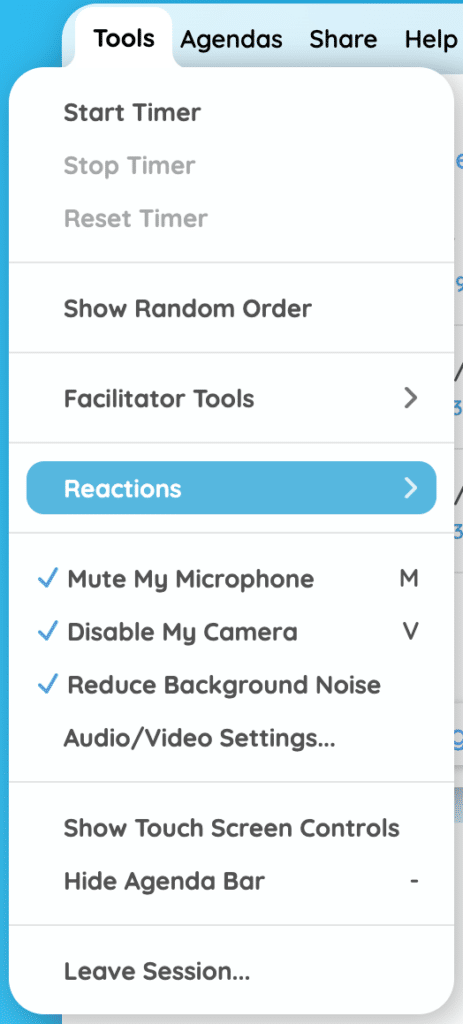
Looking for some handy keyboard shortcuts to use during a Circles session? Look no further! Here’s a list of all the current shortcuts available in the CircleSpace™️.
To add a +1, simply press the ‘1‘ key.
If you want to raise your hand to ask a question or raise a point with the group, press the ‘H‘ key. Pressing it again will lower your hand.
To mute or un-mute your microphone, press the ‘M‘ key.
To move to the spotlight press the ‘S‘ key. Repeating this will remove you from the center.
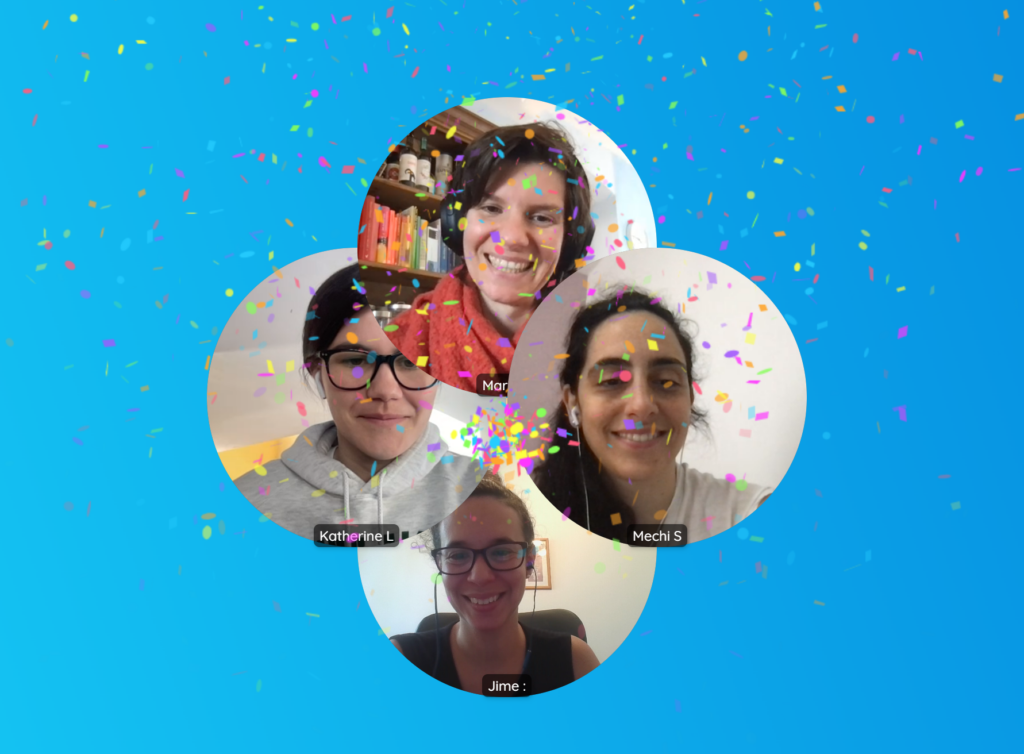
At Circles, our mission is to foster human connection and create memorable experiences virtually. One of our favourite ways to do this is with the ‘Hug’ feature used in the CircleSpace™️. Read on to discover how to give a ‘Random Hug’, a ‘Group Hug’, or a hug to another participant.
One of the best ways to show your support to another participant in your circle is to give them a virtual hug, and this couldn’t be easier in the CircleSpace™️.
Activate the virtual hug by clicking your mouse down in the center of the circle of the person you wish to hug, and holding for at least three seconds. This will cause all of the participants in the circle to hug the person you select.
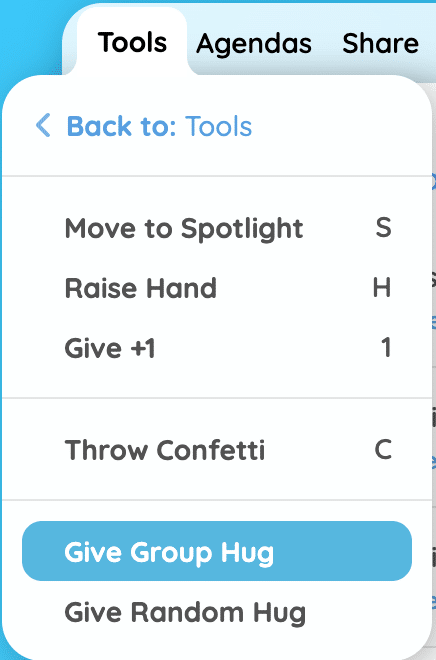
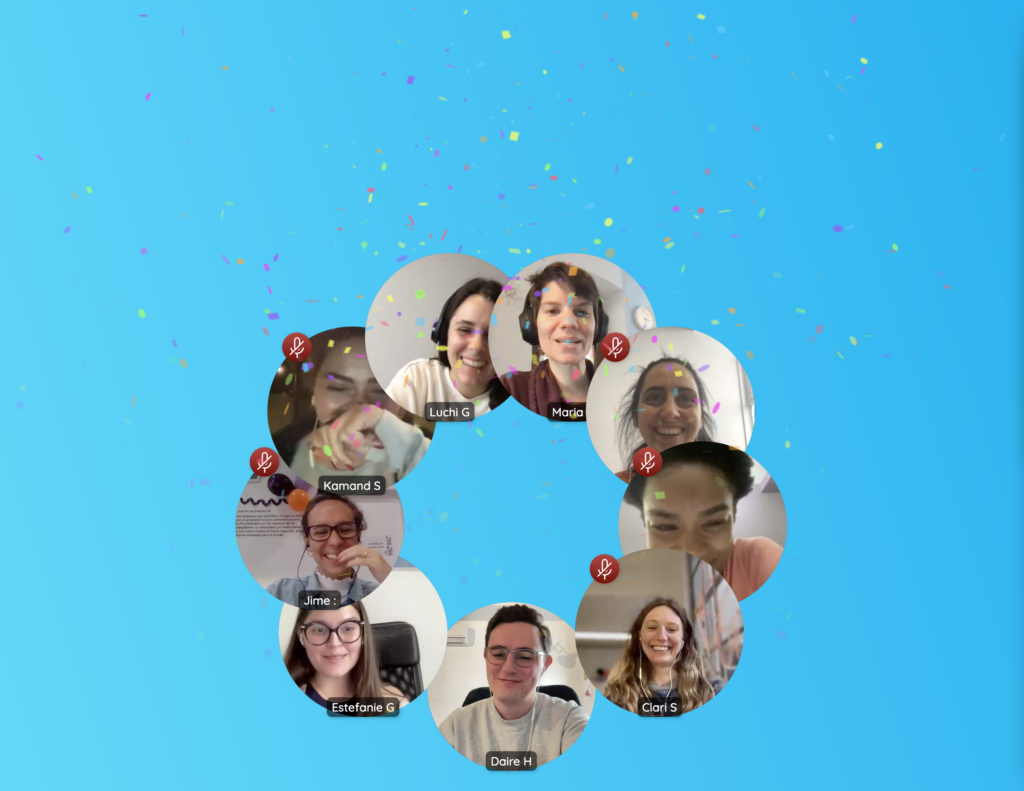
The CircleSpace™️ allows you to not only show your support with a hug for another participant, but also for the whole group! You can trigger a Group Hug from the Tools menu on the right side of the room to bring the whole circle together.
Click the Tools menu on the top right of the room above the agenda to open the tools menu.
Go to ‘Reactions’ and there you will find the option ‘Give Group Hug’.
All of the participants will move into the center of the circle for a group hug.
A ‘Random Hug’ (aka ‘Lucky Hug’) can be triggered from the Tools Menu – Reactions but can also be added as a button in the Agenda, which when pressed will choose a lucky participant at random to receive a hug from the other participants of the circle.
To add this button to your agenda, click ‘Agendas’ above the agenda space and select ‘Edit Current Agenda…’ if you want to edit the Agenda that is currently displayed or ‘Open Agenda…’ and look for the Agenda you want to edit in the Agenda Library.
Click the magic wand icon to add a button to your agenda page and select ‘Lucky Hug’.
When you have saved the agenda, all you will need to do is click the button you have created. A random participant will then receive a hug from the other participants!
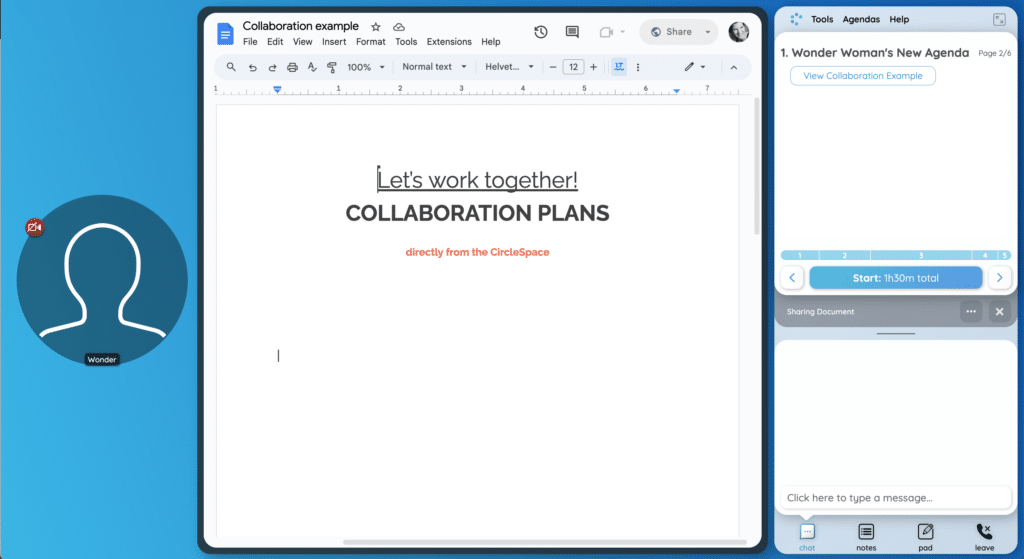
In the CircleSpace™️, you can easily display Google documents that you can collaborate in with your peers. Prepare a button in your agenda so you don’t have to worry about it during your session. Or follow the steps below to share your document immediately.
Collaborate in a Google Doc, Sheet or Slides together
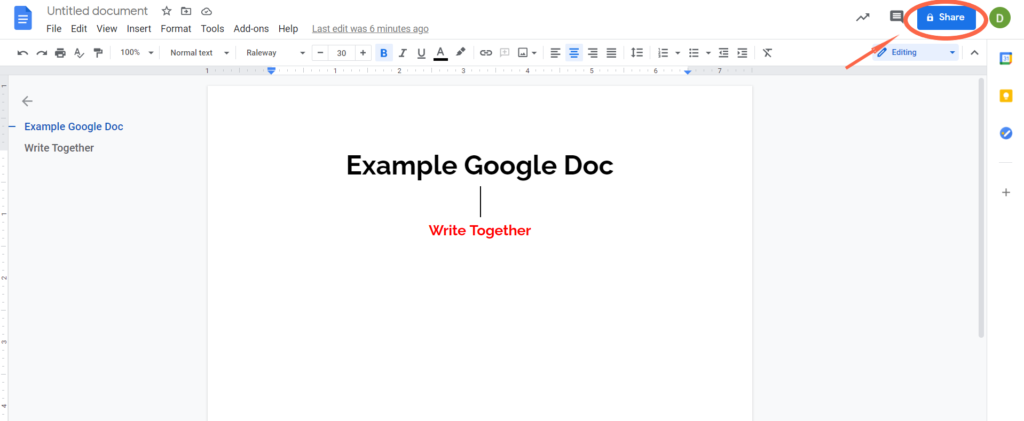
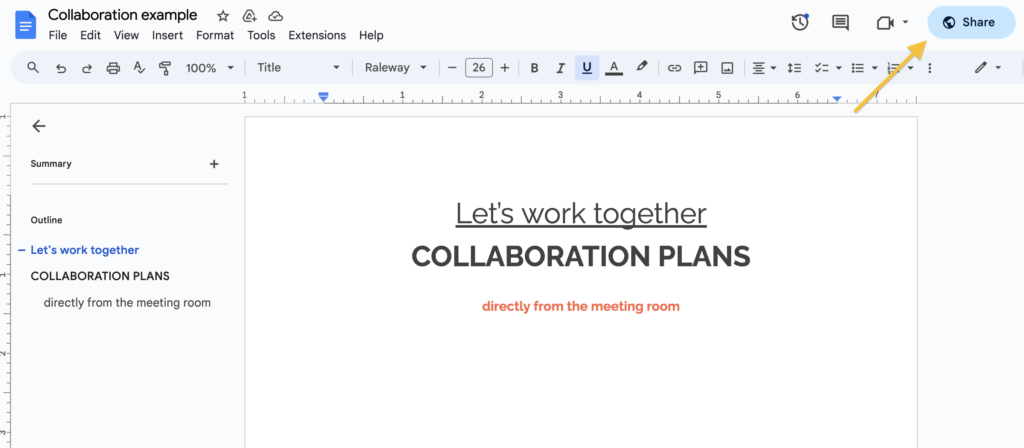
Open the document you want to share in your Google Drive and click the “Share” button in the top right corner.
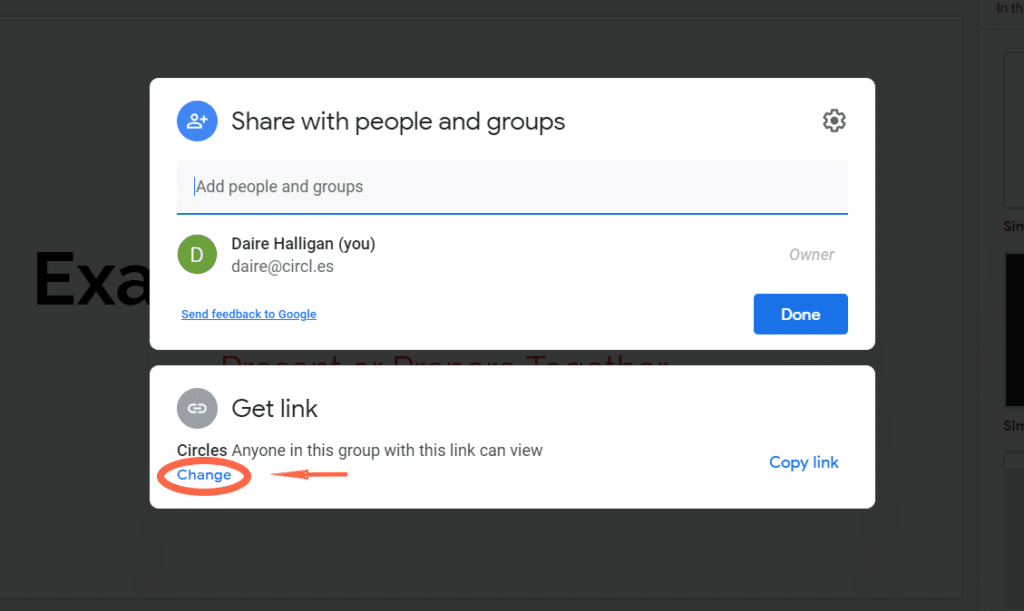
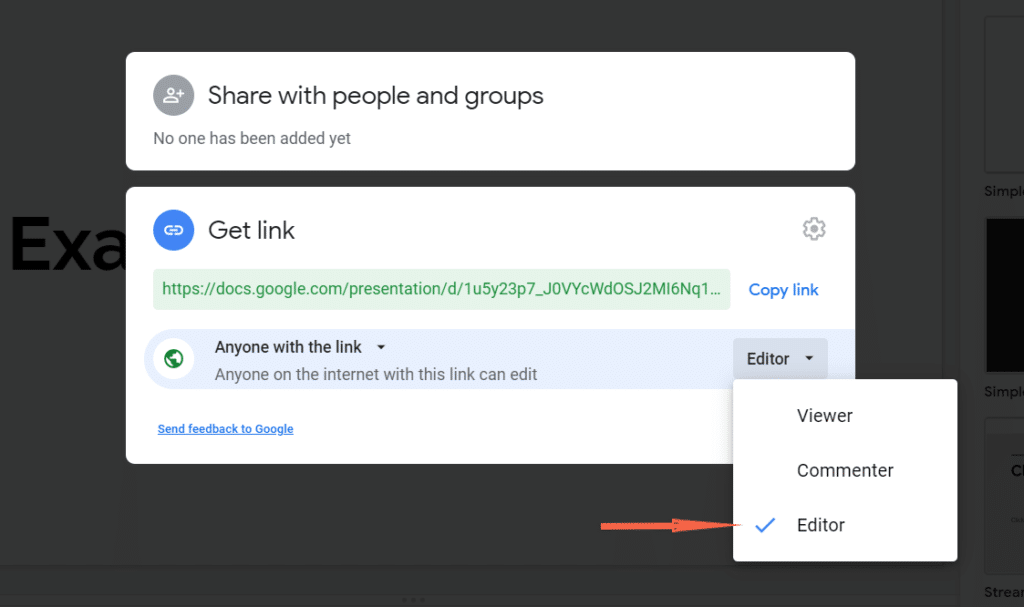
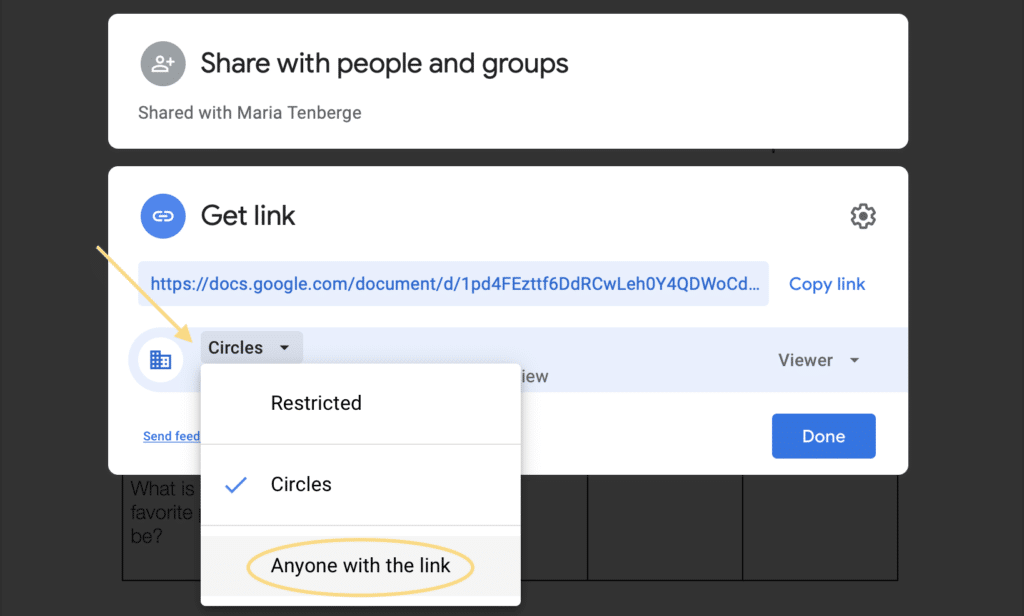
In the window that pops up, click ‘Change‘ at the bottom.
Then, select ‘Anyone with the link‘ on the left panel and change ‘Viewer‘ to ‘Editor‘ in the right panel to allow others to collaborate on the document.
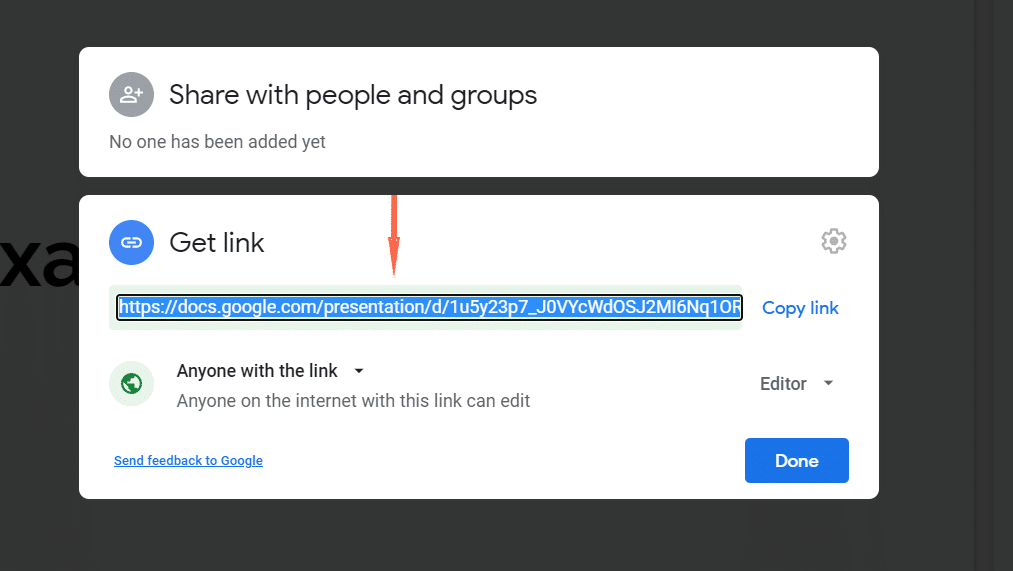
Google will automatically save your permissions preferences.
Now, copy the ‘Link to share‘
In the CircleSpace™️, open the Tools menu (on ‘Tools‘ on the top right).
In the Pop-Up Window that appears, paste the link into the first field. You can choose whether you wish to show the document in landscape or portrait view in the Layout menu. Then, click “Start Sharing”.
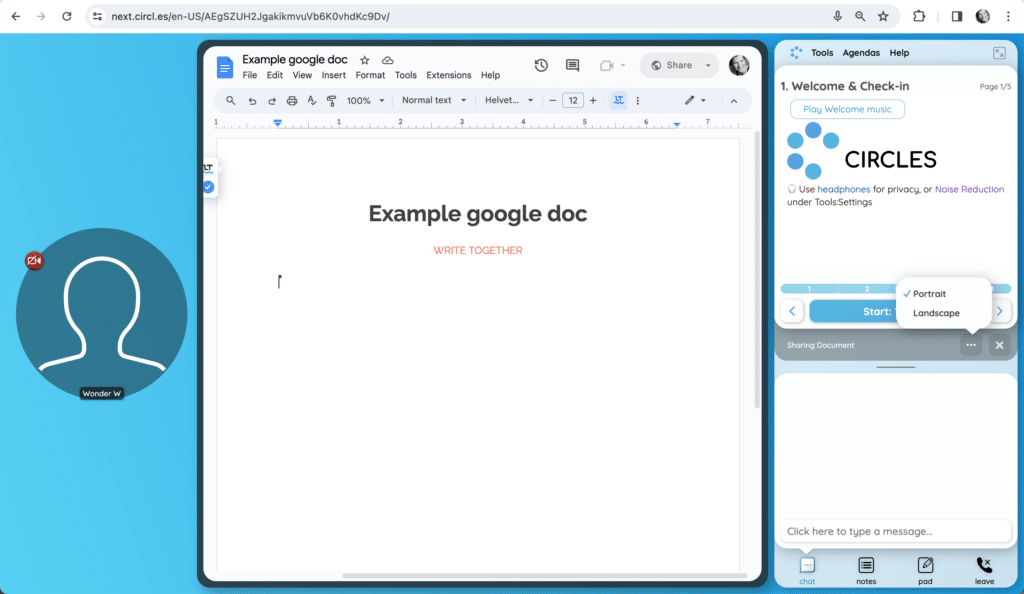
The Google Doc, Sheet, or Slide will display to everyone in the room. All participants can click into the document and start writing together.
NOTE: Each participant can change the layout or close the document, using the Sharing Document menu (grey box to the right).
Advice: You can hide the agenda to have more viewing space when sharing a document.
In the CircleSpace™️, you can do things together. When you work together, you collaborate, you share deeply. In this article, you’ll learn how to add a button to your agenda that opens a collaborative Google document – one of the many types of documents that can be shared in the CircleSpace™️.
As long as you have the option to share your documents with anyone (including those that don’t already have an account with the same platform you are using), you can share it in the CircleSpace™️, using the sharing link or an embed code. A couple of examples include Dropbox, Onedrive and Zoho.
Sharing A Google Document
Open the Google document you want to share in your Google Drive and click the ‘Share’ button in the top right corner.
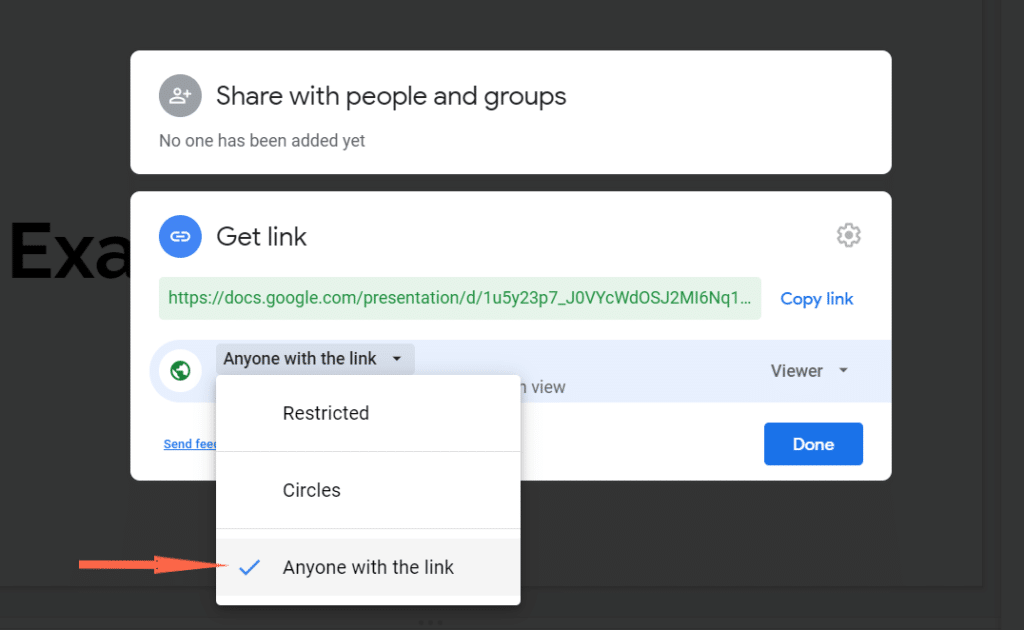
In the window that pops up, click in the box that says ‘Get link’.
Choose the options ‘Anyone with the link’ and select ‘Editor’ from the drop-down menus.
Click ‘Copy link’ and then ‘Done’.
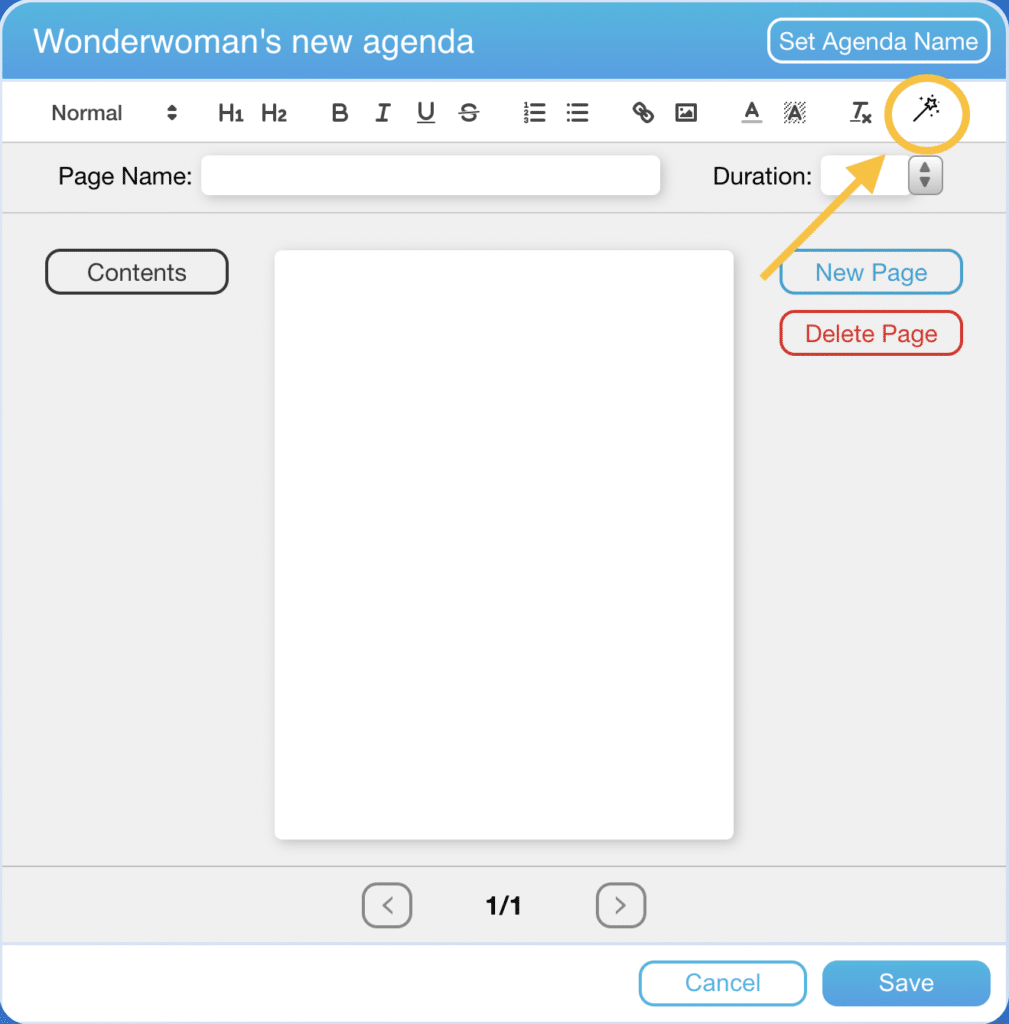
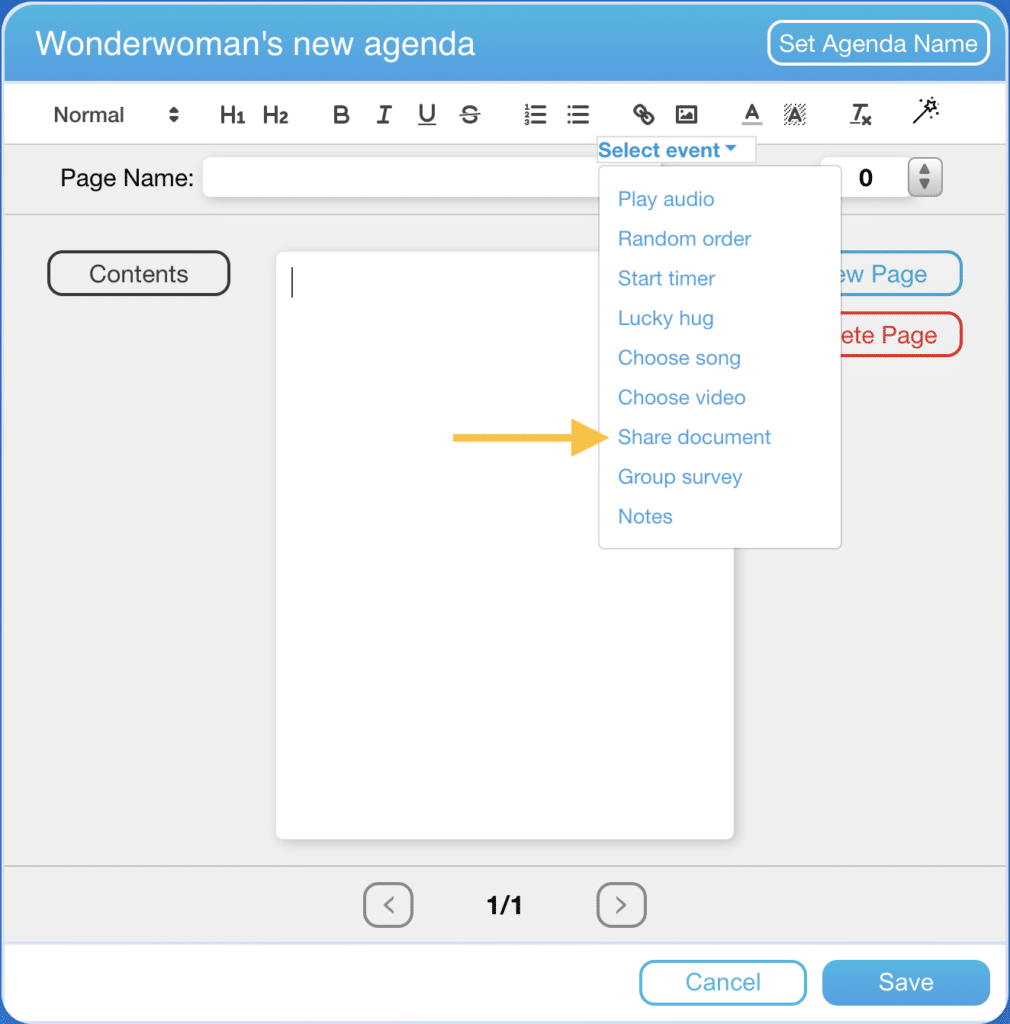
In your agenda editor (on my.circles or in the CircleSpace), click the magic wand icon to display a list of possible button functions.
Select ‘Share document’.
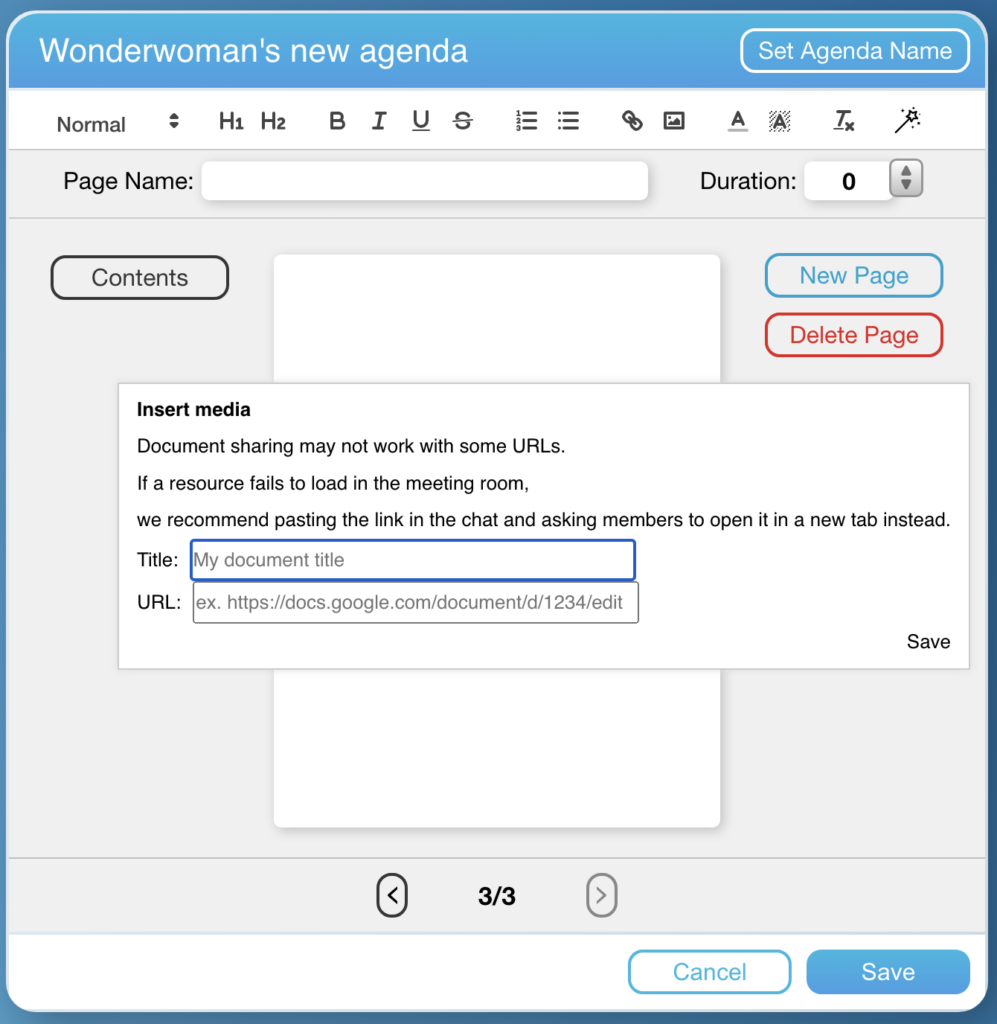
Here you will be prompted to:
Enter a title for the document. This will appear as the text within the button.
Enter a URL. Here, you should enter the ‘share’ link that you copied from your Google document. Alternatively, you can also paste embed links or iFrames into this box.
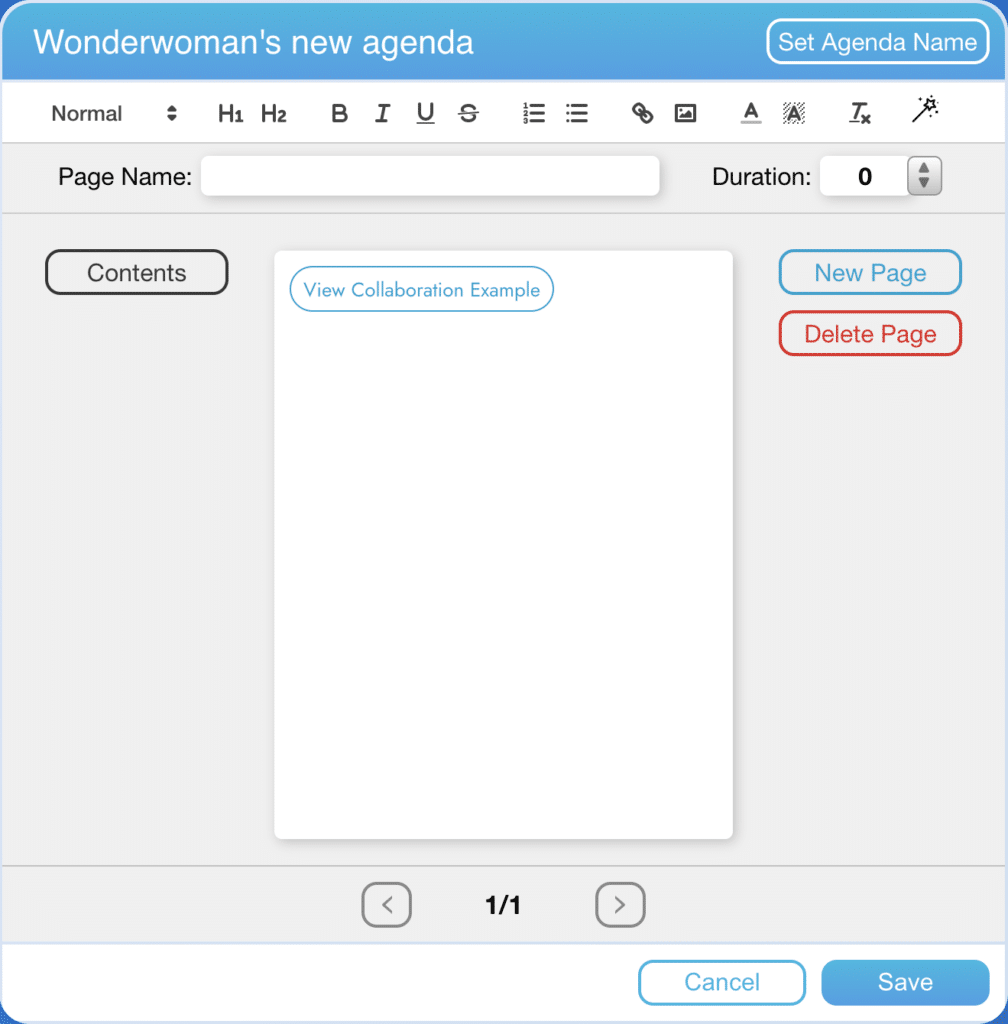
Click ‘Save’ in the pop-up window. You’ll now see the button appear within your agenda.
Click ‘Save’ at the bottom of the page once you’re happy with the agenda.
Sharing A OneDrive Document
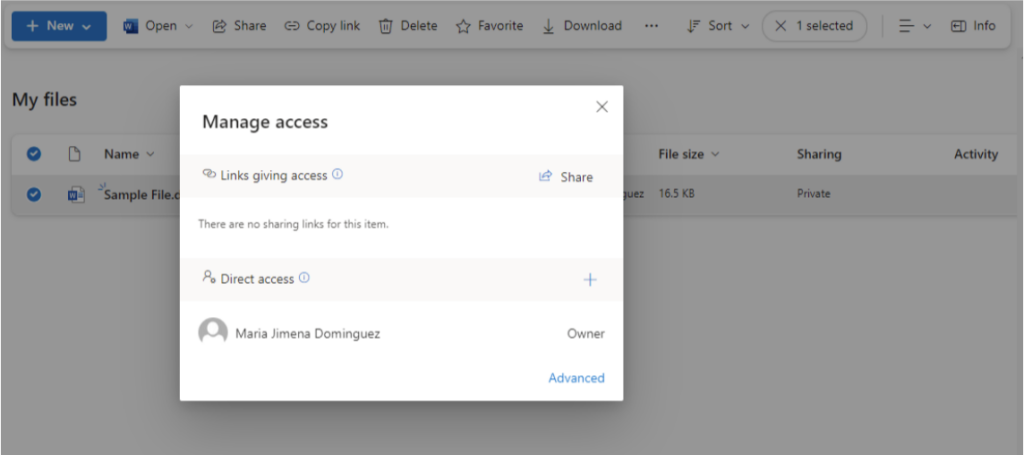
Go to your OneDrive and select the document you want to share.
Click on “Private” under the Sharing column and a “Manage Access” window will appear. Make sure to select the appropriate setting, either just for your organization or for anyone with the link as needed.
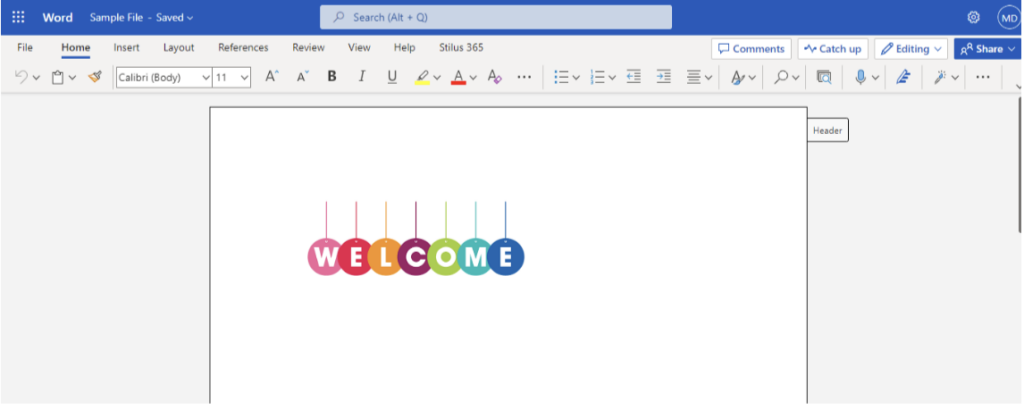
Open the document you wish to share.
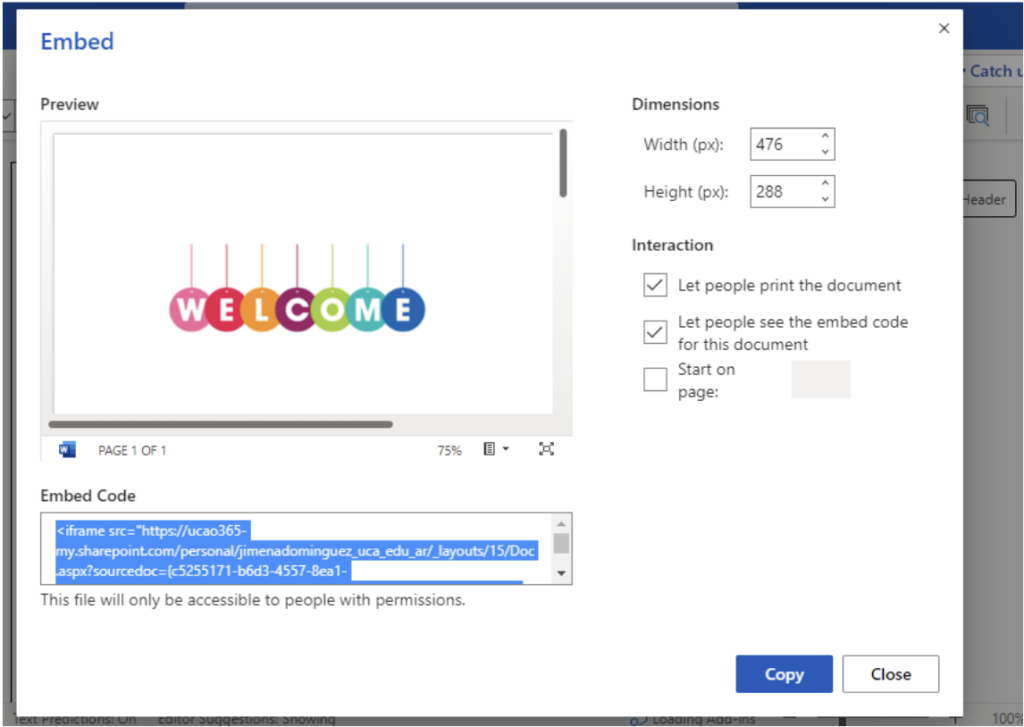
Go to the “File” menu, click on “Share” and then choose the “Embed” option.
In the “Embed” menu copy the entire Embed Code at the bottom of the page.
From this point, the steps are the same as for sharing Google Docs – you can follow the instructions from Step 5 in the above section on sharing Google Docs.
Opening the Document in the CircleSpace™️
To open the document in the CircleSpace™️, open the correct agenda and then click the button you just created. This will display the document to everyone in the room. All participants will be able to click into the document and start working together.
TIPP: Hide the agenda bar to create more space and focus (Tools > Group Tools > Hide Agenda Bar).
To close the window, click the ‘X’ in the grey area between chat and agenda. This will close the window for all participants.
P.S: Don’t forget to change the document’s ‘share’ settings back to the original after the session, if necessary!
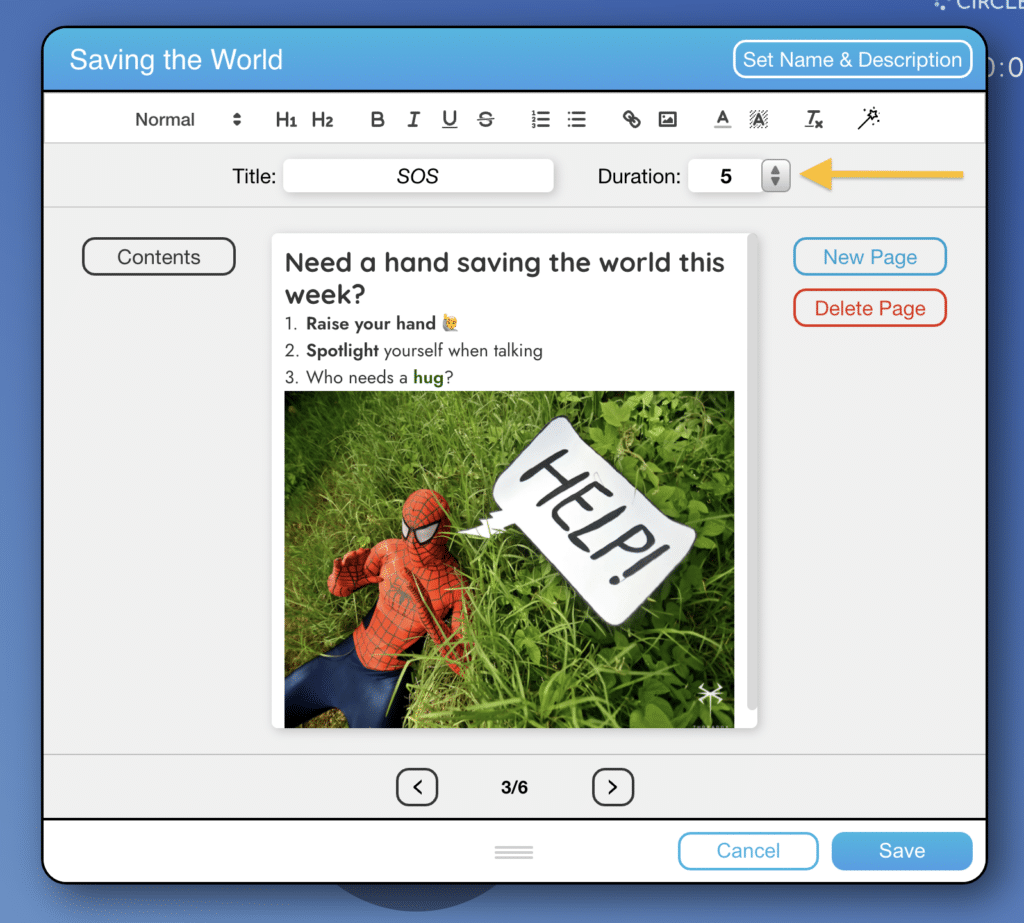
In a session, and realized that you should have allocated more time for a section of the agenda? No problem, you can adjust the timing of your agenda easily.
1. Enter agenda edit mode by clicking on the ‘Agendas‘ icon in the top part of your agenda, and then click ‘Edit Agenda…’.
2. Adjust the time allotted to the section you are currently in by writing in the ‘Duration‘ field, or by clicking the up and down arrows next to it. Clicking the ‘Save’ icon to exit agenda edit mode will implement your changes on the progress bar.
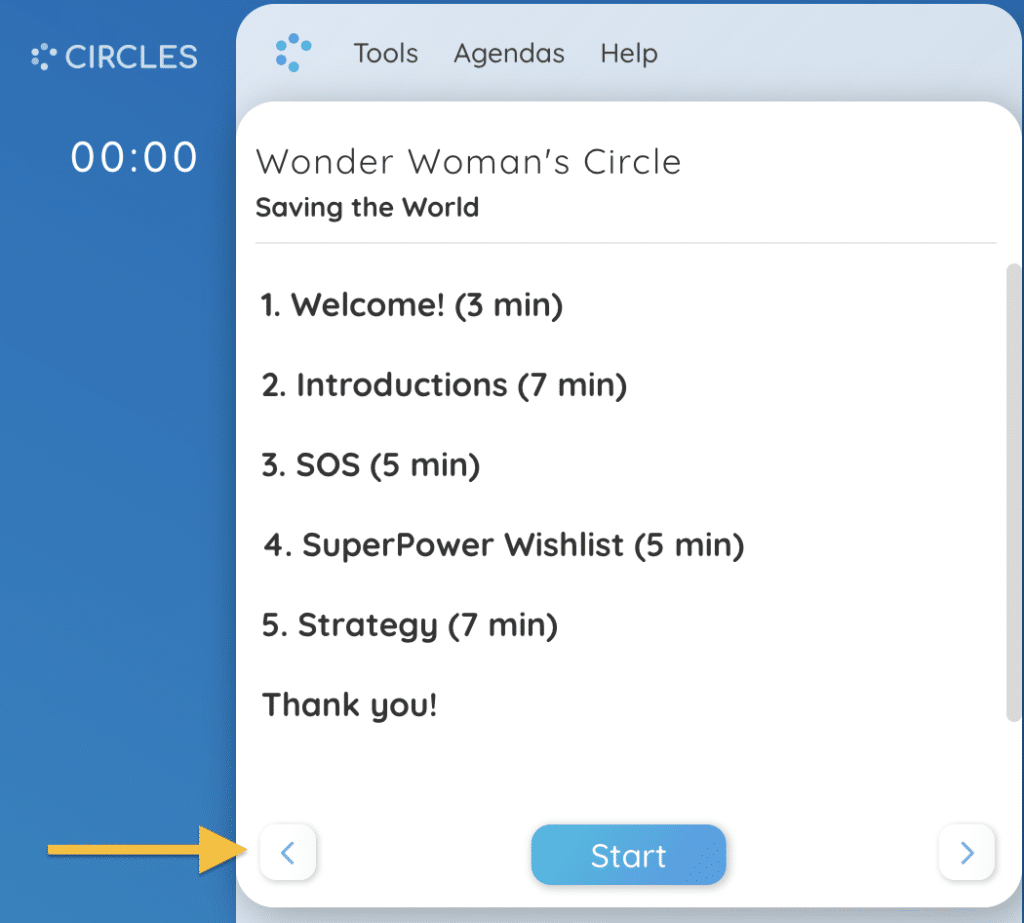
NOTE: You can see an overview of the timing of your entire agenda when you navigate it all the way to the left by clicking the arrow on the left of the ‘Start‘ button. Just be aware that your participants will always see which agenda part you are looking at.
The easiest way to present your Google slide presentation is to prepare a button in your agenda. In order to learn how to present a Google slide immediately, you can follow these steps:
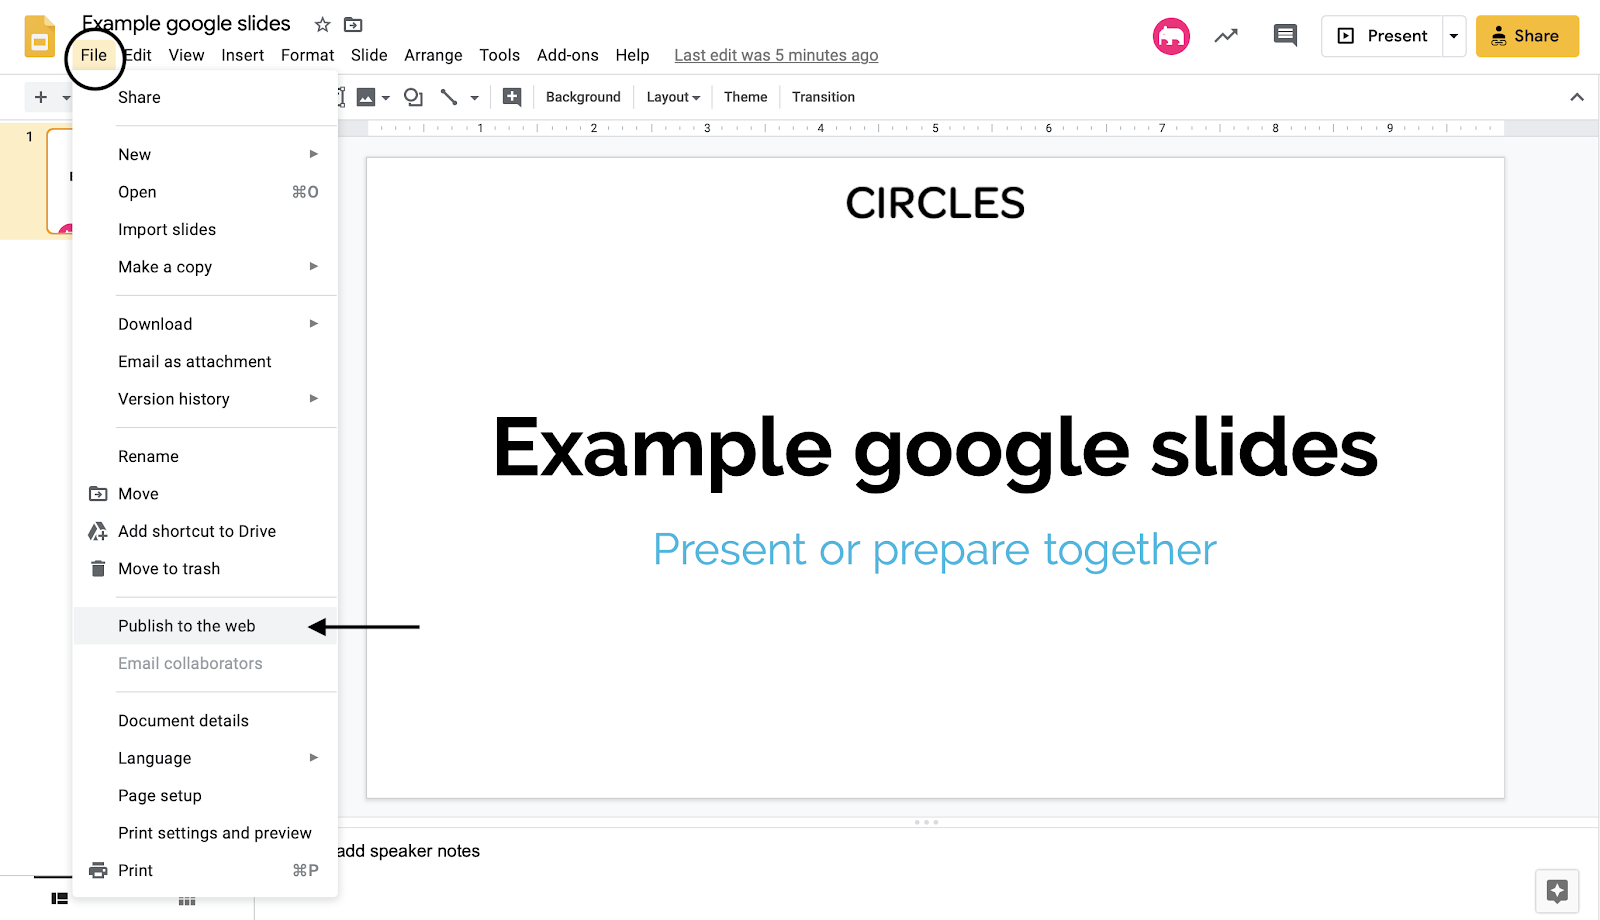
Open the Google Slides you want to present in your Google Drive. Click on ‘File‘ and select ‘Publish to the web‘ from the drop-down menu.
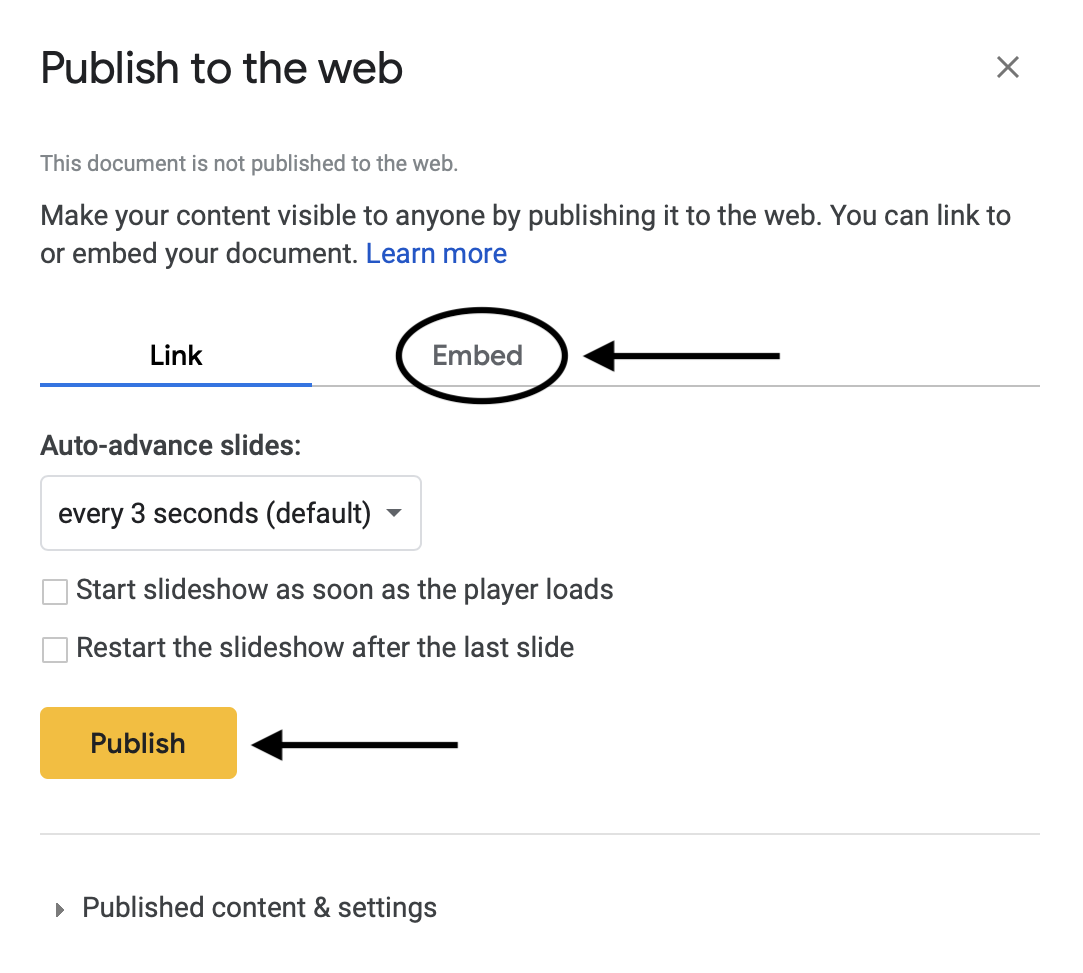
A popup window will appear. Select ‘Embed‘ from the pop-up window and click ‘Publish‘
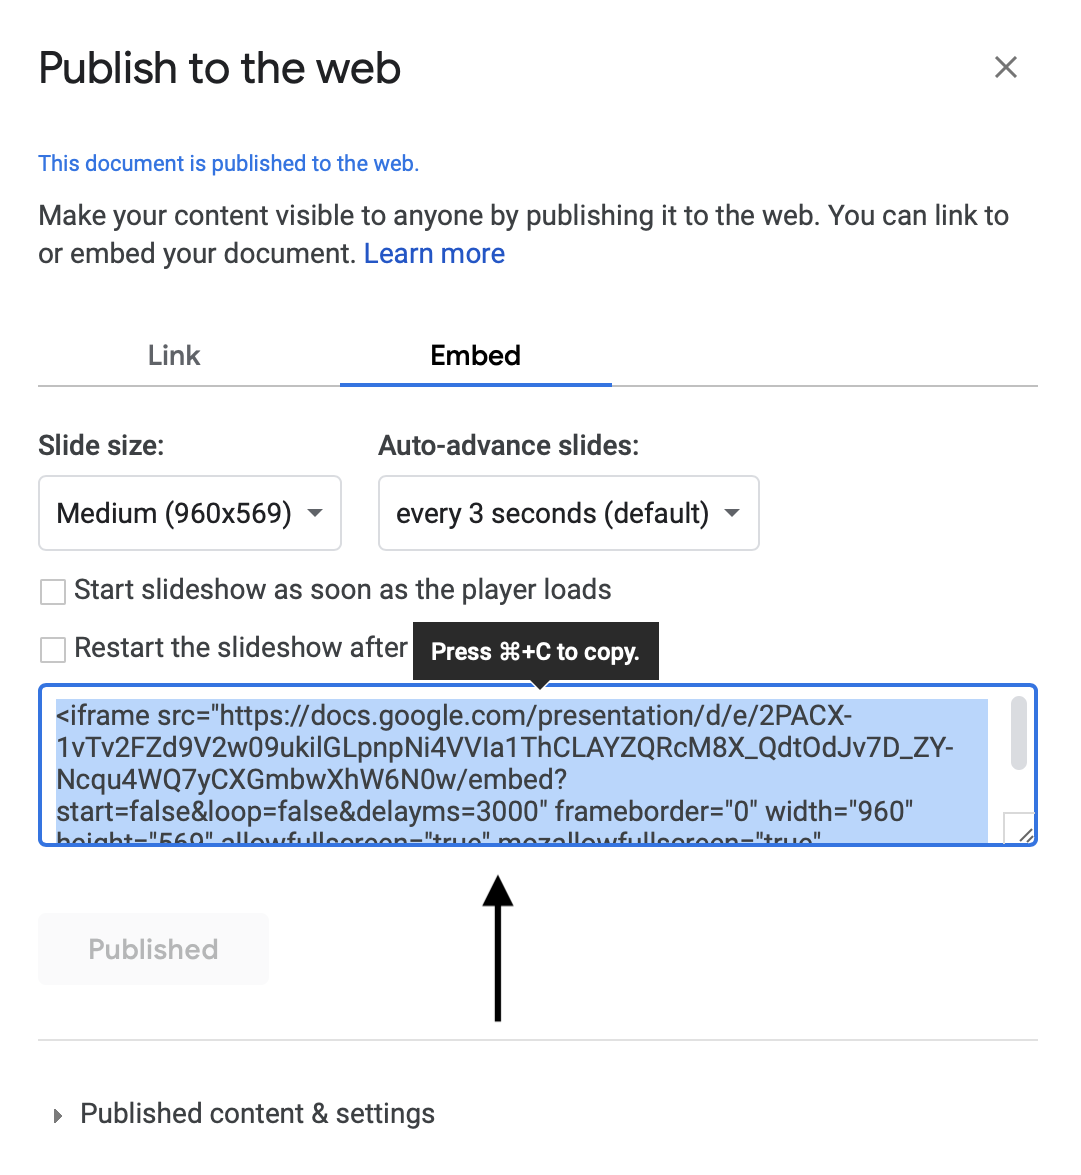
Confirm your selection by pressing ‘OK‘
Copy the embed link by right-clicking and selecting ‘Copy‘ or by pressing the ‘CTRL‘ and ‘C‘ keys.
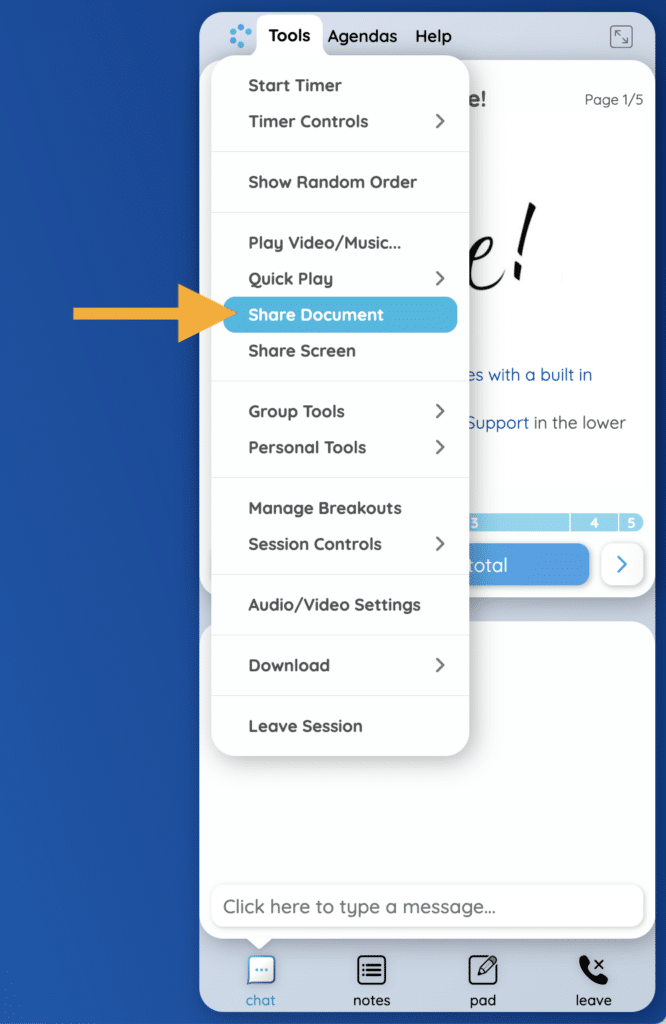
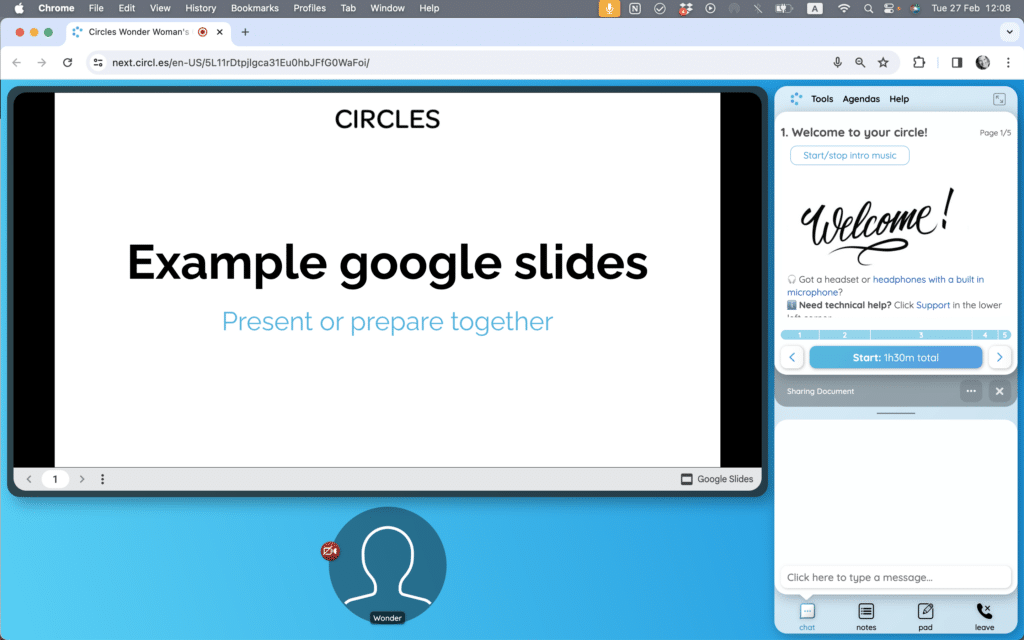
In the CircleSpace™️, open the tools menu and select “Share Document”. In the pop-up window, paste the embed or iframe link. In the Layout-Menu, you can determine whether you would like the document to be shown in portrait or landscape mode.
Clicking on “Start Sharing” will open the presentation within the CirclesSpace for all participants.
NOTE: To have everyone more focused on the slides, you can hide your agenda (under Tools > Group Tools > Hide Agenda Bar for All)
Each participant can independently navigate through the slides, so don’t forget to remind them what slide you’re on!
To close the presentation for all participants, click the ‘X‘ on in the grey fields between your chat and agenda.
IMPORTANT NOTE: Make sure to “unpublish” your document from the web after your session, by clicking ‘File‘, then ‘Publish to the web‘, and then clicking ‘Stop Publishing‘.