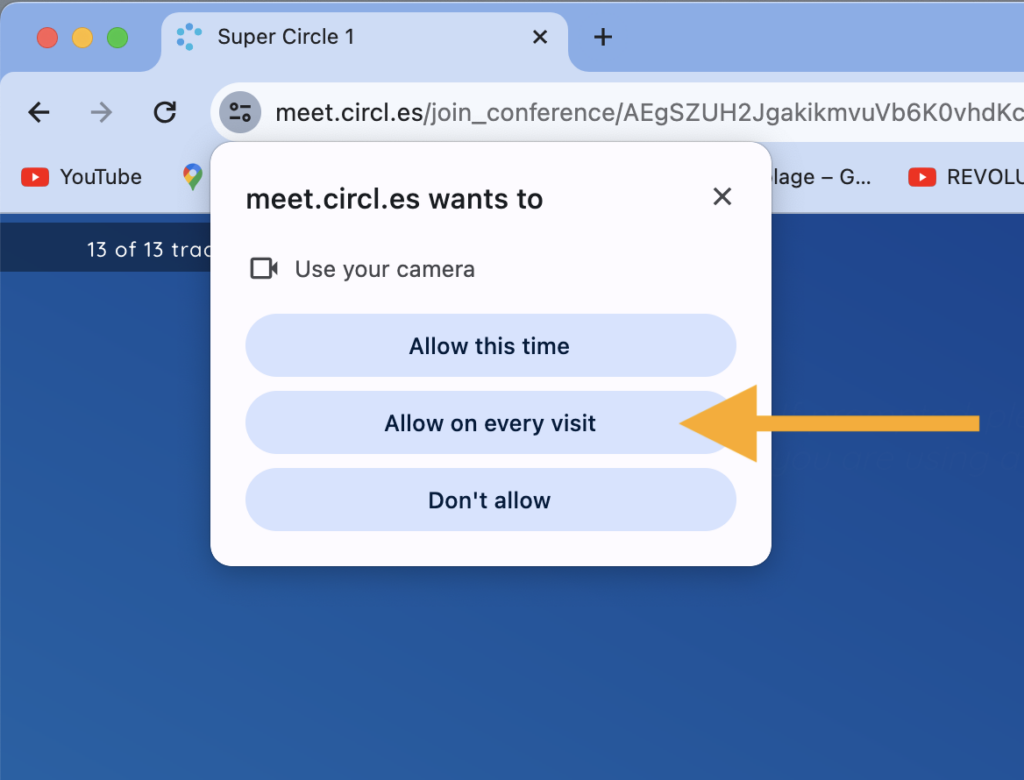
When entering a Circles session for the first time, your browser will ask your permission for Circles to use your microphone and camera. Below you can see the steps to allow Circles to use these if your browser is Google Chrome.
After you have clicked on your join link, Chrome will prompt you to give permission to use the microphone and camera. Select ‘Allow on every visit’, so you won’t be asked the next time you join.
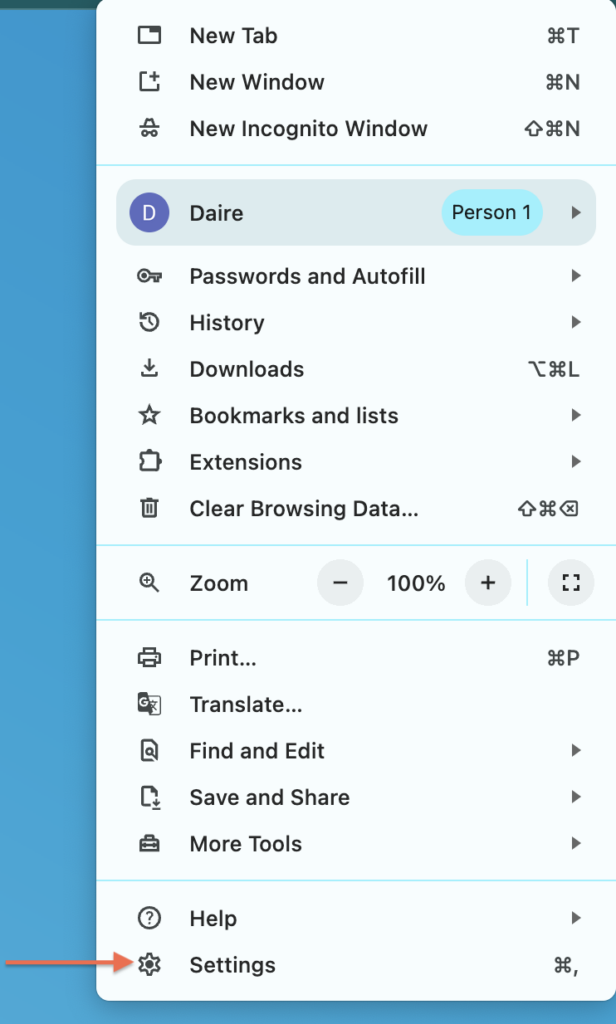
If you accidentally click ‘Don’t allow’, this is easily fixed. Click on the 3 dots in the top left corner of the browser and select ‘Settings’ in the drop-down menu.
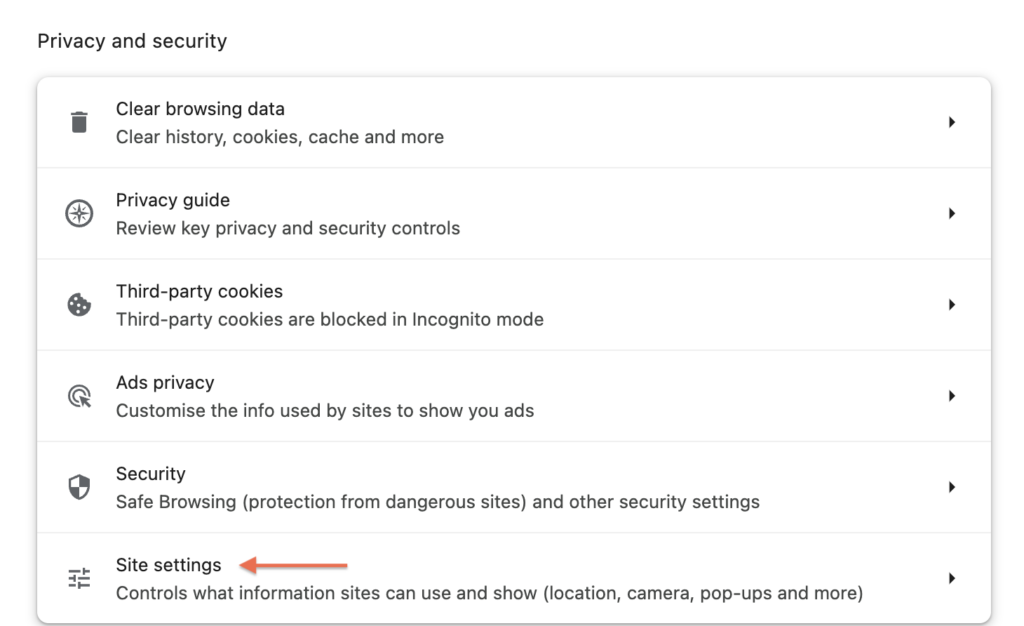
Under ‘Privacy and Security’ click on ‘Site Settings’.
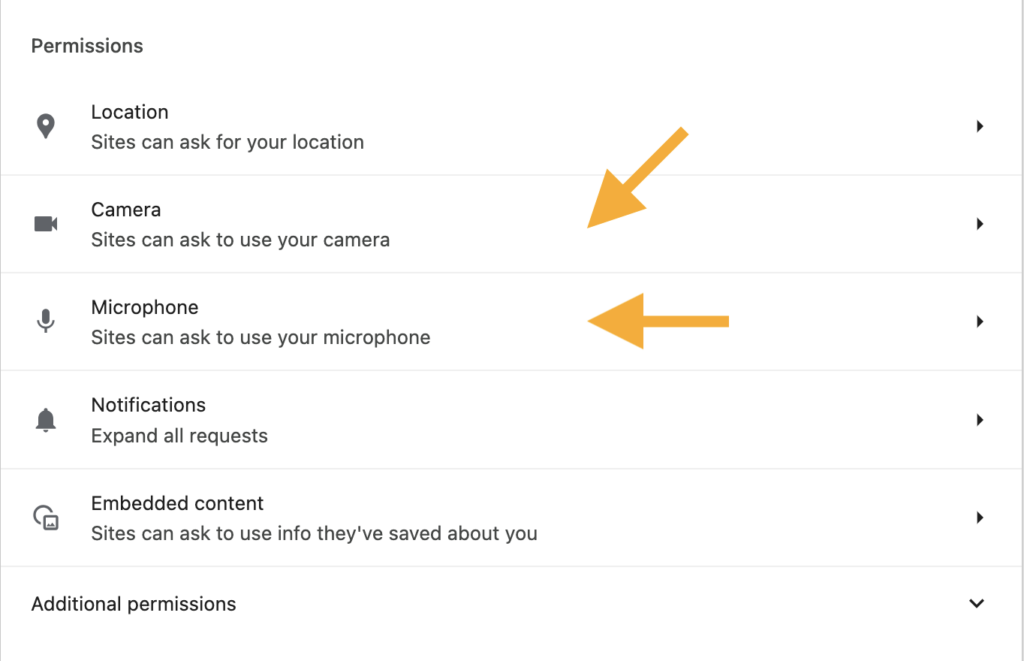
From here, you can select the permissions you need to reset: microphone and/or camera.
To reset your preference for Circles, search for ‘meet.circl.es’ in the Search bar on the top right and delete the permissions using the trash icon next to the result. Then refresh the Circles page and, you will be asked again to submit your preference.
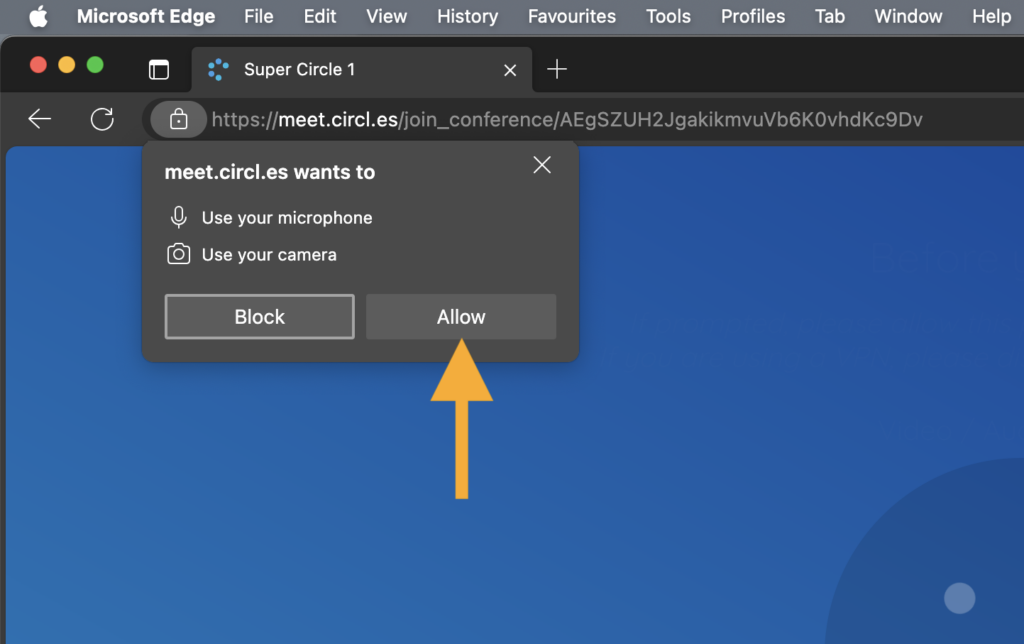
When entering a Circles session for the first time, your browser will ask your permission for Circles to use your microphone and camera. Below you can see the steps to allow Circles to use these if your browser is Microsoft Edge.
When you enter your Circles session, Edge will ask your permission to allow the use of your microphone and camera. Simply click ‘Allow’ to give your permission. Edge will automatically remember your decision, so you won’t need to give your permission again.
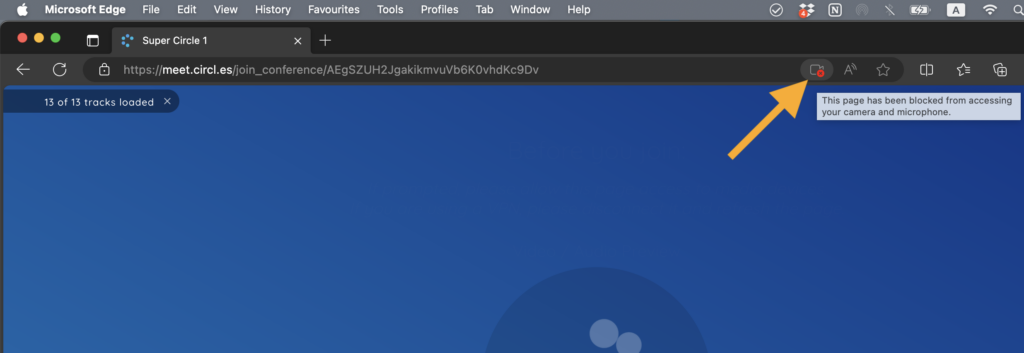
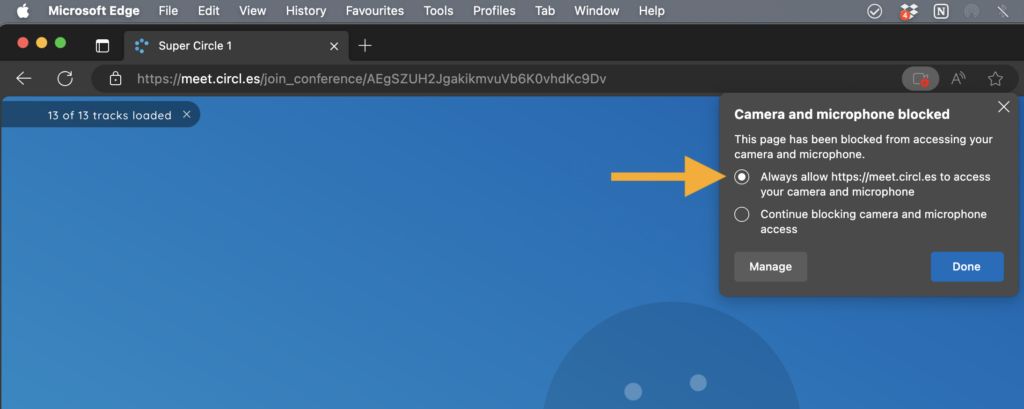
You can change your permissions at any time by navigating to the right of the address bar and clicking on the camera or microphone icon. This is useful if you accidentally refuse permission and need to change your preference.
From here you will be able to change your preference with the option to unblock your microphone and camera. After doing so, you will need to reload the page.
The are multiple ways for participants to enter the CircleSpace™️. Each participant can have their own unique join link, or an admin can create a special link that can be sent to anyone to join a circle. In both of these cases, participants are able to access the circle whenever they would like.
Organization owners and administrators can create invite links and find participant unique join links on the my.circles dashboard under ‘Circles’, when selecting one of the circles. Participants will receive their personal join link when being invited to a session.
Each access link always starts with https://meet.circl.es/join… Do you have your link and don’t know what to do with it? Read on here.
The progress bar helps you to keep your time commitments, by keeping you on track even if you run behind on any particular part of your session.
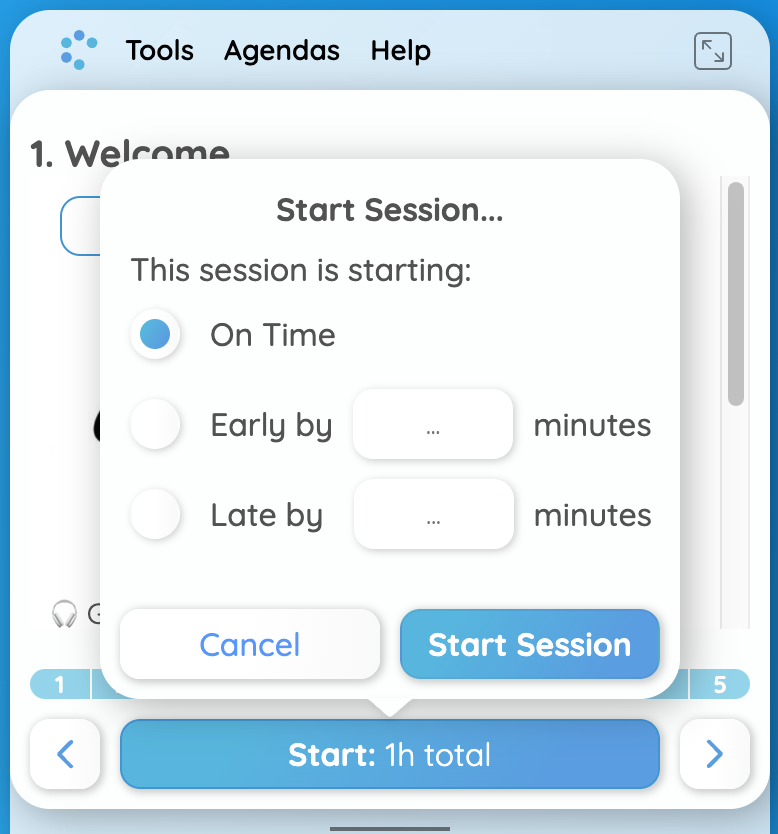
Ready for take-off? When you and your participants are ready to start the session click the ‘Start‘ button below the agenda. A window will pop up.
Are you starting on time? Press ‘Start Session‘. Running a bit behind or ahead of schedule? Make the selection accordingly and indicate how many minutes early or late you are starting. This way the time indication on the progress bar can help you to finish on time in either case.
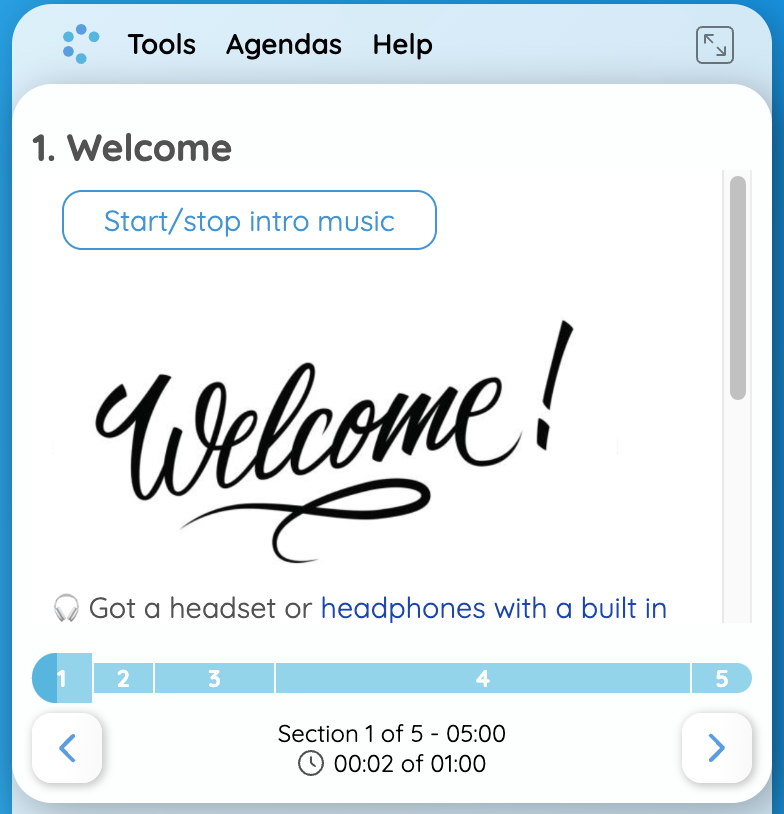
Clicking ‘Start Session‘ starts your progress bar, which is located between your agenda and your chat box, on the right of your CircleSpace. When you are on time, you can see a darker-hue blue indicating how much time has passed. Below, there is a numerical indication. In this case 2 minutes of the 60 minutes agenda have passed.
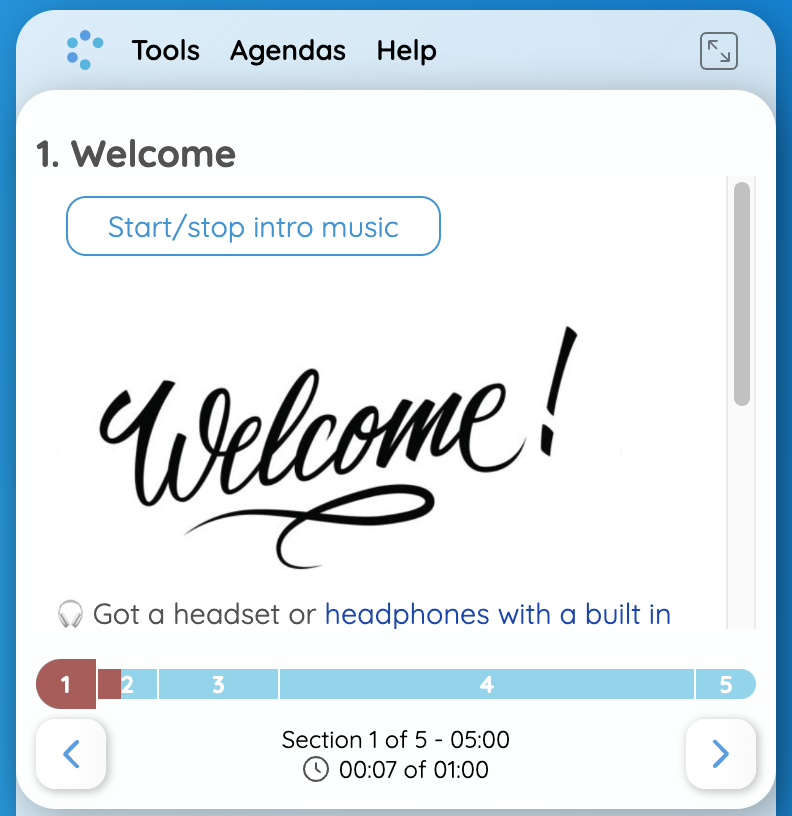
If you are behind schedule, the progress bar turns red (see below). Dark blue indicates your current run-time and lighter blue shows the section of the agenda you are in.
Use the arrows below the progress bar to navigate between the sections of your agenda.
Have you noticed that the timing you had planned for some or all of your sections wasn’t quite right? To learn how to adjust the times of each section during a session, read on here.
Accidentally clicked ‘Start‘ before you were ready? Now, the progress-bar that guides you through the sections and timings of the agenda is off. No problem, you can easily reset the progress bar during your session. Here is what you need to do:
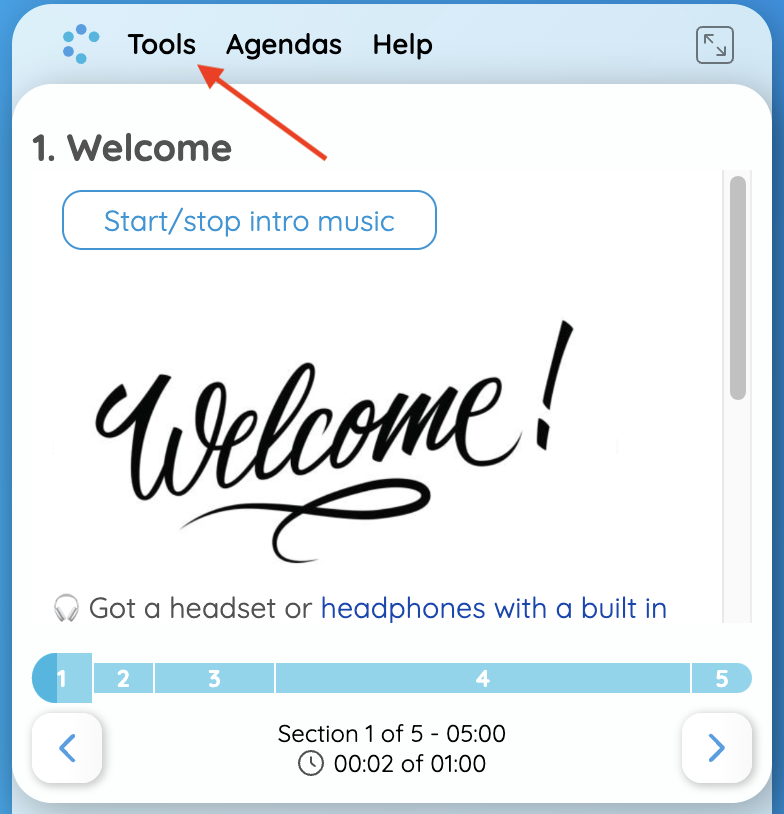
Go to Tools by clicking on the ‘Tools’ button on the right side of your screen above the agenda.
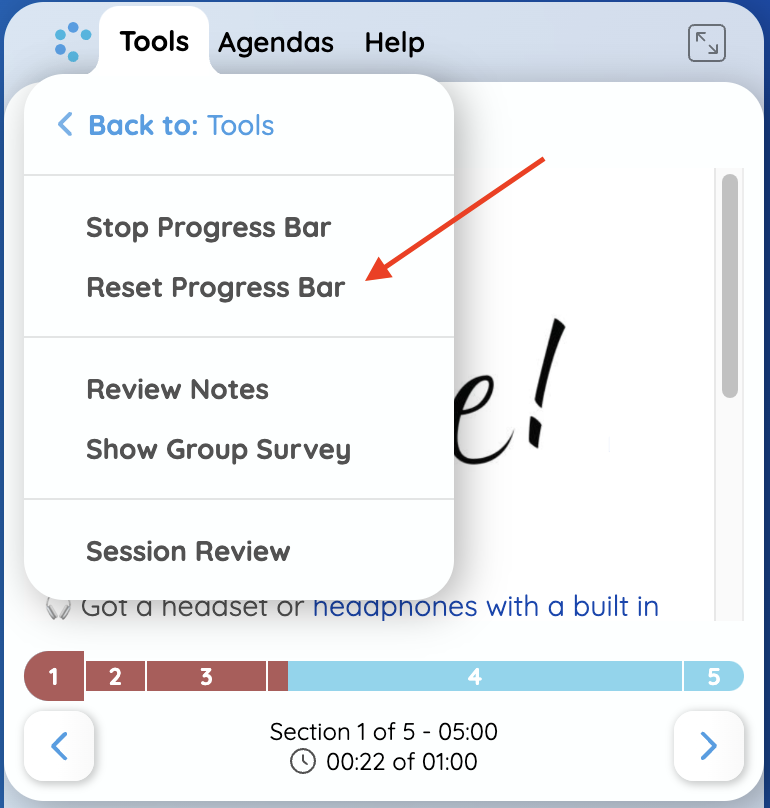
Select ‘Session Controls‘.
Click ‘Reset Progress Bar‘.
The progress bar will then go back to 00:00 to start from the beginning.
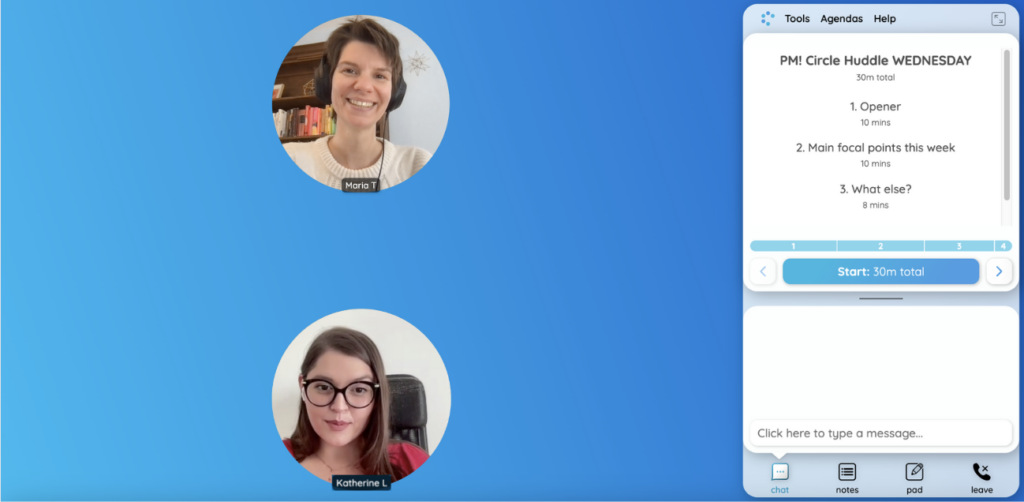
Buttons are some of the tools that allow the agenda to guide interaction rather than just being a presentation. Read on to learn more about the kind of buttons you can use in the CircleSpace™️.
Music starts playing music for all participants to set a relaxed atmosphere. Each participant can adjust the music volume by moving the lever up or down. Stop the music by clicking the button again or clicking the stop (square button) in the gray media box. A link to the music track is also shared in the chat.
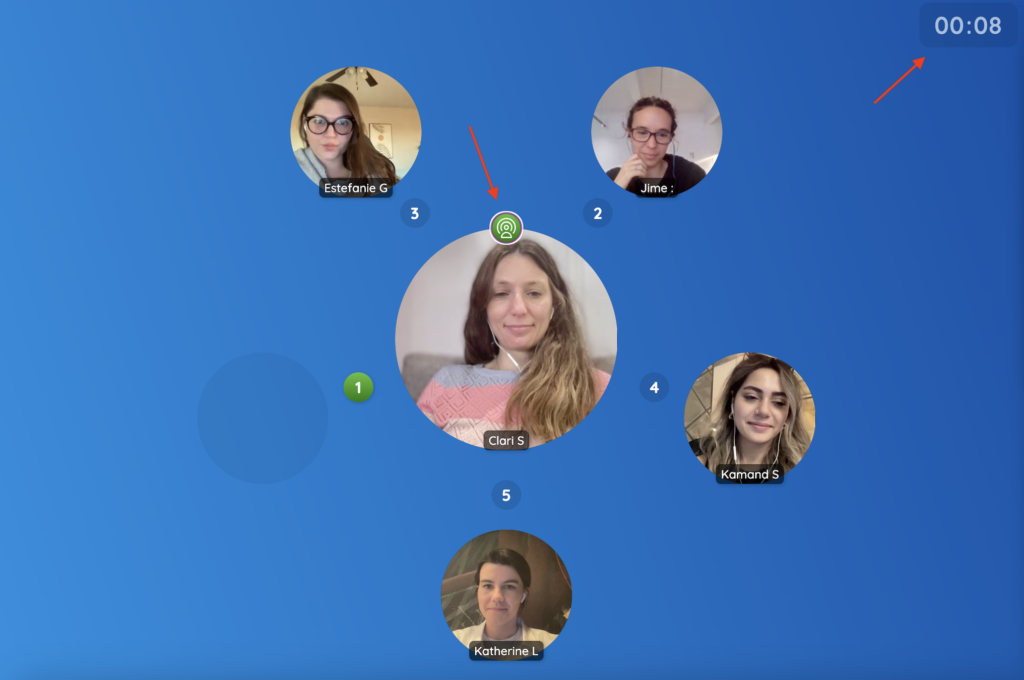
Random order assigns a number to each person’s video stream to determine who speaks first, second, third and so forth.
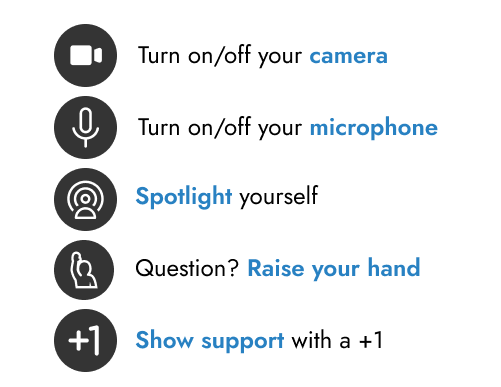
TIP: Hover your cursor over their video stream and click the top middle symbol to “spotlight” each participant. This clears their assigned number and activates the timer in the top right corner to make sure they stay within their time limit.
Start timer starts a stopwatch in the top right corner of your CircleSpace™️ so you can keep track of time. This timer starts automatically when a person moves into the spotlight.
Lucky hug makes all video streams move towards one person, giving them a virtual hug. You can also give people a direct hug by clicking down in the center of a person’s video stream for 5 seconds.
Play video opens a video to be viewed by everyone in the circle.
Share document allows you to share any kind of media from the web in the CircleSpace™️. Often these are documents, pdf files or webpages. Each person can choose to make the window landscape or portrait depending on their preference by clicking the three dots in the dark gray media tray below the agenda. You can also close the document window for everyone by clicking on the X in the media tray. You can reopen the document, by clicking on the button once again.
Group survey opens our survey in the CircleSpace™️ that each participant and the facilitator should fill out.
Notes shows the list from the Notes feature in a Notes window or in the agenda. The Notes can be ticked off, re-sorted, assigned to others and deleted.
Do you want to know how to create buttons and add them to your agenda? Read on in step 5 of How to create your own agenda.
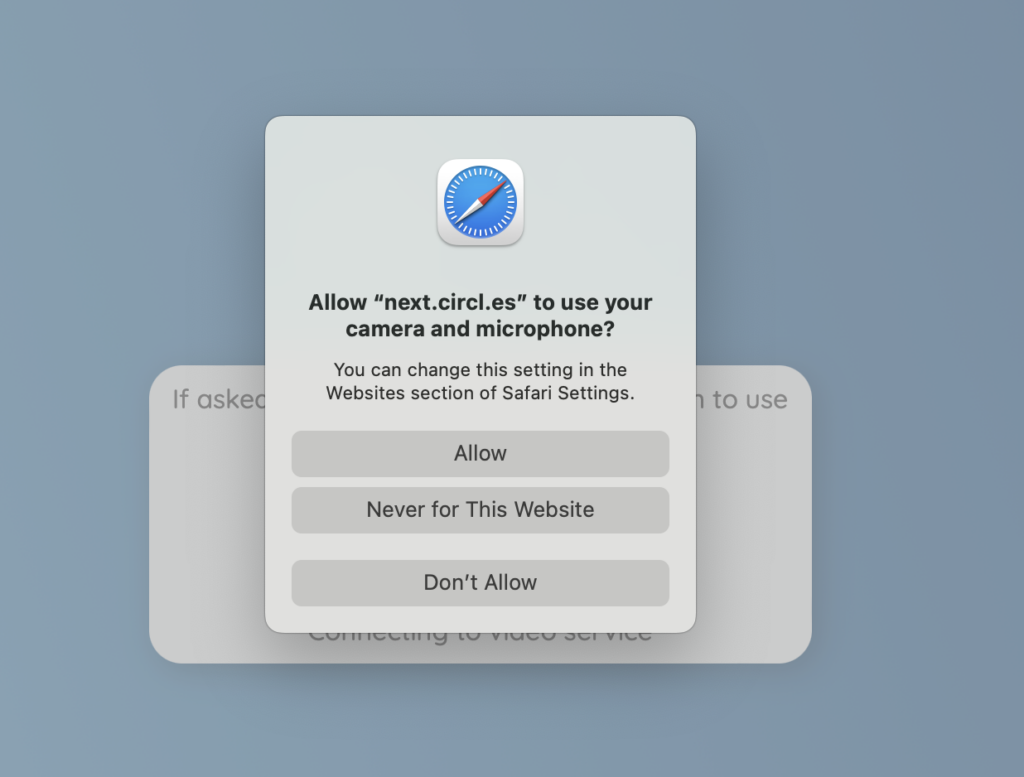
When entering a Circles session for the first time, your browser will ask your permission for Circles to use your microphone and camera. Below you can see the steps to allow Circles to use these if your browser is Safari.
When you enter your Circles session, Safari will ask your permission to allow Circles to use your microphone and camera. Simply click ‘Allow’ to give your permission.
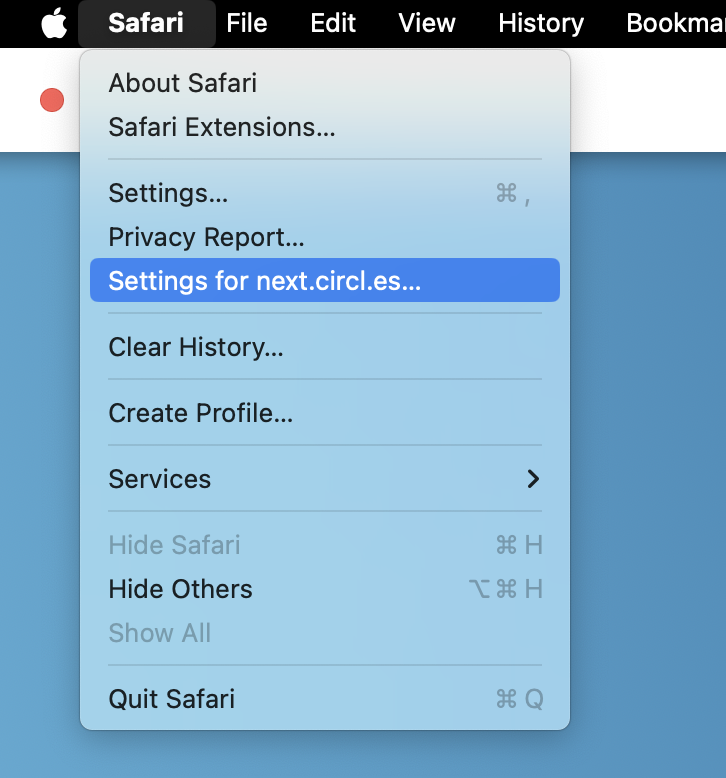
If you accidentally clicked “Don’t allow”, then simply reload the page and it will ask you the same question again. If you clicked “Never for this website”, then click “Safari” > “Settings for next.circles”
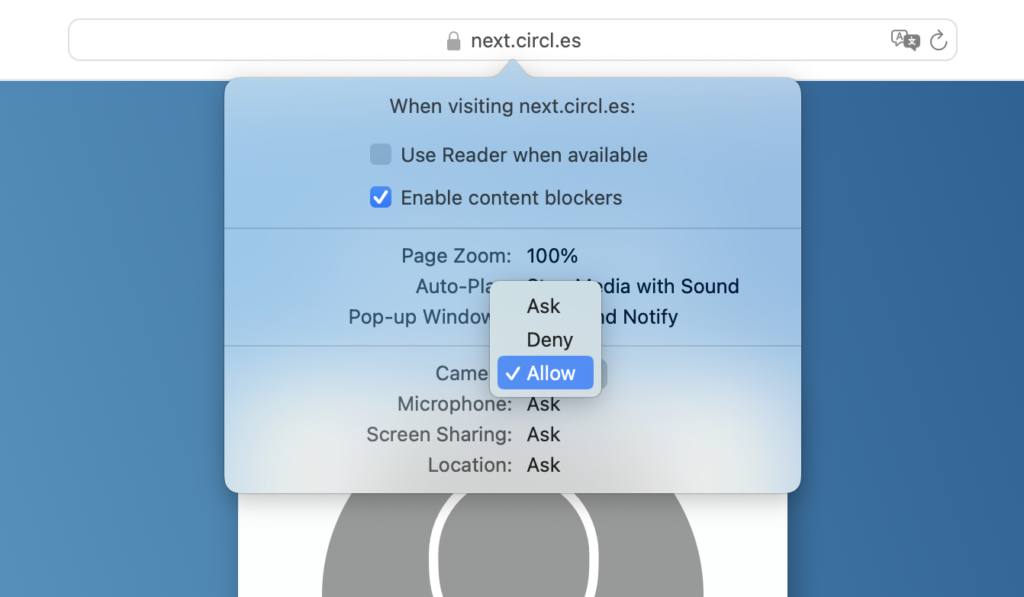
From here you will be able to update your preferences with the option to allow your microphone or camera.
Once you’ve updated your preferences, simply close the preferences pop up and reload the page in order to join your circles session.
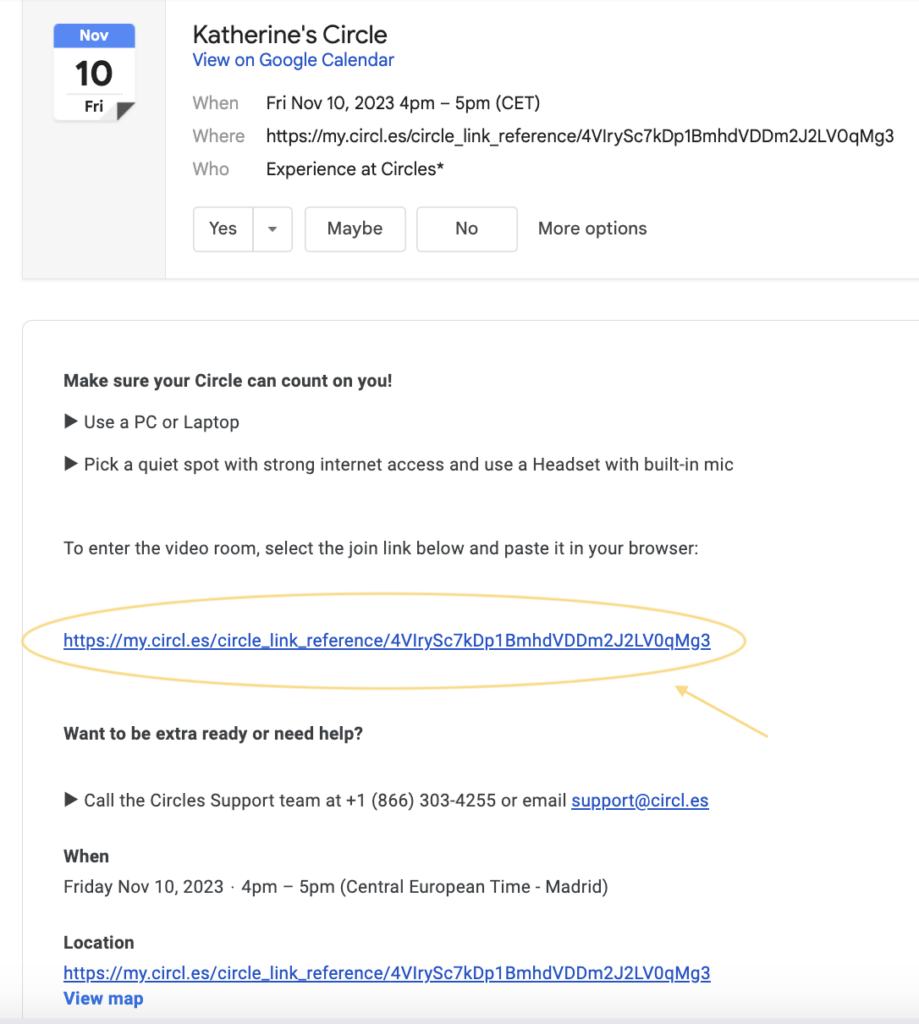
Have you been invited to a Circles Session? Joining is easy, just follow the steps below!
Make sure you are using a laptop or a PC and one of our supported browsers (Google Chrome, Safari, Microsoft Edge). We recommend all participants join from a computer in order to have the full experience but if you are on the go, you can also join from a phone or tablet.
Open the invitation you have received via email and look for the join link. This link is your way into the CircleSpace™️. In order to keep the privacy of your other circle members, do not share it with other people.
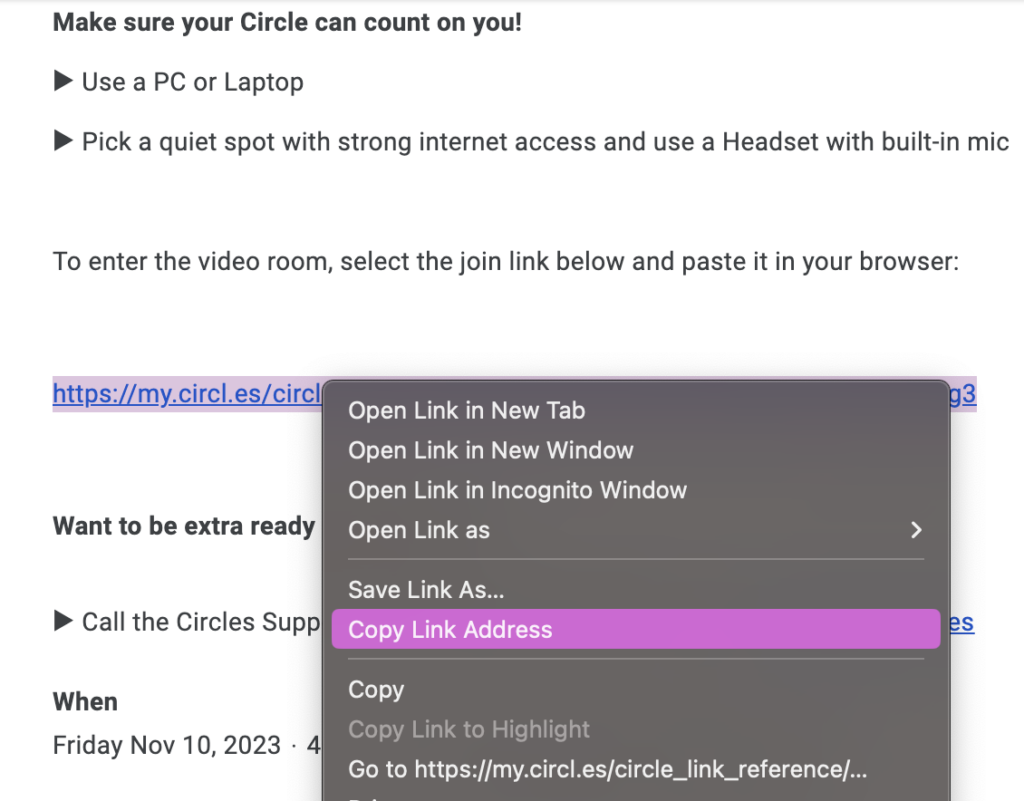
Copy your join link into the address field of your browser. To do so, right-click on the link and select ‘Copy LinkAddress.’
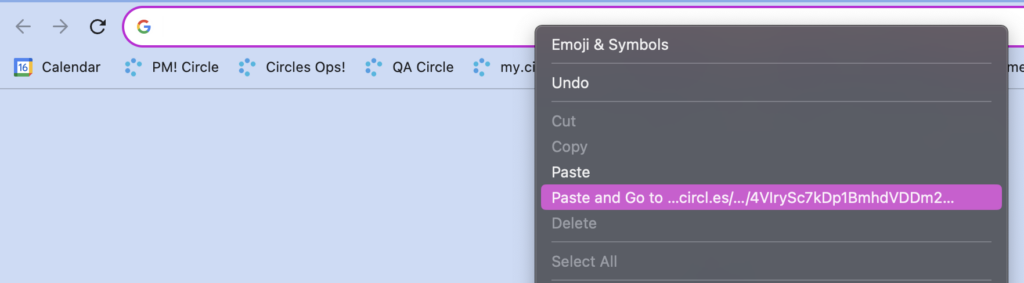
Next, open your browser. Right click into the address field and select ‘Paste’ and press enter/return.
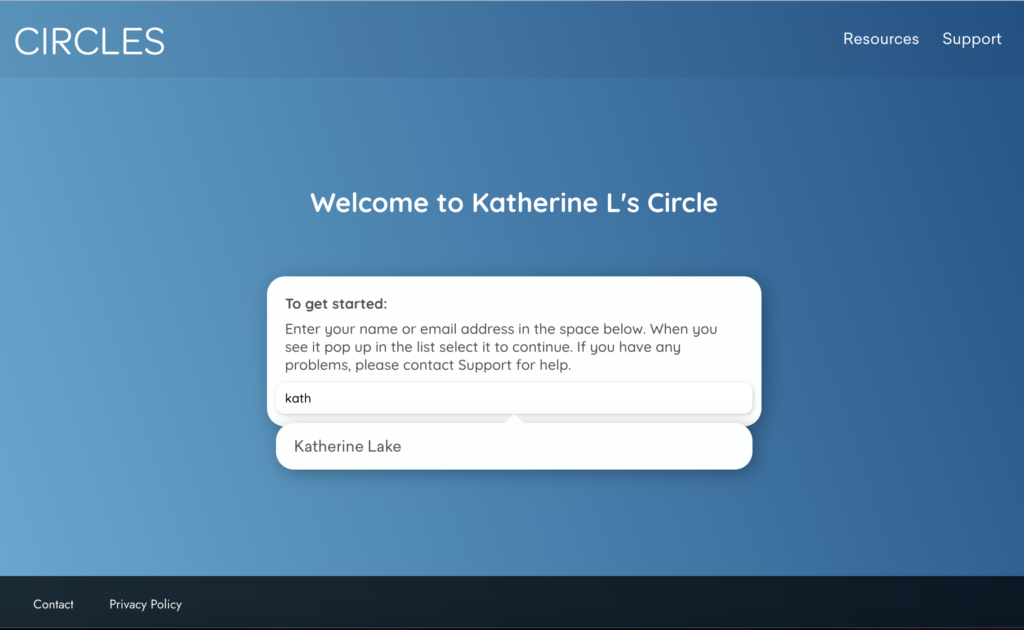
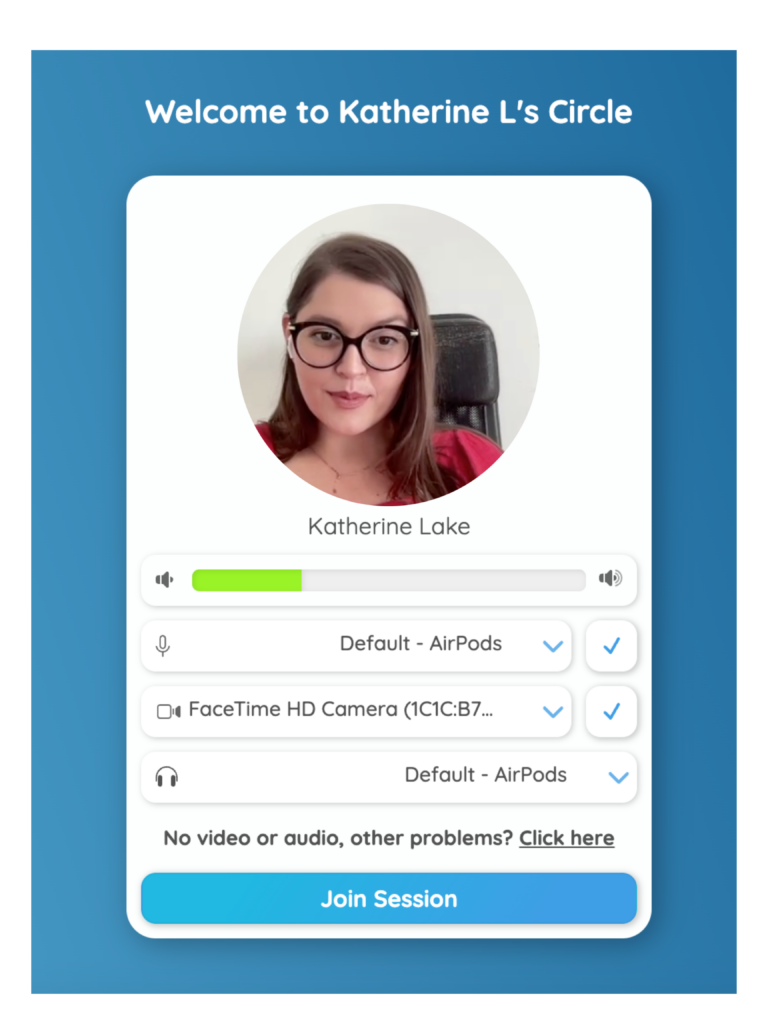
If your link is a personal link you will be taken directly to the greenroom where you can select your camera and microphone choices before entering the CircleSpace. If the join link is not personal, you will be taken to an additional page where you’ll type your name into the search bar prior to entering the greenroom.
After typing/selecting your name:
Select ‘allow’ in any pop-up window, so your video and your microphone are connected to the room.
Make sure you turn off your VPN.
Check whether your camera and audio work in the preview: Do you see yourself? When you speak, can you see the microphone bar move? Are there check marks next to both the microphone and camera choices?
If you want to select a different camera or mic, click on the according drop-down.
6. When you are all set, click ‘Join Session‘ to enter the CircleSpace™️.
It’s that easy!
If you are experiencing problems, please make sure that you are following all the above steps. If you are still having trouble joining the room, you can contact us by phone or live chat from the greenroom screen.
Do you want to learn about the features of the CircleSpace™️? Check out this article.
To add images and icons to your agenda, you need to copy the image URL and paste it into the agenda editor. For more information on how to add an image to your agenda, check out this article.
Make sure that you copy the URL with no spaces on either side, otherwise the image will not be copied correctly.
At Circles we’ve created a list of some of our most popular icons and images used in agendas, including the +1 and handraise icons. Each image has its own URL and the smaller icons also have suggested sizings, all of which are below.
As part of the release of our new agenda management system, we’ve made some updates to make agenda storage and movement easier than ever. In the My Circles dashboard you’ll still be able to make copies of agendas, but you can now also move agendas between circles and organizations and even link an agenda to a different location.
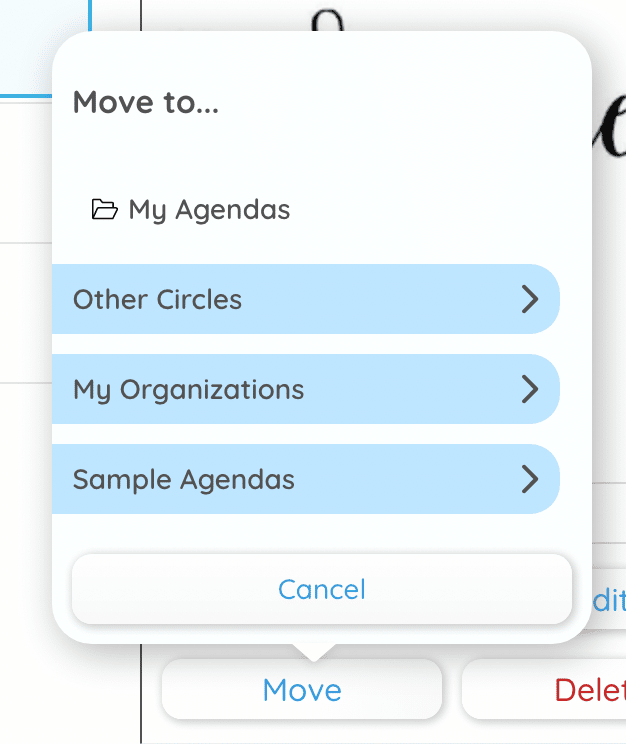
Step 1: Moving Agendas
Moving an agenda simply means taking it from one location and transferring it to another so that it will only be visible there.
Select the agenda you wish to move and click the ‘Move’ button on the bottom right.
Next you’ll be asked to choose the circle or organization you’d like to move the agenda to in the drop down menus that appear. You can also move agendas into your personal folder if you don’t want it to be available to anyone else.
Navigate to where you want to store the agenda and click, at which point the agenda will move to that new location.
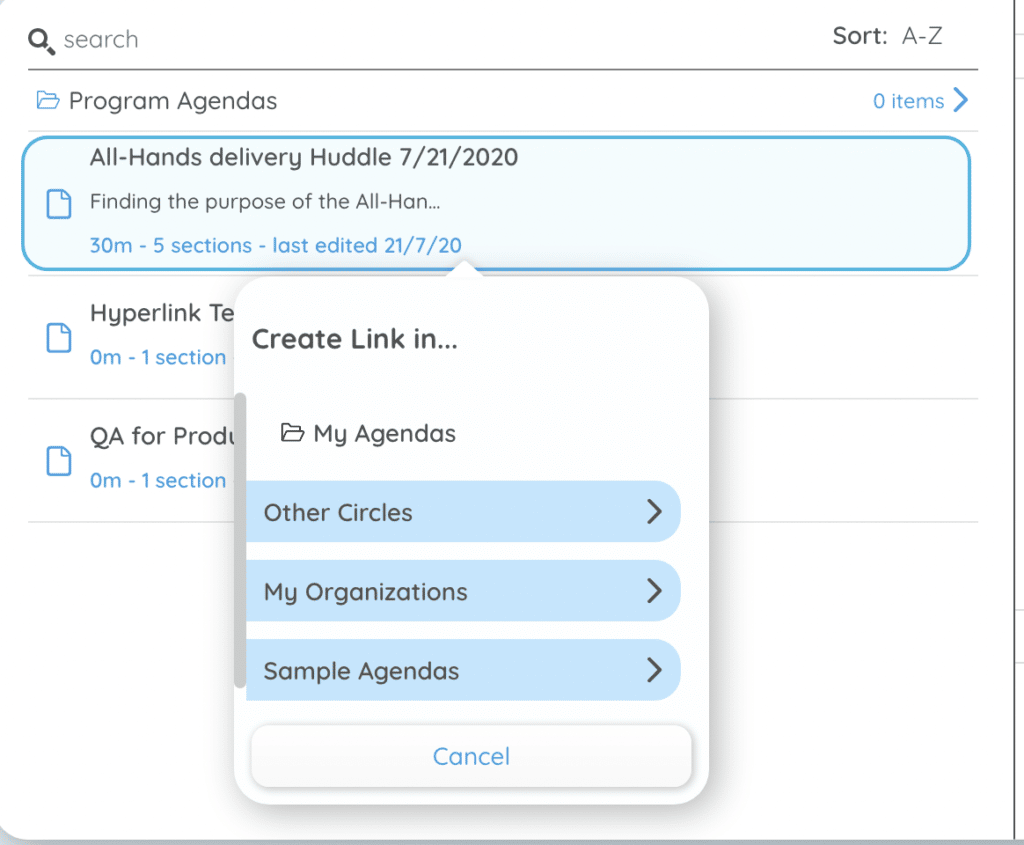
Step 2: Linking Agendas
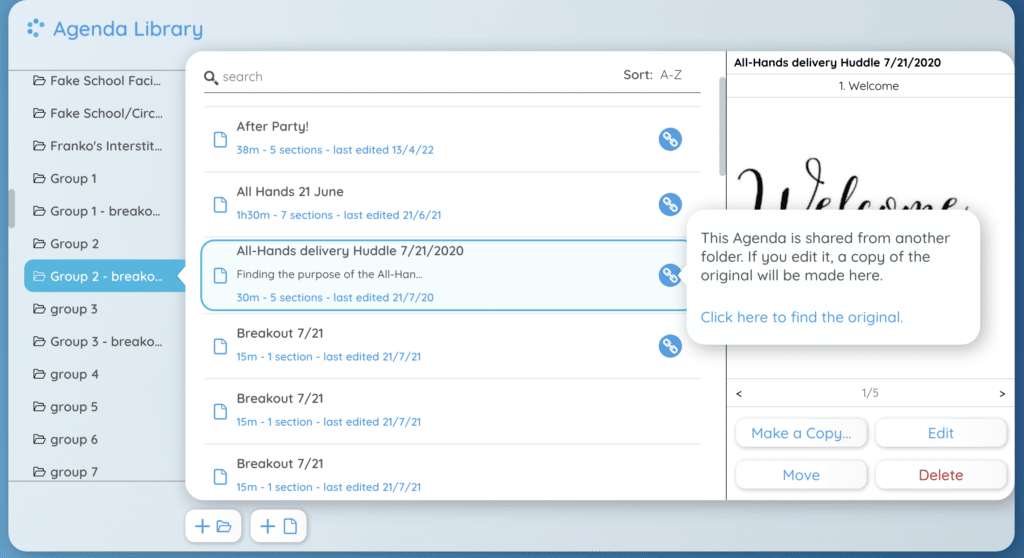
The ability to link agendas is a brand new feature we’ve brought out that allows you to share an agenda in a number of places. Importantly, any edits you make to the original copy will carry over to the linked versions, but you cannot edit an agenda from a place where it has been linked to.
Right click on the agenda you wish to link and select ‘Create a Link..’
You’ll now need to choose from the menus which circle or organization you’d like to link the agenda to.
Once you’ve linked the agenda in another circle or organization you’ll see it there with a small ‘Link’ icon. You will also see a message letting you know that if you edit this linked version, a copy of the original will be made.
Step 3: Copying Agendas
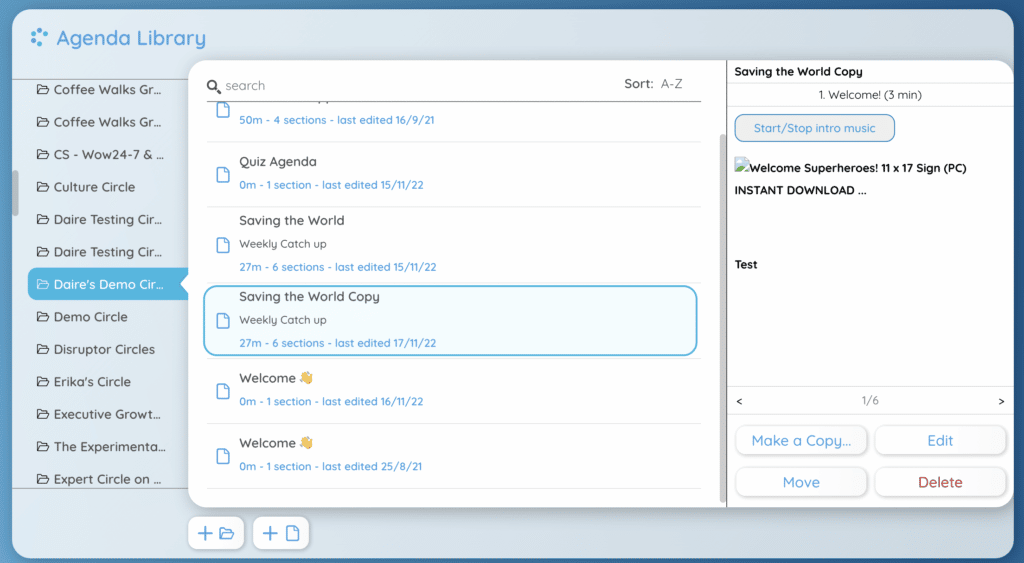
With this new release, you can still make a copy of an agenda if you wish to make edits to a new version while still retaining the original.
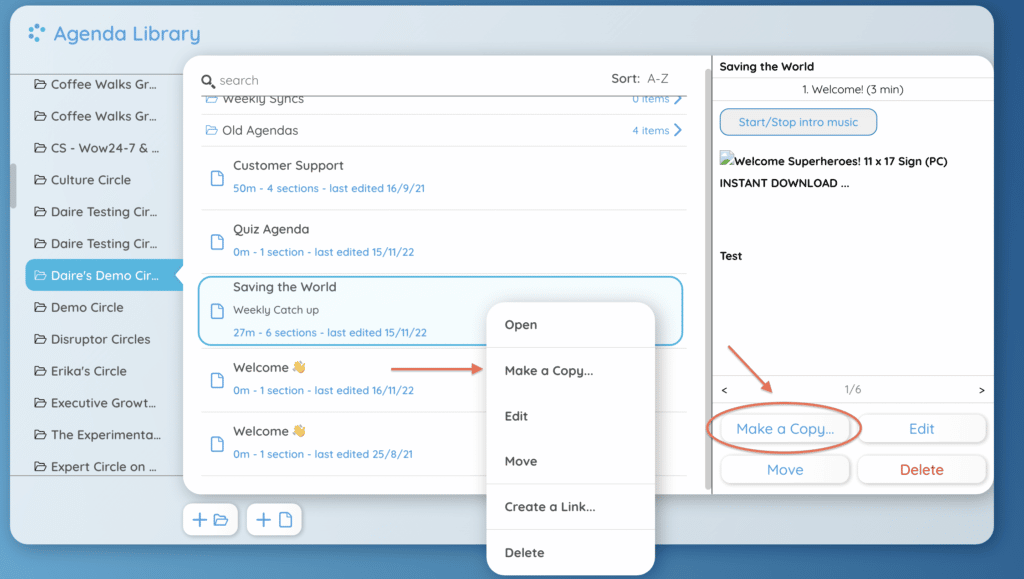
Click the agenda you wish to copy, and select ‘Copy’ in the bottom right corner. You can also right click and select ‘Make a Copy’ from the menu that appears.
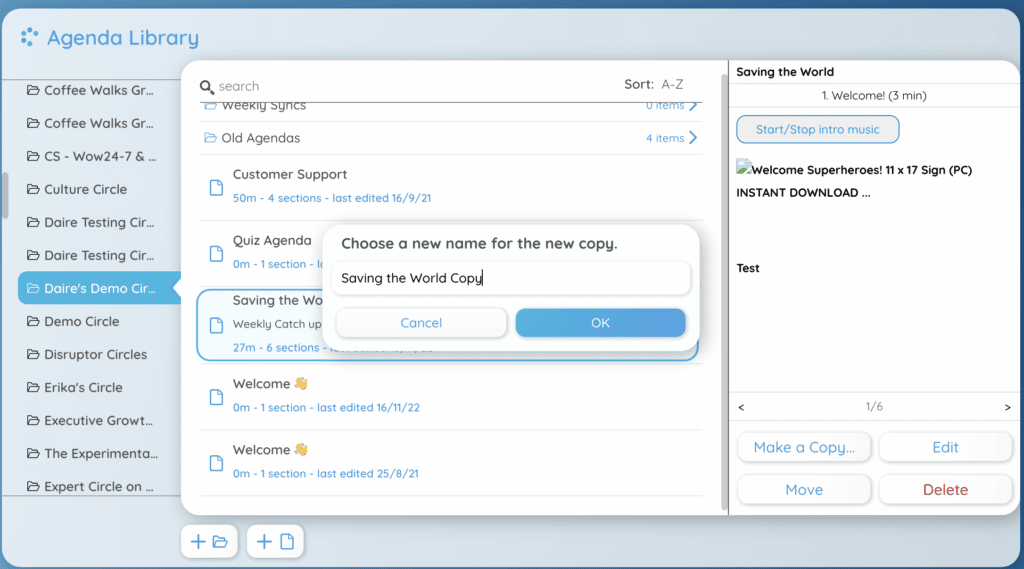
Now it’s time to give your copied agenda a name, and hit ‘OK’ once you’re done.


